Extending Order object and hooking on event in Magento

Extending Order object and hooking on event in Magento

One of my previous articles was a Magento Event Hooks. This one will be a practical example on using the event hooks. Although the more proper way would be to call them Observers, bare with me. I’m use to this “hooks”.

Here’s the walk-trough on how to add a new property (attribute) to an object (Mage_Sales_Model_Order object in our case).

To add an attribute to object, we need (the dirty way) 2 little steps

  • Go to app/code/core/Mage folder. If you drill down into most of the folders and go to /Model subfolder there you will see /Entity subfolder under /Model for most of the stuff (modules) under /Mage. For our example we go to app/code/core/Mage/Sales/Model/Entity/Setup.php file. This Setup.php file holds Objects fields definitions in database. We need to add new fields to public function getDefaultEntities(). Once again, this is the “quick” and “dirty” way of adding new attributes. The “propper” way would be to create the sql file and update config file to read the new sql file and… Whatever, I haven’t got the whole day :)Here is the code in my example, that I added to the array in public function getDefaultEntities().
    'inchoo_custom_info' => array(
    'type'                          => 'text',
    'backend'                       => '',
    'frontend'                      => '',
    'label'                         => 'Extra info',
    'input'                         => 'textarea',
    'class'                         => '',
    'source'                        => '',
    'global'                        => Mage_Catalog_Model_Resource_Eav_Attribute::SCOPE_STORE,
    'visible'                       => true,
    'required'                      => false,
    'user_defined'                  => false,
    'default'                       => '',
    'searchable'                    => false,
    'filterable'                    => false,
    'comparable'                    => false,
    'visible_on_front'              => true,
    'visible_in_advanced_search'    => false,
    'unique'                        => false,
    ),

    Basically you can copy-paste some existing attribute that suites you the most and just change the array key name.

  • Run this code only once (you can place it inside any file, like index.php or view.phtml or any other that you will execute) then uncomment or remove this code.
    $setup = new Mage_Eav_Model_Entity_Setup('core_setup');
    $AttrCode = 'inchoo_custom_info';
     
    $settings = array('position' => 1, 'is_required' => 0);
    $setup->addAttribute('11', $AttrCode, $settings);

    NOTE: In code above, note the line $setup->addAttribute(’11’, $AttrCode, $settings). You probabily wonder where did I pool the number “11” from? If you open your database (with any tool), and go to sales_order table, you will notice entity_type_id column. Each and every entry in sales_order table has the same value for entity_type_id column. In my Magento installation, this value is “11”. Keep in mind that this does not have to mean yours will also be the same.

    To confirm everything went ok, just Search the database for the “inchoo_custom_info” (or whatever you used for attribute name).

Ok, now that we added new attribute (property) to Order object, we will go on to Observer part. We will create a hook that will watch for successfull checkout process and trigger appropriate code execution. In my example I needed to add some extra info to order upon it’s successfull creation. Meaning as soon as checkout process is successfully executed, order is stored in database with some extra info I saved in its previously created field “inchoo_custom_info”.

Here is my Observer file, I called it Observer.php and it’s saved under app/code/local/Inchoo/HookSystem/Model/Observer.php.

< ?php
 
class Inchoo_HookSystem_Model_Observer
{
/**
* Event Hook: checkout_type_onepage_save_order
* @param $observer Varien_Event_Observer
*/
 
public function hookToOrderSaveEvent()
{
/**
* NOTE:
* Order has already been saved, now we simply add some stuff to it,
* that will be saved to database. We add the stuff to Order object property
* called "inchoo_custom_info"
*/
$order = new Mage_Sales_Model_Order();
$incrementId = Mage::getSingleton('checkout/session')->getLastRealOrderId();
 
$order->loadByIncrementId($incrementId);
 
$extraInfo = array(
'shirt_color' => 'Freakin cool blue color',
'developer_is_freak'    => true,
'coded_by'        => 'Branko Ajzele, Web Application Developer'
);
 
$extraInfo = serialize($extraInfo);
 
$order->setData('inchoo_custom_info', $extraInfo);
$order->save();
 
}
}

Since this is a module, we also need to add some config files. Here is the content of my app/code/local/Inchoo/HookSystem/etc/config.xml

< ?xml version="1.0"?>
<config>
 
<global>
<models>
<hooksystem>
<class>Inchoo_HookSystem_Model</class>
</hooksystem>
</models>
</global>
 
<frontend>
<events>
<checkout_onepage_controller_success_action>
<observers>
<hooksystem_order_success>
<type>singleton</type>
<class>hooksystem/observer</class>
<method>hookToOrderSaveEvent</method>
</hooksystem_order_success>
</observers>
</checkout_onepage_controller_success_action>
</events>
</frontend>
 
</config>

And one more config file to add to app/etc/modules/Inchoo_HookSystem.xml.

< ?xml version="1.0"?>
<config>
<modules>
<inchoo_hooksystem>
<active>true</active>
<codepool>local</codepool>
</inchoo_hooksystem>
</modules>
</config>

And for the final step, open the app/design/adminhtml/default/mytheme/template/sales/order/view/tab/info.phtml file and add the following to it:

< ?php /** START CUSTOM Coded by Branko Ajzele | branko.ajzele@surgeworks.com */ ?>
< ?php
/**
* NOTE:
* 'inchoo_custom_info' assumes you have added new attribute/property to Sale/Order entity
* Please use serialize and unserialize with 'inchoo_custom_info'
*/
$extraInfo = $_order->getData('inchoo_custom_info');
?>
< ?php if($extraInfo != null or !empty($extraInfo)): ?>
< ?php $extraInfo = unserialize($extraInfo) ?>
<div class="entry-edit">
<div class="entry-edit-head">
<h4 class="icon-head head-products">Extra order info</h4>
</div>
</div>
<div style="height: 30px; padding: 10px; border: #ccc 1px solid; margin-bottom: 20px;">
<pre>
< ?php print_r($extraInfo) ?>
</pre>
</div>
<br /><br /><br /><br /><br /><br /><br />
<div class="clear"></div>
< ?php endif; ?>
< ?php /** END CUSTOM Coded by Branko Ajzele | branko.ajzele@surgeworks.com */ ?>

Feel free to remove all my comments. One thing to keep in mind here, the url path has the “mytheme” pointing to my custom theme. Usefull if you do not wish to edit default admin tempate files. Cooworker and friend of mine, Ivan Weiller, wrote a nice little plugin for switching the admin themes (to avoid editing the default one). You can download Admintheme module here.

Important: Our colour highlighting plugin on this site seems to lower-case some tag names on xml code, so keep that in mind if you experience some trouble with sample code.

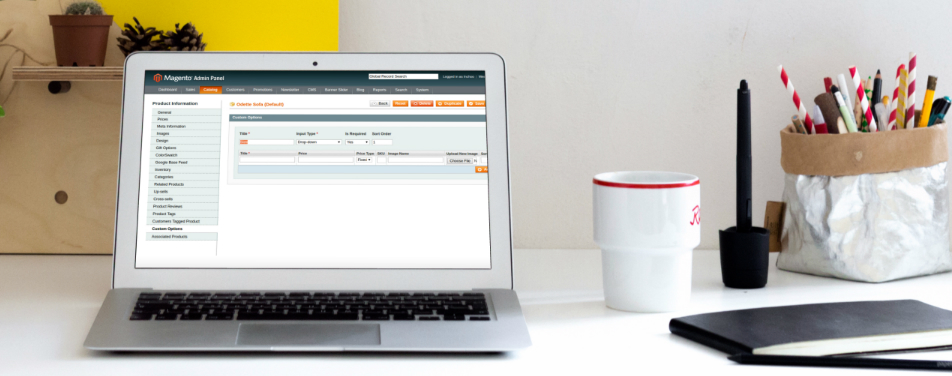
Huh, we are done! Final result is shown on image.

Cheers…

You made it all the way down here so you must have enjoyed this post! You may also like:

Calling out all Magento developers who want to improve their testing skills – visit MageTestFest! Maja Kardum
Maja Kardum, | 0

Calling out all Magento developers who want to improve their testing skills – visit MageTestFest!

Newsletter auto-subscribe on create account and place order in Magento Marko Martinovic
Marko Martinovic, | 14

Newsletter auto-subscribe on create account and place order in Magento

Custom Magento Events: Customer First Order Branko Ajzele
Branko Ajzele, | 7

Custom Magento Events: Customer First Order

25 comments

  1. Hello. It seems like this post is very useful. I decided to add additional order attributes to extract some more information. During purchasing, customers can leave some words about our service and our web store.

    If it is interesting for somebody, I use http://amasty.com/order-attributes.html for such issues.

    Have a nice day,
    Jim Karlitt

  2. Hello Inchoo,
    using the method in your module,

    $incrementId = Mage::getSingleton(‘checkout/session’)->getLastRealOrderId()

    I m not getting the last placed order increament id. Instead i am gettting the last to second order increament_id. Let me know if you have any idea…

  3. is this tutorial applicable to Magento 1.5.0? as i keep receiving error that: ‘Method “hookToOrderSaveEvent” is not deined in “” ‘

  4. This article was very useful for me for hooking to customer_login event. I could not find a clearer custom_module/etc/config.xml file in any of the other blogs/pages/wikis/forums

  5. FYI – I was using 1.3.3.0

    The EAV attribute was created in eav_attribute table. What I did not expect was that data would actually be stored in the sales_order_varchar table. (I was incorrectly looking at eav_entity_X tables and sales_order_entity_X tables.)

    Looking further as to why, it is because the 11 specified as the entity_type_id for a sales_order stores data in the sales_order_X tables. Imagine that! Right where it is supposed to be.

  6. This tutorial was made on Magento 1.3 version. There have been some changes in the Sales module regarding its use of EAV in Magento. This might be causing the issue.

  7. I am simply trying to add an attribute called ‘recipient’ to the order model. I agree with the question above, and add a problem. Using the second part of the “quick and dirty” setup, i am getting an error stating Class ‘Mage_Eav_Model_Entity_Setup’ not found.
    Odd?

  8. Unfortunately I cannot get past the ‘quick and dirty’ steps of adding the attribute to the order. I am not sure why the attribute should be added as and eav_attribute?

    Also, why is it that almost all of the attributes listed underneath app/code/core/Mage/Sales/Model/Entity/Setup.php simply have => array(), or => array(‘type’ => int), when the example attribute has some many more?

  9. Thank you for the nice explanation.
    Does this mean i can watch for any already fired events from Magento itself. What if some events are caught by core Observer classes, am i able to catch them too with my own Observer methods?

  10. Hello , does this code work with 1.3.2.4. ? I’ve tried the above code without success even with ‘codePool’ in the xml. It seems like function hookToOrderSaveEvent() is never executed. Can someone please provide a zip of working files ? Thank you.

  11. In my previous comment:

    it’s the XML codePool tag – in the article example the tag is spelled codepool

  12. hey branko !!

    cant get it work … i just create the same module as you , but nothing happen i think the hook didn’t actually work for me ….
    is that too much asking of you that you send me your source code for this particular module ?

  13. Hi,

    I can access extra info by using
    {{var order.getExtraInfo().format(‘html’)}}.

    But problem is that it is in format of serialize and it shows like

    a:2:{s:10:”CreditCard”;s:11:”Master Card”;s:26:”Total Pyament Installments”;s:1:”1″;}

    How to unserialize this for displaying in proper format?

    Thanks

  14. Hi,
    This article helps me a lot and implement successfully.

    I use this article to display credit card info (Visa, Master Card and number of installments etc..) in order detail at admin side.

    But i also use this information when order email send to the customer.

    So how can i access this info in email template.

    Thanks

  15. @ Scott, We are currently doing something similar, to manage products via the API, and the only solution it seems is to extend the API classes/objects themselves (adding your own fields).

  16. Thanks for the great article. We also have added a field to our sales_order table. Any idea how to make a new field searchable via the api?

  17. Hello,

    I found this stuff really nice and I am trying to do the same. Thanks for this nice article for getting started with my new module and soon I will return with good results.

    Thanks alot

  18. I was looking for a better way to do this (I was going to extend the controller by over-riding the saveOrderAction method). Thanks for taking time to document it Branko!

Leave a Reply

Your email address will not be published. Required fields are marked *

You may use these HTML tags and attributes: <a href="" title=""> <blockquote cite=""> <code> <del datetime=""> <em> <s> <strike> <strong>. You may use following syntax for source code: <pre><code>$current = "Inchoo";</code></pre>.

Tell us about your project

Drop us a line. We'd love to know more about your project.