Add Pagination to Custom Collection in Magento

If you are starting with Magento, just like I am, you might run into the issue of adding pagination to your table, list of products or anything else you want to list on frontend. Magento allows you to create your own pagination with adjustable built-in options. This tutorial will show you how to create pagination for a custom collection in Magento.
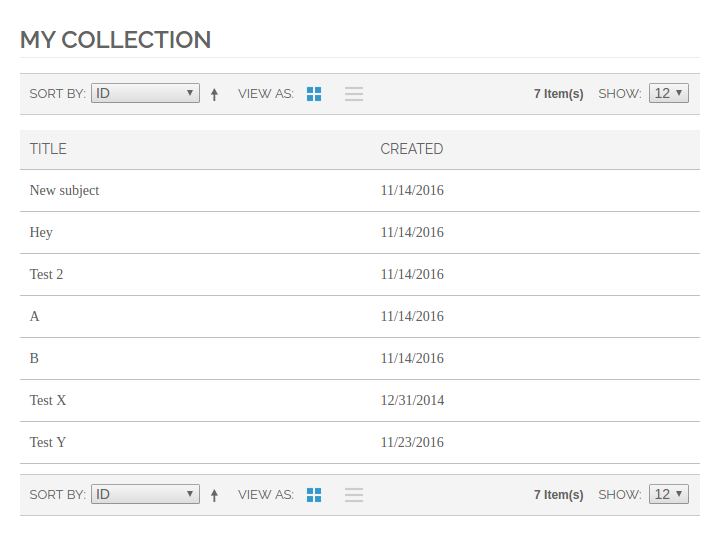
This is how final custom pagination looks like:
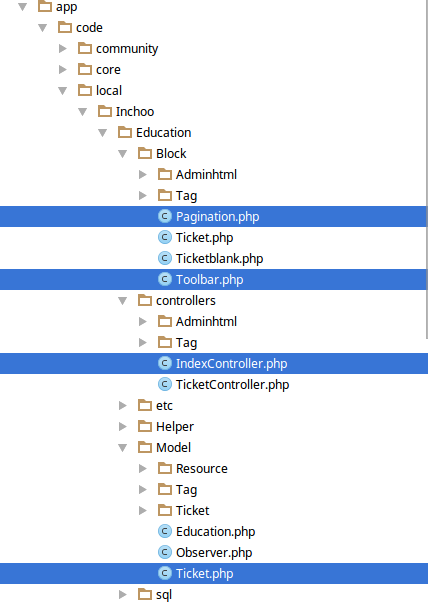
I created Education module inside Inchoo package with Ticket model.
STEP 1
First of all create custom action to access your content. Add a custom action inside your controller:
public function paginationAction()
{
    $this->loadLayout();
    $this->renderLayout();
}
STEP 2
In your xml (app > design > frontend > rwd > default > layout > your_layout.xml) inside “layout” node add the node referencing your custom action. If you are using different or custom theme your path might be different than “rwd > default”.
“education/pagination” – where “education” is the name of your module, “pagination” is name of your block inside pp/code/local/Inchoo/Education/Block folder, my block is named Pagination.php.
<education_index_pagination>
  <reference name="content">
    <block name="collection_ticket" type="education/pagination" template="education/pagination.phtml"/>
  </reference>
</education_index_pagination>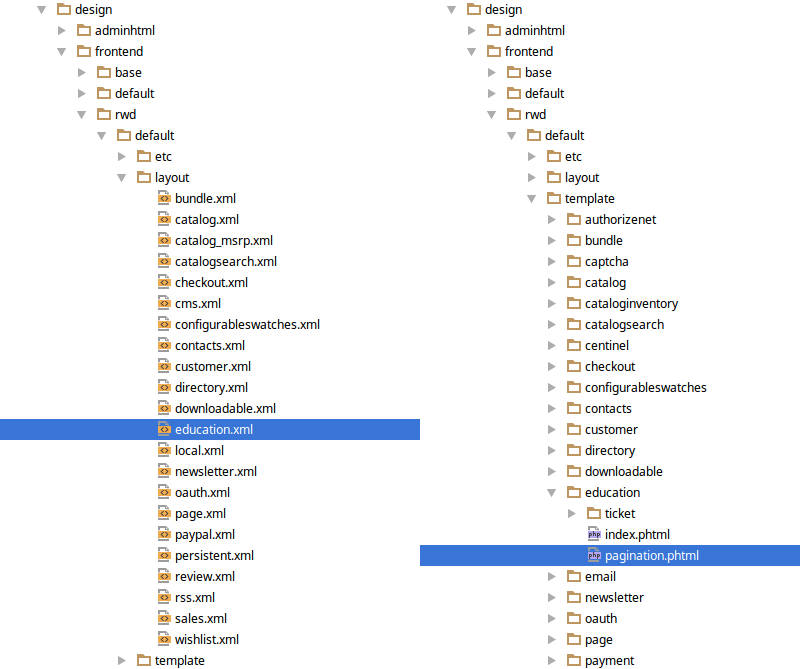
STEP 3
Create class that will extend Magento’s default product list toolbar so you can alter default behavior. Inside app/code/local/Inchoo/Education/Block create Toolbar.php
class Inchoo_Education_Block_Toolbar extends Mage_Catalog_Block_Product_List_Toolbar
{
    public function getPagerHtml()
    {
        $pagerBlock = $this->getLayout()->createBlock('page/html_pager');
        if ($pagerBlock instanceof Varien_Object)
        {
            /* here you can customize your toolbar like h*/
            $pagerBlock->setAvailableLimit($this->getAvailableLimit());
            $pagerBlock->setUseContainer(false)
                ->setShowPerPage(false)
                ->setShowAmounts(false)
                ->setLimitVarName($this->getLimitVarName())
                ->setPageVarName($this->getPageVarName())
                ->setLimit($this->getLimit())
                ->setCollection($this->getCollection());
            return $pagerBlock->toHtml();
        }
        return '';
    }
}
STEP 4
Create your block inside your module’s block, in this case app/code/local/Inchoo/Education/Block. I named this block Pagination, you can call it however you want to, but then you have to be careful about calling it in your xml.
class Inchoo_Education_Block_Pagination extends Mage_Core_Block_Template
{
    public function __construct()
    {
        parent::__construct();
        //set your own collection (get data from database so you can list it)
        $collection = Mage::getModel('education/ticket')->getCollection();
        $this->setCollection($collection);
    }
    protected function _prepareLayout()
    {
        parent::_prepareLayout();
        //this is toolbar we created in the previous step
        $toolbar = $this->getLayout()->createBlock('education/toolbar');
        //get collection of your model
        $collection = Mage::getModel('education/ticket')->getCollection();
        //this is where you set what options would you like to  have for sorting your grid. Key is your column in your database, value is just value that will be shown in template
        $toolbar->setAvailableOrders(array('created_at'=> 'Created Time','id'=>'ID'));
        $toolbar->setDefaultOrder('id');
        $toolbar->setDefaultDirection("asc");
        $toolbar->setCollection($collection);
        $this->setChild('toolbar', $toolbar);
        $this->getCollection()->load();
        return $this;
    }

    //this is what you call in your .phtml file to render toolbar
    public function getToolbarHtml()
    {
        return $this->getChildHtml('toolbar');
    }
}
STEP 5
Inside app > design > frontend > rwd > default > template (or change rwd > default to your theme path) create pagination.phtml (as you stated in step 2):
<?php $collection = $this->getCollection();  ?>
    <div class="page-title">
        <h1><?php echo $this->__('My Collection') ?></h1>
    </div>
<?php echo $this->getToolbarHtml(); ?>
    <table class="data-table" id="my-custom-table">
        <thead>
        <tr>
            <th><?php echo $this->__('Title') ?></th>
            <th><span class="nobr"><?php echo $this->__('Created at') ?></span></th>
        </tr>
        </thead>
        <tbody>
        <?php $_odd = ''; ?>
        <?php foreach ($collection as $item): ?>
            <tr>
                <td><span class="nobr"><?php echo $item->getSubject(); ?></span></td>
                <td><?php echo $this->formatDate($item->getCreatedAt()) ?></td>
            </tr>
        <?php endforeach; ?>
        </tbody>
    </table>
<?php echo $this->getToolbarHtml(); ?>
*Custom pagination
If you want to create your own custom pagination without using Magento’s Toolbar, after you finished step 1 and step 2 inside app/code/local/Inchoo/Education/Block create Pagination.php.
class Inchoo_Education_Block_Pagination extends Mage_Core_Block_Template
{
public function __construct()
{
parent::__construct();
$collection = Mage::getModel('education/ticket')->getCollection();
$this->setCollection($collection);
}
protected function _prepareLayout()
{
parent::_prepareLayout();
$pager = $this->getLayout()->createBlock('page/html_pager', 'custom.pager');
$pager->setAvailableLimit(array(5=>5,10=>10,20=>20,'all'=>'all'));
$pager->setCollection($this->getCollection());
$this->setChild('pager', $pager);
$this->getCollection()->load();
return $this;
}
public function getToolbarHtml()
{
return $this->getChildHtml('pager');
}
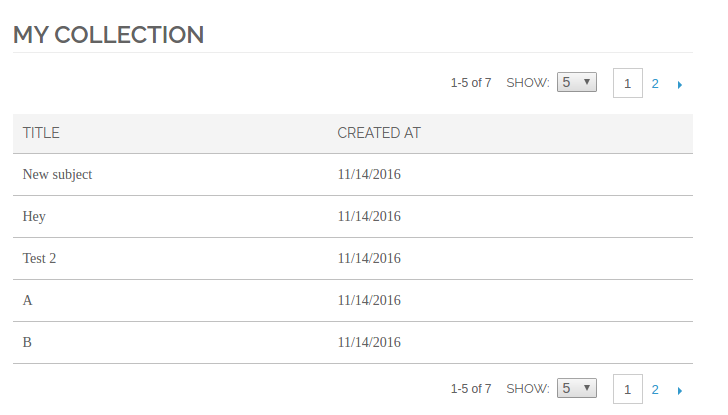
}After you did this, skip step 3 and 4 and go straight to step 5 to create .phtml. When you’re done with that you’ll get something like this:


7 comments
can we add the id field start with 1 and then we give next page id wii continue of last page last id end.
THIS IS NOT WORKING!!!!
our email address will not be published. Required fields are mark
do u have any video demo for creating a complete project Eg: Student Management Iam beginner so i cant understand the work flow
I followed all these steps, for me page loads with all records? But paging number are showing properly. Whats wrong with my code?
Which one did you use, custom pagination (the last heading “*Custom pagination”) or did you use pagination with Toolbar (all 5 steps)?
i also same page loads with all records