Latest version of Magento, as of time of this writing, is 1.3.2.3. Latest, as well as previous versions come with “half-packed” support for TinyMCE editor. There are however few bugs and few steps that need to be handled in order to enable wysiwyg editing in CMS pages. Personally I am not that big of a fan of wysiwyg editors, mostly because I am developer and like to know what I write down.
However, most of the store owners are not developers or even not that much technically savvy people (not that this is a bad thing) and they could use wysiwyg editors when adding, modifying content.
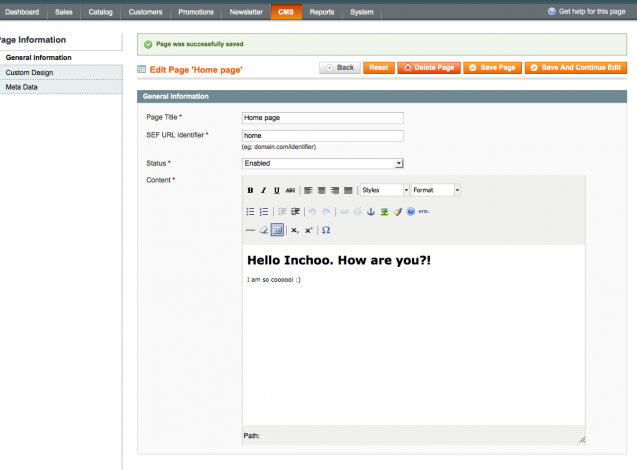
Here I will walk you trough few simple steps that will make you enable wysiwyg editing by using TinyMCE. You can see the screenshots of final result below.
Step 1: Download and unpack TinyMCE to root /js folder. Two things to keep in mind here. Download regular version (not jQuery version) of TinyMCE. This is due to the fact that Magento uses Prototype, so we need to avoid conflicts. Second, watch out for unpack location. Your tiny_mce.js file should be accessible on js/tiny_mce/tiny_mce.js path.
Step 2: Open the app/code/core/Mage/Adminhtml/Block/Cms/Page/Edit/Tab/Main.php file. Locate the
$fieldset->addField('content', 'editor', array(
'name' => 'content',
'label' => Mage::helper('cms')->__('Content'),
'title' => Mage::helper('cms')->__('Content'),
'style' => 'height:36em;',
'wysiwyg' => false,
'required' => true,
));
and change it to
$fieldset->addField('content', 'editor', array(
'name' => 'content',
'label' => Mage::helper('cms')->__('Content'),
'title' => Mage::helper('cms')->__('Content'),
'style' => 'height:36em;',
'wysiwyg' => true,
'theme' => 'advanced',
'required' => true,
));
As you can see, here we changed on existing attribute (‘wysiwyg’) value and added new attribute ‘theme’.
Step 3: Open the /lib/Varien/Data/Form/Element/Editor.php file and locate the method getElementHtml(). Here we change
$html = '
<textarea id="'.$this->getHtmlId().'" class=""textarea" title="'.$this->getTitle().'" name="'.$this->getName().'">getClass().'" '.$this->serialize($this->getHtmlAttributes()).' >'.$this->getEscapedValue().'</textarea>
<script type="text/javascript">
//< ![CDATA[ /* tinyMCE.init({ mode : "exact", theme : "'.$this->getTheme().'",
elements : "' . $element . '",
theme_advanced_toolbar_location : "top",
theme_advanced_toolbar_align : "left",
theme_advanced_path_location : "bottom",
extended_valid_elements : "a[name|href|target|title|onclick],img[class|src|border=0|alt|title|hspace|vspace|width|height|align|onmouseover|onmouseout|name],hr[class|width|size|noshade],font[face|size|color|style],span[class|align|style]",
theme_advanced_resize_horizontal : "false",
theme_advanced_resizing : "false",
apply_source_formatting : "true",
convert_urls : "false",
force_br_newlines : "true",
doctype : '< !DOCTYPE html PUBLIC "-//W3C//DTD XHTML 1.0 Strict//EN" "http://www.w3.org/TR/xhtml1/DTD/xhtml1-strict.dtd">'
});*/
//
</script>';
to
$_storeBaseUrl = str_replace('index.php', '', Mage::getBaseUrl());

//Just to test retrieved url
//echo '$_storeBaseUrl: '.$_storeBaseUrl;

$html = '
<textarea id="'.$this->getHtmlId().'" class=""textarea" title="'.$this->getTitle().'" name="'.$this->getName().'">getClass().'" '.$this->serialize($this->getHtmlAttributes()).' >'.$this->getEscapedValue().'</textarea>
<script language="javascript" type="text/javascript" src="'.$_storeBaseUrl.'/js/tiny_mce/tiny_mce.js"></script>
<script type="text/javascript">
//< ![CDATA[ Event.observe(window, "load", function() { tinyMCE.init({ mode : "exact", theme : "'.$this->getTheme().'",
elements : "' . $element . '",
theme_advanced_toolbar_location : "top",
theme_advanced_toolbar_align : "left",
theme_advanced_path_location : "bottom",
extended_valid_elements : "a[name|href|target|title|onclick],img[class|src|border=0|alt|title|hspace|vspace|width|height|align|onmouseover|onmouseout|name],hr[class|width|size|noshade],font[face|size|color|style],span[class|align|style]",
theme_advanced_resize_horizontal : "false",
theme_advanced_resizing : "false",
apply_source_formatting : "true",
convert_urls : "false",
force_br_newlines : "true",
doctype : '< !DOCTYPE html PUBLIC "-//W3C//DTD XHTML 1.0 Strict//EN" "http://www.w3.org/TR/xhtml1/DTD/xhtml1-strict.dtd">'
});
});

//
</script>';
As you might noticed, I used $_storeBaseUrl in this other chunk of code to get the valid path to my TinyMCE javascript file. If you are using store that does not have url rewrites this is something that needs to be done because your javascript file would not be found if you go trough link like “http://store.local/index.php/js/tiny_mce/tiny_mce.js”. Then you would get TinyMCE shown on CMS page but it would be disabled.
As you can see, there were only three minor changes needed (download, modify, modify) to get the TinyMCE editor working.
Hope this helps. Cheers.