Remember those days when you could easily deploy something to production without executing each time a number of commands and clearing cache a few times meanwhile? Yeah, me neither.
Every modern framework or platform has their own individual perks that shape our development and deploying process. Magento is no different here and its deployment process can be a challenge for newcomers.
In this post, we will introduce Deployer, automated deployment tool for PHP.
Since Deployer is just a PHP application distributed as a PHP Archive (.phar), extending its functionalities and customizing deployment tasks are quite easy. Most importantly, if something goes wrong, we see few PHP exceptions now and then so they can be fixed in no time.
Installing Deployer
We will start by downloading it down and setting it globally executable for our user
curl -LO https://deployer.org/deployer.phar
mv deployer.phar /usr/local/bin/dep
chmod +x /usr/local/bin/dep
Now you can execute dep command which will run Deployer. Position yourself at the root of your project and run
dep initwhich will trigger the Deployer config generator. Here it will ask us about our project type, but that only means it will require a specific recipe. Recipes are nothing more than already written tasks for deploying a specific framework or platform.

As you can see, Magento is not listed here, but since we know it is part of the code by looking at source, we will start by manually creating deploy.php file to avoid refactoring. In this file we will require Magento 2 recipe like this:
namespace Deployer;

require 'recipe/magento2.php';
Magento 2 recipe already contains almost everything we need for deployment, we just need to make a few adjustments, like adding the project name and project repository:
// Project name
set('application', My awesome project);

// Project repository
set('repository', '[email protected]:username/my-awesome-project.git');
We still didn’t define where we want to deploy, so we will start by defining a host.
For this simple example we will define only our local machine, but in practice, there is probably more than one environment where we want to deploy, like staging or production, so it is best to keep those definitions in a separate file.
In the root of your project create a new file called hosts.yml and write something like this inside:
localhost:
 stage: dev
 local: true
 branch: master
 deploy_path: /var/www/my-awesome-project
For different stages like staging or production, we most likely need to do an ssh which we don’t need in our example so you won’t need this local: true line, but you will have to add one more line at the end:
configFile: ~/.ssh/configSome of your teammates can connect in a different way so it is best to keep that information at config level. Now when we have this defined, we can tell in our deploy.php where is this hosts file located:
// Hosts
inventory('hosts.yml');
And that is, actually, all there is. You can now run:
dep deploy devWell actually, there is an exception in the process. I got
[Exception]
Warning: array_replace_recursive(): Argument #1 is not an array in /var/www/my-awesome-project/releases/1/vendor/magento/framework/App/DeploymentConfig/Writer.php on line 135
That is because of missing env.php since cloned repository doesn’t have this file, so we will create it ourselves, or it could be already created for you by Deployer but it is empty.
Change the directory to your deploy path defined in hosts.yml and from here on you can edit this file on path shared/app/etc/env.php.
We will explain in a moment why is it located there, but don’t forget to set a production mode in here or you will get another exception if you try to deploy again with our current settings. Of course, this is done only once.
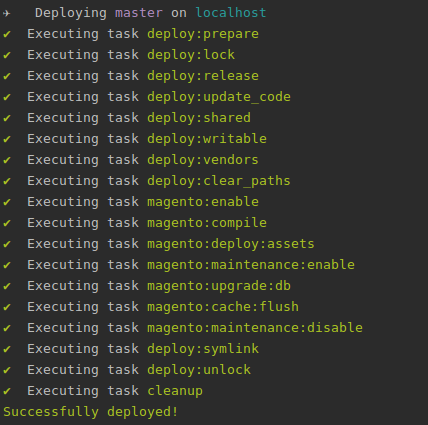
Let’s try again running
dep deploy devAnd yes, this time everything went fine:
How does it work
There are a lot of tasks that are executed but in theory the simplest explanation is that when you run command for deploying, Deployer will make an SSH to a specified remote server (unless we explicitly say that we want to deploy to local environment), create a new release folder and in it clone the VCS repository.
With the magic of symlinks, it will point your latest release to the current directory.
After deployment, you will see three main directories:
- Current
- Releases
- Shared
Releases are your release folder where the code is cloned from the repository, while current is symlinked to the latest release.
In the current directory, there are symlinks to also files in a shared directory that contains something that is the same/shared for all releases, like env.php or media folder.
In practice, if you want to use Deployer for deployment of Magento 2 projects, your server should point to current/pub directory.
Conclusion
In this post, we haven’t created our custom tasks or overridden some of the existing ones, but I hope you get the basic idea how Deployer works and what is the idea behind it.
With the help of available documentation, you will be able to customize it according to projects specific needs. If you need any additional help, feel free to contact us!
And just one final pro tip
If you are running PHP-FPM on the server where you are deploying, create a new task for restarting this service after the deployment is done, because the symlinks can be cached and your server will end up serving the older release. Trust me, I learned this the hard way.