
We are happy to share with you the ultimate guide on how to set up and manage taxes in Magento 2. Everything you need as a merchant, consultant or developer, you’ll find right here.
This guide is based on Magento 2.3.X, however, there were no significant changes in previous versions of Magento 2 when it comes to sales tax setup, so it should be backward compatible as well.
The setup presented in this guide works the same way in Magento 2 Commerce (Enterprise), Magento 2 Open Source (Community), and Magento Commerce Cloud.
Table of content:
- Introduction
- Tax Zones and Rates
- Tax Rules
- Tax Settings
- Shipping Tax
- Configurable Products Tax
- Tax Exempt Customers
- M1 to M2 Tax Migration
- Taxes in eCommerce
- Sales Tax in the USA
- VAT in Europe
Where are taxes configured in Magento 2 admin?
There are three main areas in Magento admin you need to consider when configuring sales tax in Magento 2:
- Stores > Tax Zones and Rates
- Stores > Tax Rules
- Stores > Configuration > Sales > Tax
The best way to set up your sales tax in Magento 2 is probably to go in this specific order, so let’s first take a look at zones and rates.
Tax Zones and Rates
First, in Magento admin navigate to Stores > Tax Zones and Rates. Depending on how you installed your Magento, you might find some sample rates in there for New York etc, feel free to delete those and start from scratch.
Let’s say you want to add a new tax rate for all zip codes in California with 7.25% tax, this is the way you would set this zone and rate up:
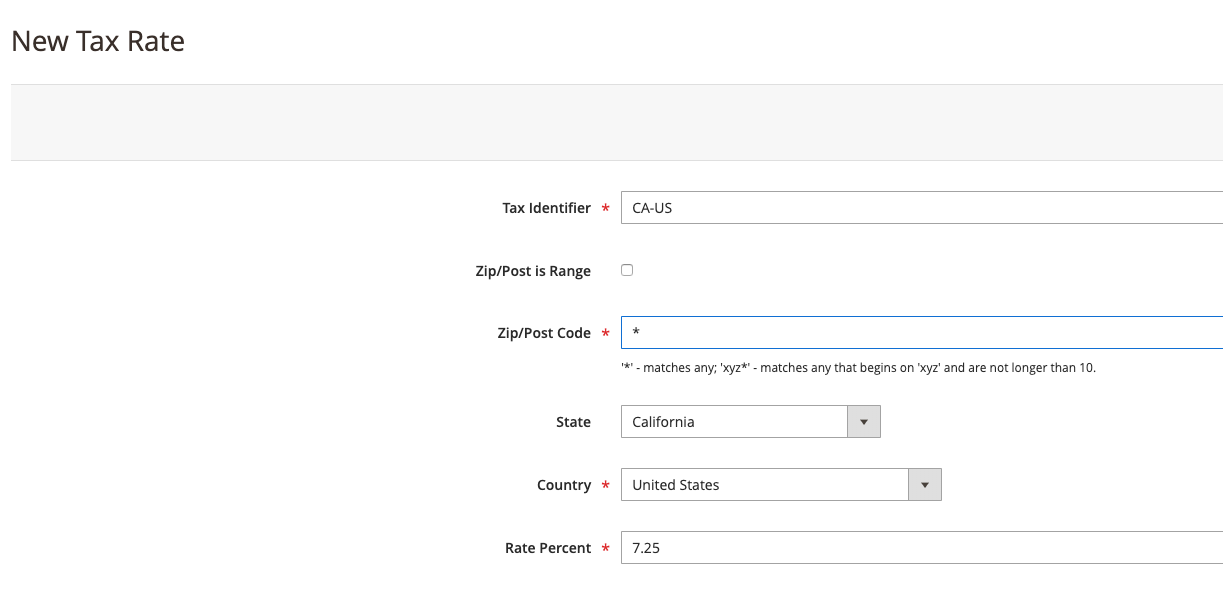
Let’s go through those fields in the screenshot above:
Tax Identifier – this is a unique name that represents your tax zone and rate, you may call it whatever you want, but you want to name it so you can easily identify what this rate is for in case you’ll have a long list of zones and rates in the future.
Zip/Post is Range – If you select this, you’ll be able to insert a starting and ending zip code in between which there’s a range of zip codes this rate applies to. In most cases we don’t need this as you’ll mostly be setting sales tax for all zip codes in certain states and countries as one rate.
Zip/Post Code – We placed “*” in there which means this rate applies to all zip codes in selected country and state. You could determine a specific rate for a specific zip code if you needed to by inputting that specific zip code in this field instead of “*”.
State – The state this rate applies to.
Country – The country this rate applies to.
Rate Percent – A decimal number representing sales tax rate for this specific zone.
Now that we defined this zone and rate for California, if a user was to try and purchase something from your store with address in California, the user would still not be charged this sales tax. This is because we have not set up any sales tax rules that would trigger this zone and rate yet.
Tax Rules
Now that we have a tax zone and rate for California US, we want to add a rule that will trigger this zone and rate. Navigate to Stores > Tax Rules and add a new rule:
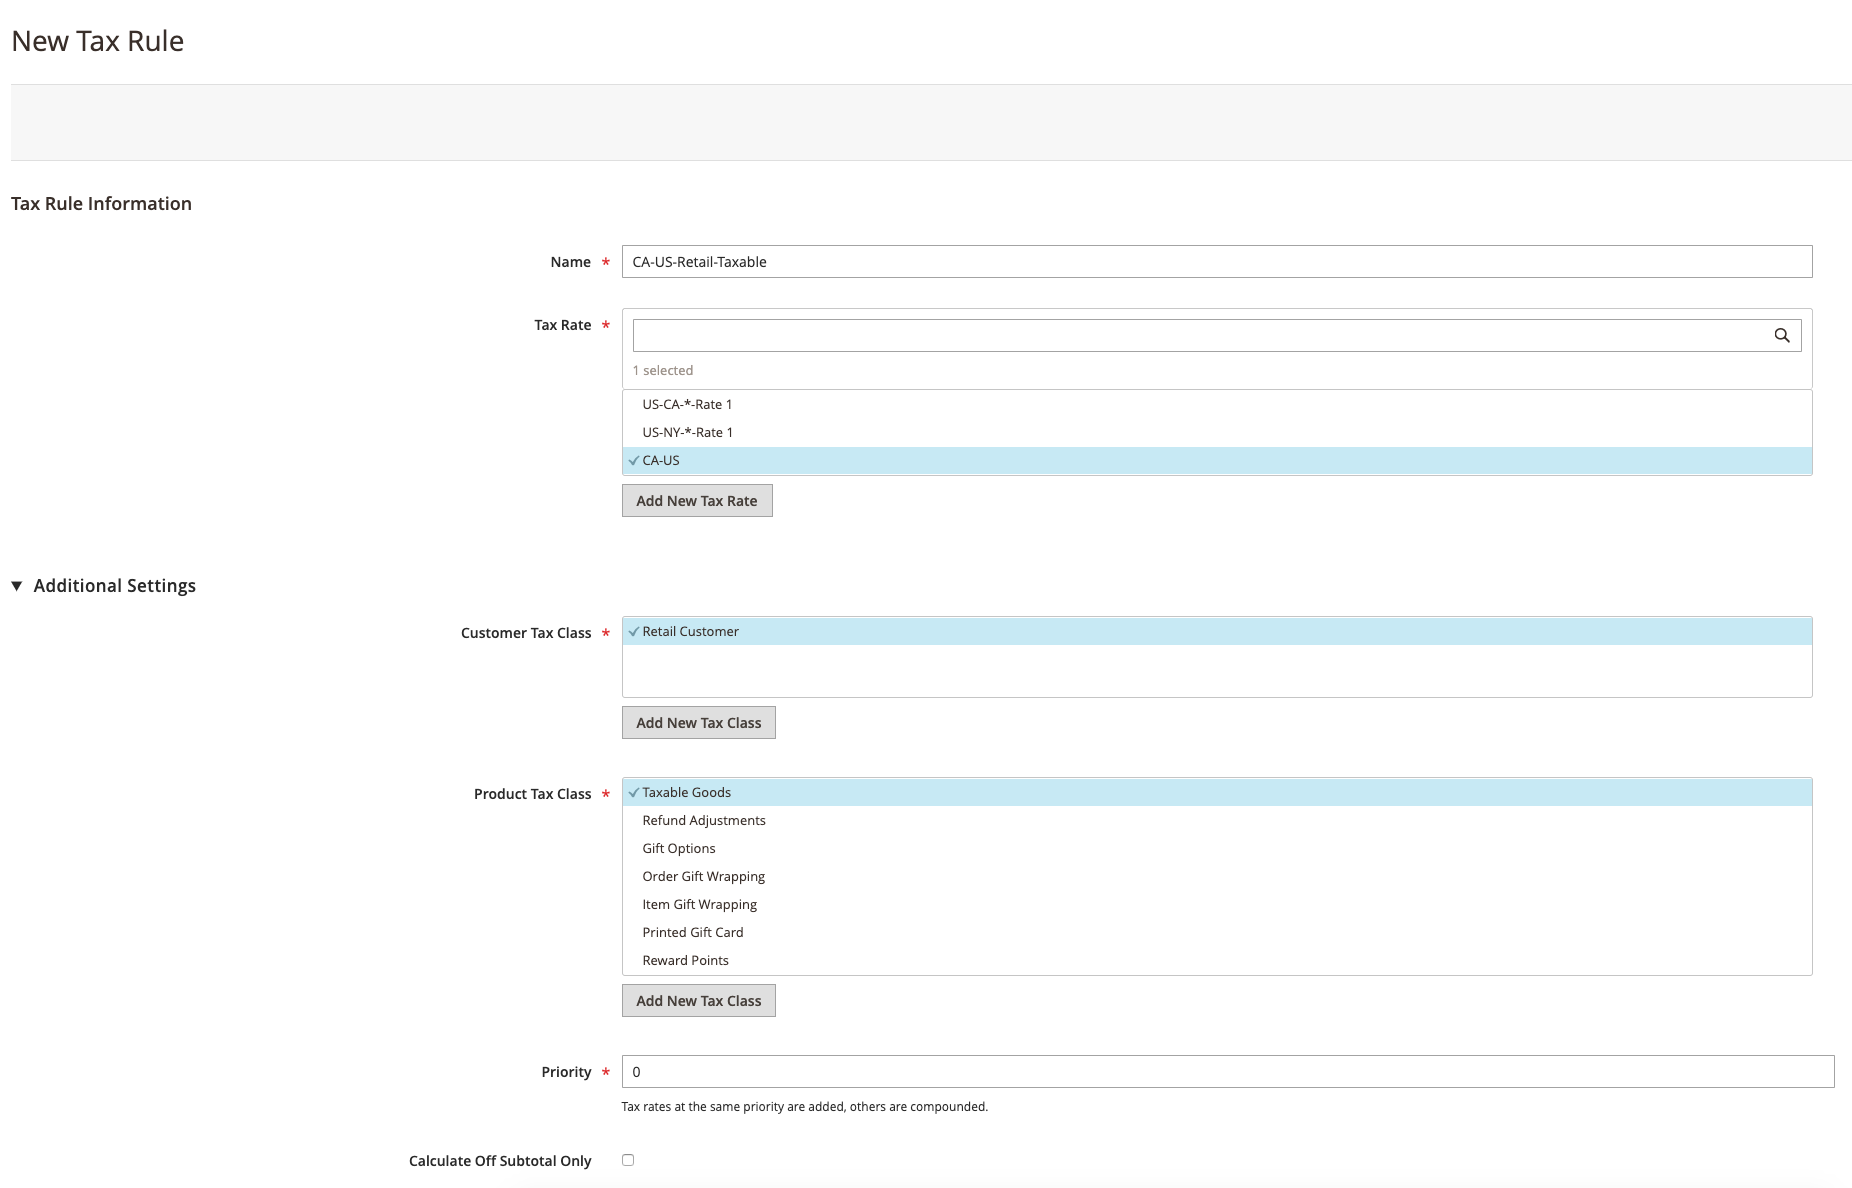
Here’s what this rule means: If a customer has a customer tax class “Retail Customer”, and if the product in cart this rule affects has a product tax class “Taxable Goods” this rule will apply the rate defined in “CA-US” zone/rate as long as the customer’s address is within the zone defined in “CA-US” tax zone/rate. If this is our only rule, all other customers would get no tax calculated at this point.
Here is what we did:
Name – Once again, it can be whatever you want but you want to be able to figure out what this rule does from the name itself.
Tax Rate – This is where we select a zone/rate we created in the previous step of this tutorial. This is a multi-select field as one rule can trigger multiple zones and rates, for example, if you had set up another rate for New York and everything in this screen is the same for both your California customers and your New York customers, you could select both California’s zone and rate as well as New York’s in this one rule. This doesn’t mean a customer would be charged both California’s and New York’s tax rate, the customer would be charged one of them, depending on his address – if he is in California, the rate defined in California’s zone and rate would trigger and if he was based in New York, New York’s would.
Customer Tax Class – Also a multi-select field. In most configurations, you will have just one customer tax class which is the same for all your customers. Some merchants, however, might have some customers who are sales tax exempt. In this case, we would define a new customer tax class for those, assign it to a specific customer group, and create separate tax zones and rates for these customers if necessary, but more on that in the upcoming sections of this guide. For now, we want all our customers to be affected by this rule so we’re selecting our only customer tax class we have so far.
Product Tax Class – Each product in Magento 2 can have only one product tax class assigned to it. This is so we can target them specifically with tax rules such as this one. If all your products are taxable, each of them should have the same product tax class assigned to them, in our case, this is the “Taxable Goods” tax class. So this is the one we’re selecting here.
Priority – OK, this is a tricky one. In most setups, you want to keep all of your tax rules on the same priority level and leave the default 0 in there. To understand when this needs to be changed, please note the warning below:
Tax rates at the same priority are added, others are compounded.
What does this mean?
Imagine your sales tax setup is a bit different. Instead of having the same rate of 7.25% for all zip codes in California, imagine you really need to split it into state and local rates. In fact, the 7.25% in California right now is made up of 6% state tax and 1.25% local sales tax. Now, some zip codes might not be in 1.25% local rate but have a different 1% rate. This means our current setup would not calculate the sales tax correctly for those zip codes and would charge them 0.25% extra.
To solve this, instead of the current setup we would have one zone and rate defined for all zip codes in California where ZIP code would be “*”, and rate would be the state’s sales tax rate of 6%.
We would create the additional zone and rate for zip code ranges that have an additional 1.25%, and additional zone and rate for zip code ranges that have 1% local tax rate.
So in total, we would have 3 zones and rates for California, one for all zip codes with a 6% rate, one for certain zip codes with 1.25% rate, and one for certain zip codes with 1% rate.
Let’s say we have 3 rules that trigger each of these tax zones and rates separately.
If all of these rules have the Priority on the same level, let’s say “0”, the rates would be added. Meaning, a customer from California with a zip code that has a local tax of 1.25 would be affected by our general California tax zone and rate of 6% + 1.25% local tax rate, bringing the total sales tax merchant would collect from this customer to 7.25%.
If the priority was different, the higher priority tax rate would kick in first, meaning, if the 6% rate would be the higher priority one, we would first add 6% to the product price, and then on that number the 1.25% local tax would be applied, meaning customer would be paying more sales tax than 7.25%.
So in our particular case where we want the total tax to be 7.25%, we would want both state tax and local tax to be on the same priority level.
Calculate Off Subtotal Only – In most cases, you would leave this unticked. The use case for this would be if you needed tax rates of different priority levels (because you want them to be displayed as separate taxes) but don’t want them to be compound but added instead, in which case you would tick this box.
Sort Order – This is for display purposes, you may leave it as is and the same for all rules unless you have some preferences in which order they are displayed.
Import & Export – In case you’ve previously set up these things on some other instance of Magento 2 this might come in handy not to move everything manually again, but if you’re setting this up for the first time, this is useless to you.
Now, at this point, after saving the rule, a customer from California should have his sales tax calculated during checkout, but how exactly this calculation will behave and be displayed is determined by our next chapter.
Tax Settings
Let us navigate to Stores > Configuration > Sales > Tax.
In the current version of Magento, the first tab is Vertex Settings. This is a third-party tool you might pay and sort things through it, but this will not be covered in this guide. There are many 3rd party SaaS solutions out there that can integrate with Magento and automate some of the sales tax setups, especially for US-based merchants so feel free to explore them. Some of these worth mentioning are Avalara and TaxJar – which has an amazing content section on their website specifically explaining sales tax rules and regulations for US-based merchants, including how sales tax nexuses are established and current state of economic nexuses.
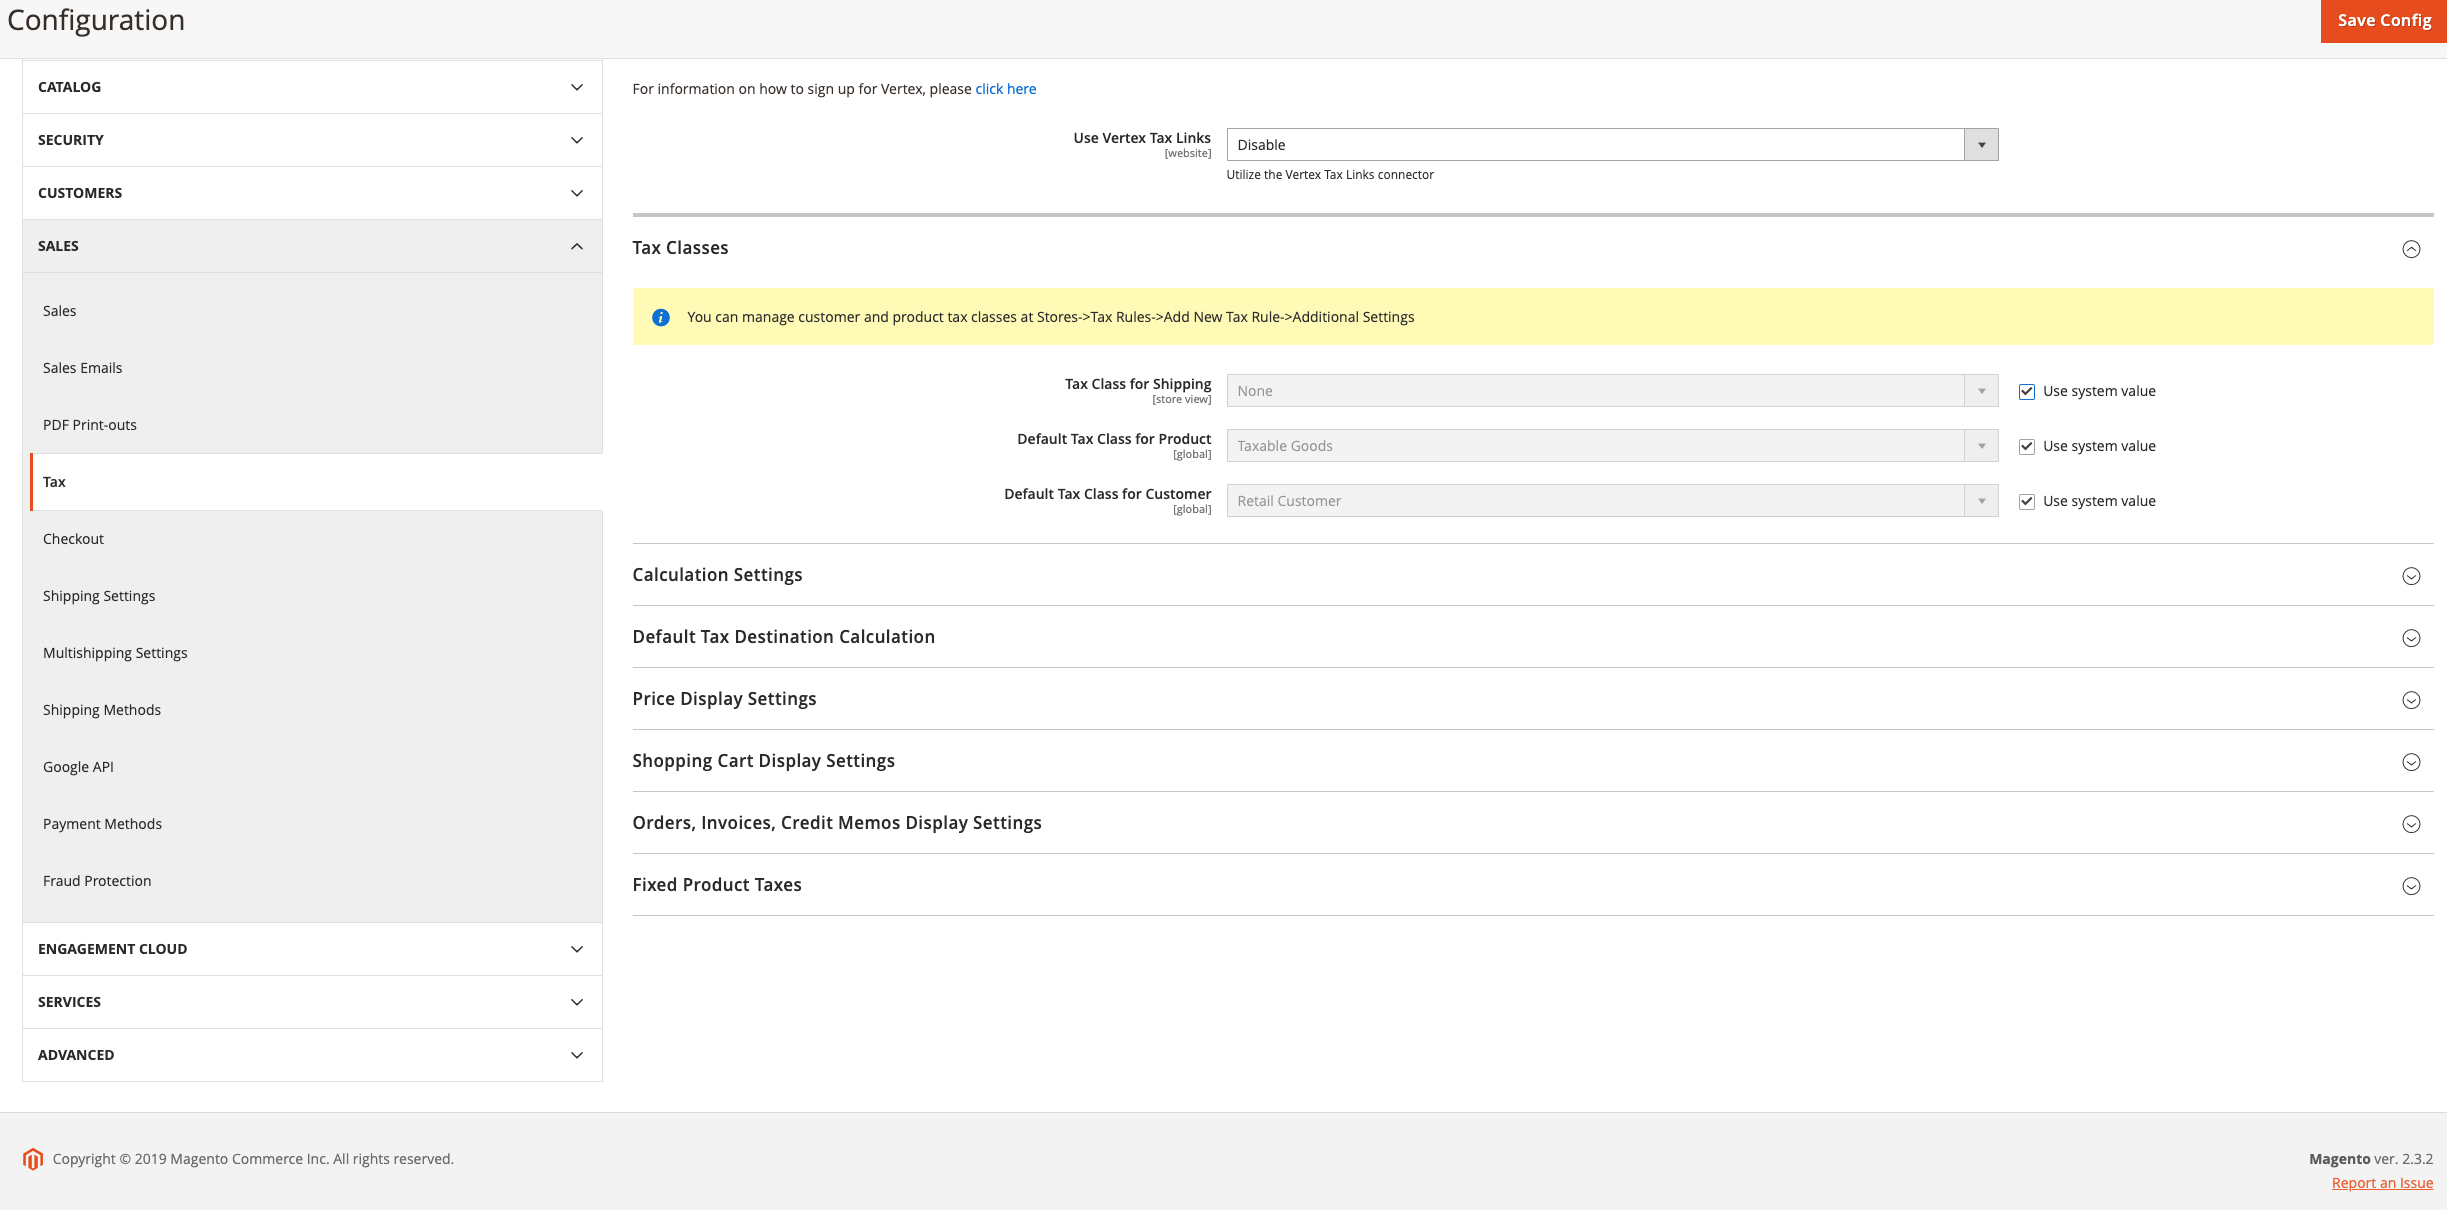
The first thing to look at is our tax class settings.
Tax Class for Shipping – This is probably the most confusing part of the entire Magento tax setup.
If you want to change this in the dropdown you will see there are actually product tax classes listed.
In Magento 2, there are two types of tax classes – product tax classes and customer tax classes. Over here it asks you to choose the product tax class that will apply to shipping, most likely because Magento never created a separate entity for shipping tax classes. So we’re using a product tax class for something that would be best described as shipping tax class.
To set this up properly, in most tax setups you’ll probably want to create a product tax class called “Shipping” and never assign any products into that product tax class. More on that in the shipping tax part of this guide.
As far as Default Tax Class for Product and Default Tax Class for Customer, in most cases you can leave it as is unless you want some specific class to be the default one.
Calculation Settings
Tax Calculation Method Based On – Total, Row Total, or Unit price.
Unit price – this means that Magento will calculate tax on each quantity of each product in the cart, then round those-up and add them together.
Row total – meaning each row item (for example 3x Green T-Shirt XL) minus discounts is taxed and then added to other rows to form the grand total price with tax.
Total – Unlike the unit price where rounding occurs on each item separately, Magento applies tax to all items separately, adds them together and then applies rounding.
Tax Calculation Based On – up until this point in this guide, we referred to customer address as just where the customer is from because we didn’t get to this field yet. In Magento 2, customer has a separate billing and shipping address. This setting determines if the zones and rates we defined are applied to the customer’s billing or customer’s shipping address. The third option is that the tax zones/rates look at shipping origin address (merchant’s warehouse address from which the item ships) instead of the customer’s billing or shipping address to determine if the item should be taxed and with which rate.
Catalog Prices – This setting tells Magento 2 if prices of products you are entering already include tax or not.
This might be confusing for US-based merchants – how could you possibly enter product price with tax already calculated in it when tax varies depending on the state and zip code you’re shipping to. This is due to the fact in some countries, for example, European countries such as the United Kingdom and Croatia VAT doesn’t vary by state – it’s the same in all states or countries don’t even have states, and catalog prices are displayed with taxes and thus these merchants are used to entering products with taxes already calculated in product price, mostly because they want prices to look nice and rounded (9.99 for example) which would be very impractical to enter if they were to enter prices before tax.
So for US-based merchants this setting would be “Excluding taxes” while for some countries this setting would be “Including taxes”.
If you’re using an ERP that’s sending product prices to Magento, check if the prices ERP is sending include or exclude sales tax and adjust this setting accordingly.
Shipping Prices – much like catalog prices setting, this setting determines whether the cost of shipping you enter in Magento admin already has tax calculated into it or not. If you’re receiving shipping rates from a 3rd party software or carrier’s live rates API integration or similar, check if those come with tax already included in shipping price or not and adjust this setting accordingly (once again for US-based merchants, shipping prices would usually be entered and come through carriers without tax).
Apply Customer Tax – This setting tells Magento if the tax should be applied before or after products’ prices are reduced by certain shopping cart price rules and coupons. This setting in combination with some other settings for some European merchants might cause some rounding errors in calculations so test which one works better for your specific setup.
Apply Discount On Prices – this setting tells Magento if discounts should be applied on product price excluding tax or product price including tax. What you want here depends on how you set up the previous few dropdowns.
Apply Tax On – Custom price or original price. Meaning should the tax always be calculated based on what you entered in the product price or should it calculate tax on a reduced special price for example. In most cases, you’d want to apply the tax on the reduced price instead of the original.
Enable Cross Border Trade – This one might be a bit confusing. See the note on this one:
When catalog price includes tax, enable this setting to fix the price no matter what the customer’s tax rate.
For US-based merchants, this setting would usually be “No”.
For some European merchants such as the United Kingdom, it would depend on what they want to achieve. The best way to explain it would be with an example.

Let’s say you are a UK based merchant. You are entering your product prices in Magento admin including VAT which is in your specific case 20%.
This means that a product you entered in Magento with price 100 already has 20% VAT included in this price. However, you’ve passed the VAT threshold for Croatia and you have to collect Croatia’s sales tax when shipping to Croatia (more on EU thresholds further down in this guide). Unlike your 20% VAT, Croatia’s VAT is 25%.
Now, if Enable Cross Border Trade is set to “No”, a customer from Croatia ordering from you would have the following outcome:
- Since your product price with 20% VAT was 100, Magento will calculate that without VAT the price is 83.33
- Now Magento takes 83.33 as price before taxes and applies a Croatian VAT of 25% for this customer
- Customer now sees the product price with tax for him is 104.16
If Enable Cross Border Trade is set to “Yes”, a customer from Croatia ordering from you would have the following outcome:
- Magento knows you entered product price with VAT as 100
- Instead of taking out UK’s VAT of 20% from this 100 price, it takes out Croatia’s VAT of 25% out of this 100 price
- Customer sees that this product costs him 100 with taxes.
As you can see, the difference is whether you as a merchant will pay for the difference in tax rate or you’ll pass that cost along to the customer.
Default Tax Destination Calculation
The next accordion in our tax configuration is this one:

What is this used for? Remember, some countries show prices in the catalog including tax (UK for example). So what customers from UK see on product page or category page as product price already has tax in it and it’s the same price customers will see during checkout and the price customers pay in the end.
For Magento to know which zones/rates and tax rules to apply before the customer entered his own billing or shipping address, Magento uses this setting to determine it.
Price Display Settings
Display Product Prices In Catalog – There are three options – Excluding Tax (usual for the USA), including tax (usual for Europe), both Including and Excluding tax.
You might feel like we’ve already configured this in previous settings but no. This setting controls if prices are displayed including or excluding tax. What we configured before is if they were entered including or excluding tax.
What Magento means by “Catalog” is pretty much everywhere where product appears on the front-end of Magento – in category pages, on the product page, in site-search, as related products etc, es well as in Magento admin product edit grid or other places within Magento admin where product price is listed.
Display Shipping Prices – Same as above but for shipping.
Shopping Cart Display Settings & Orders, Invoices, Credit Memos Display Settings
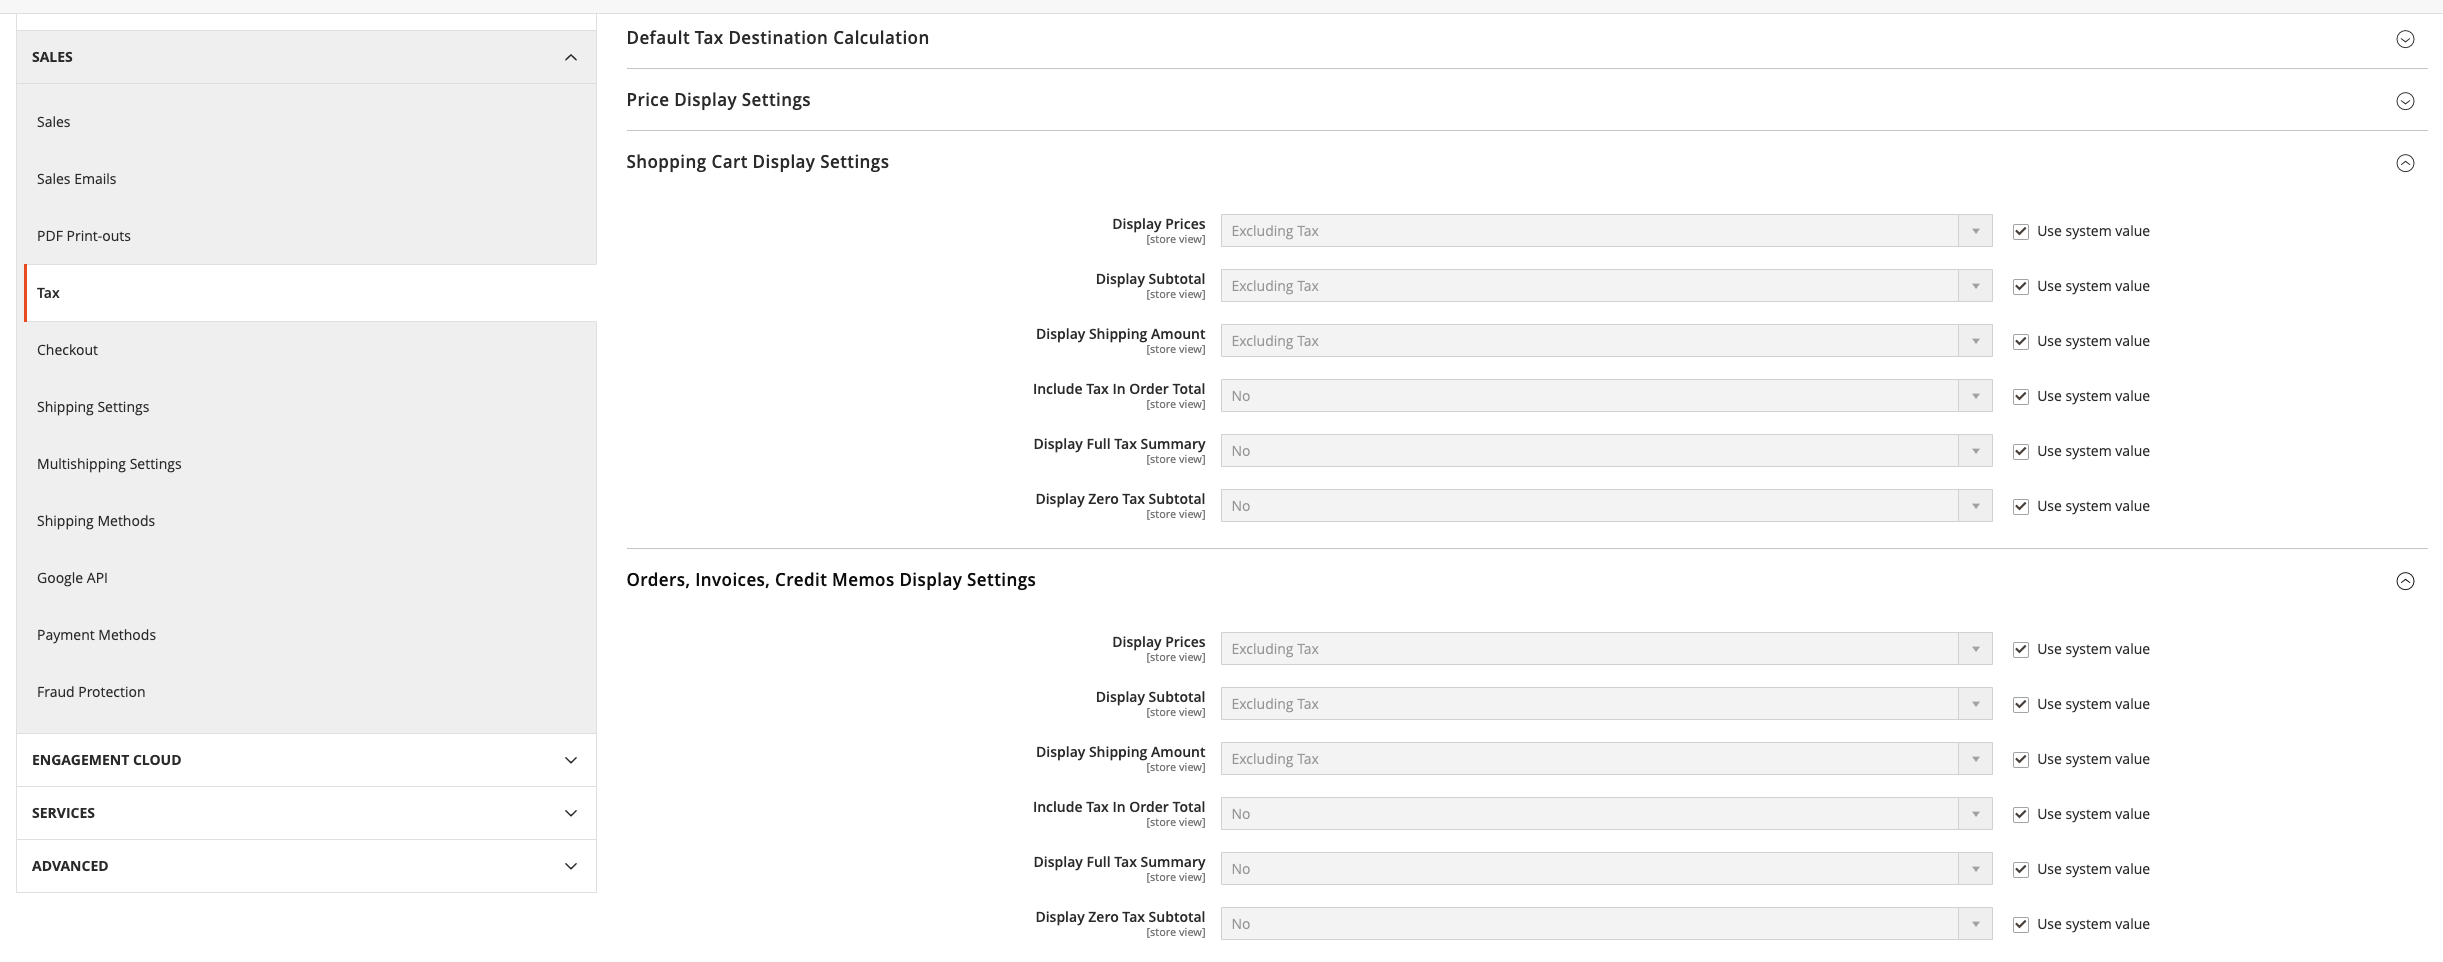
This section doesn’t influence how much tax will be charged to the customer. It only influences how tax is displayed on your cart page and in order-related e-mails and documents Magento generates such as new order or invoice. Configure this in any way that a tax display is required for your specific country.
Fixed Product Taxes
Our final accordion in tax setup is configuration of fixed product taxes:
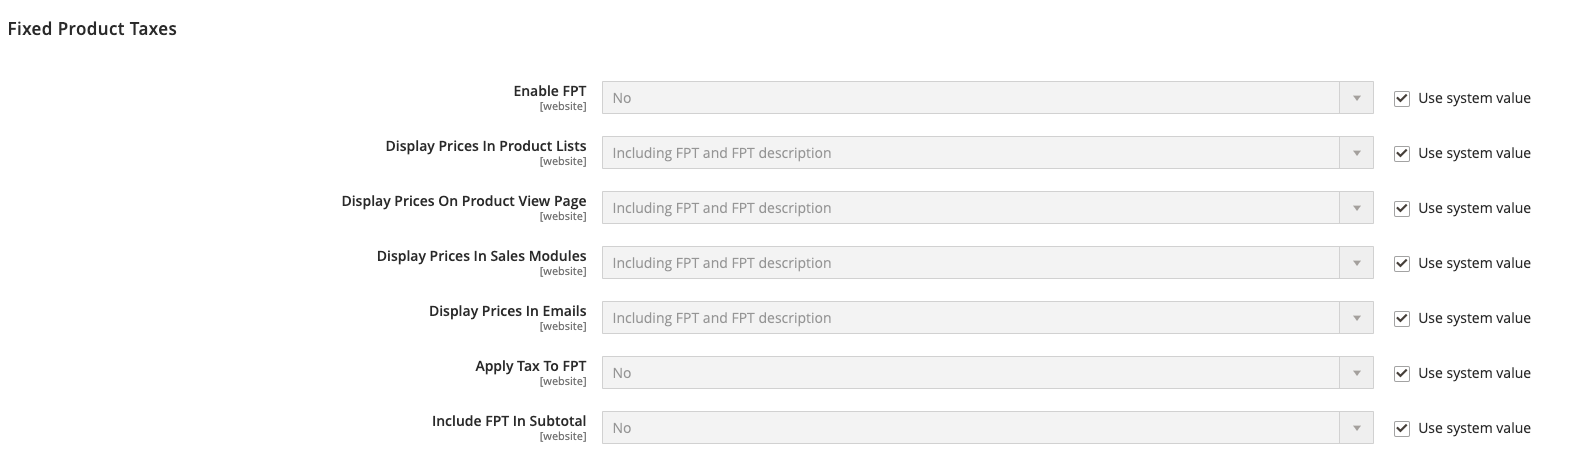
The best way to explain this would be, imagine if some of your products have specific taxes applied to them due to some special tax regulations. It might be some sort of eco-taxes or similar that only apply to certain products in your catalog.
Enabling FPT by itself does nothing, but in combination with a specific product attribute it does something useful.
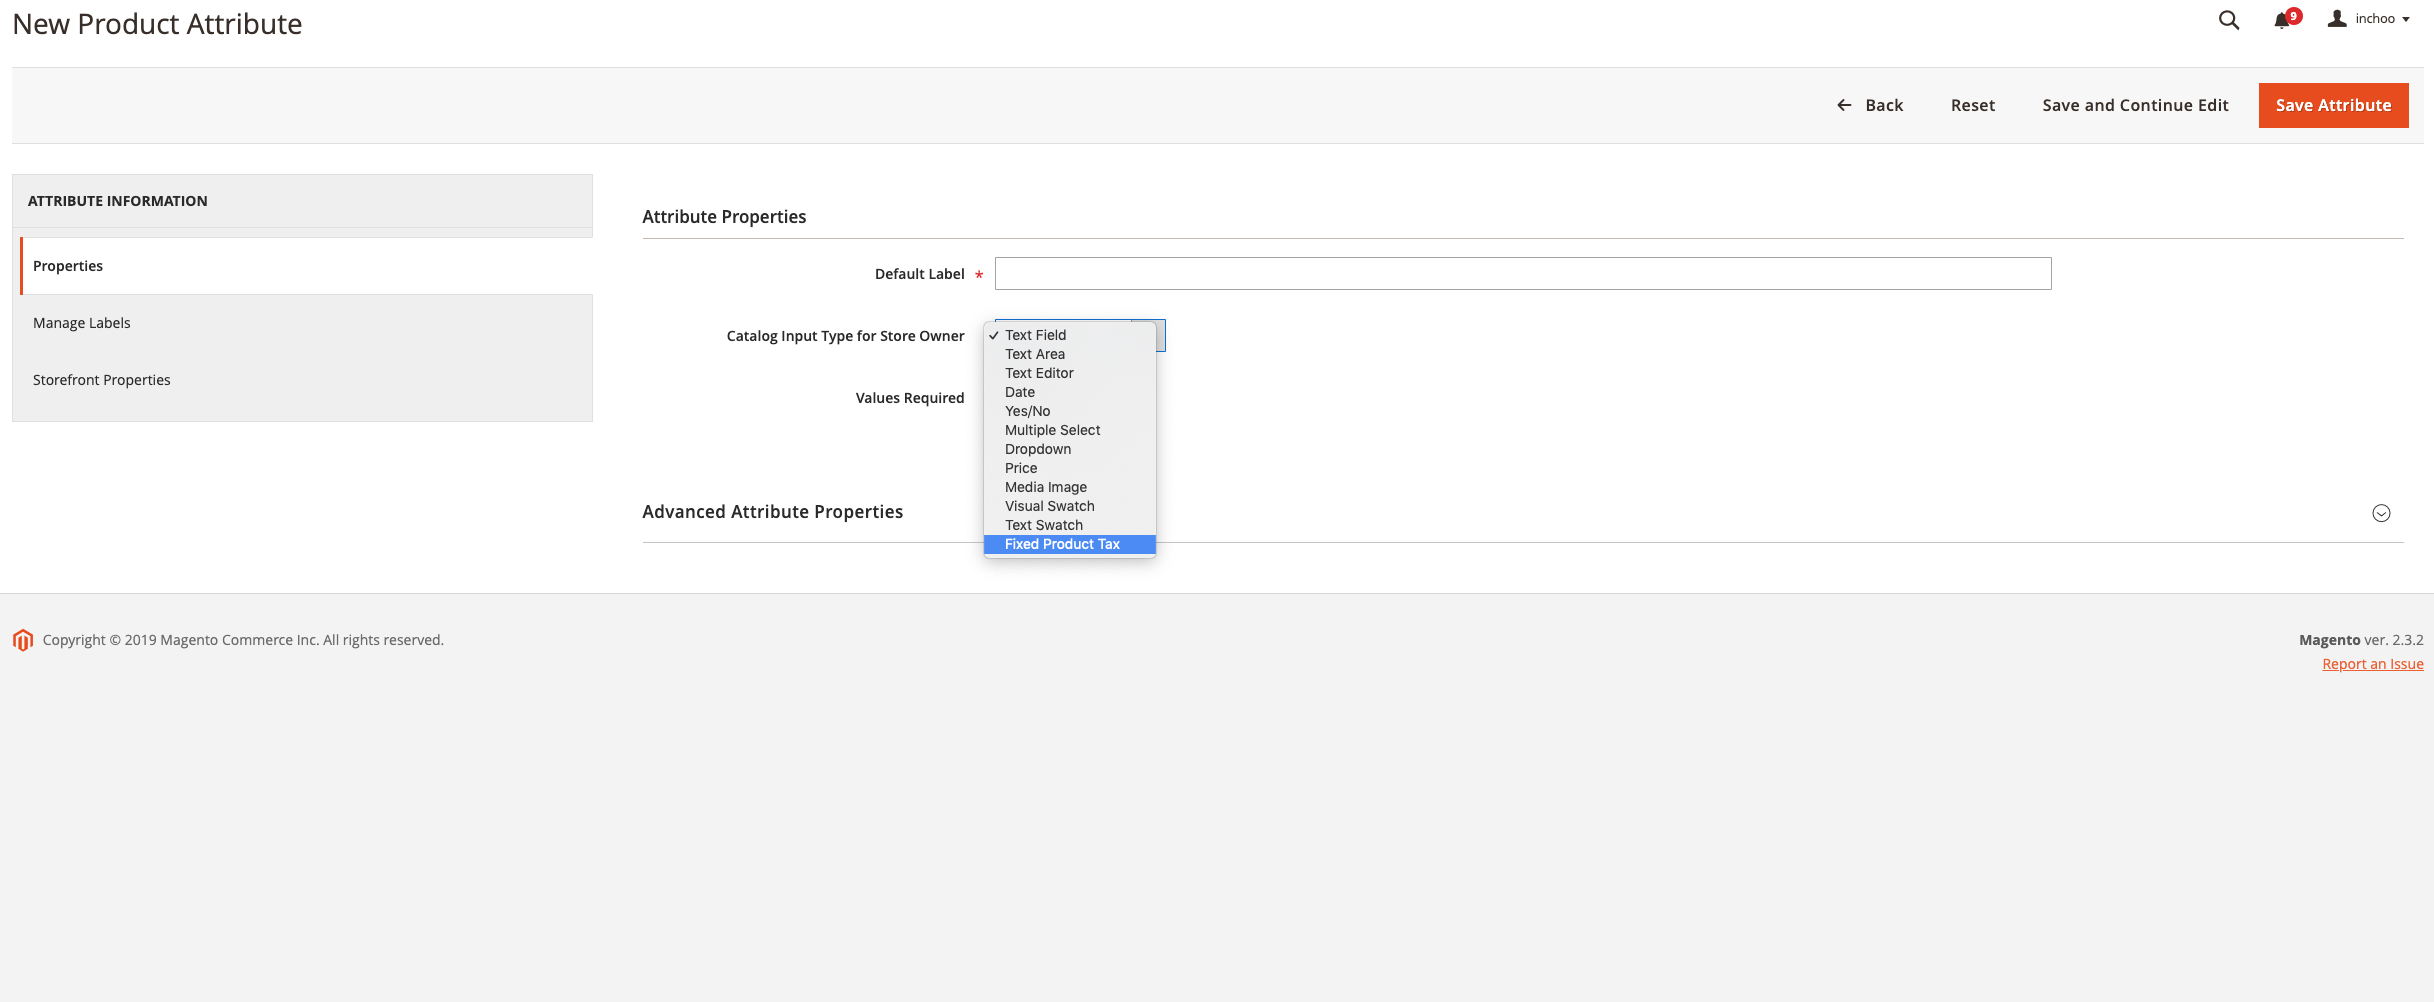
If you navigate to Stores > Attributes > Product and add a new attribute, in the “Catalog Input Type for Store Owner” dropdown you can select “Fixed Product Tax“.
You’ll need to add your FPT attribute to the attribute sets where products with special tax are included by navigating to Stores > Products > Attribute Sets.
Now when you’re creating or editing a product in Magento with attribute set that has FPT attribute within it, you get these FPT options where you can defin specific tax for this specific product within defined Country/State combination:
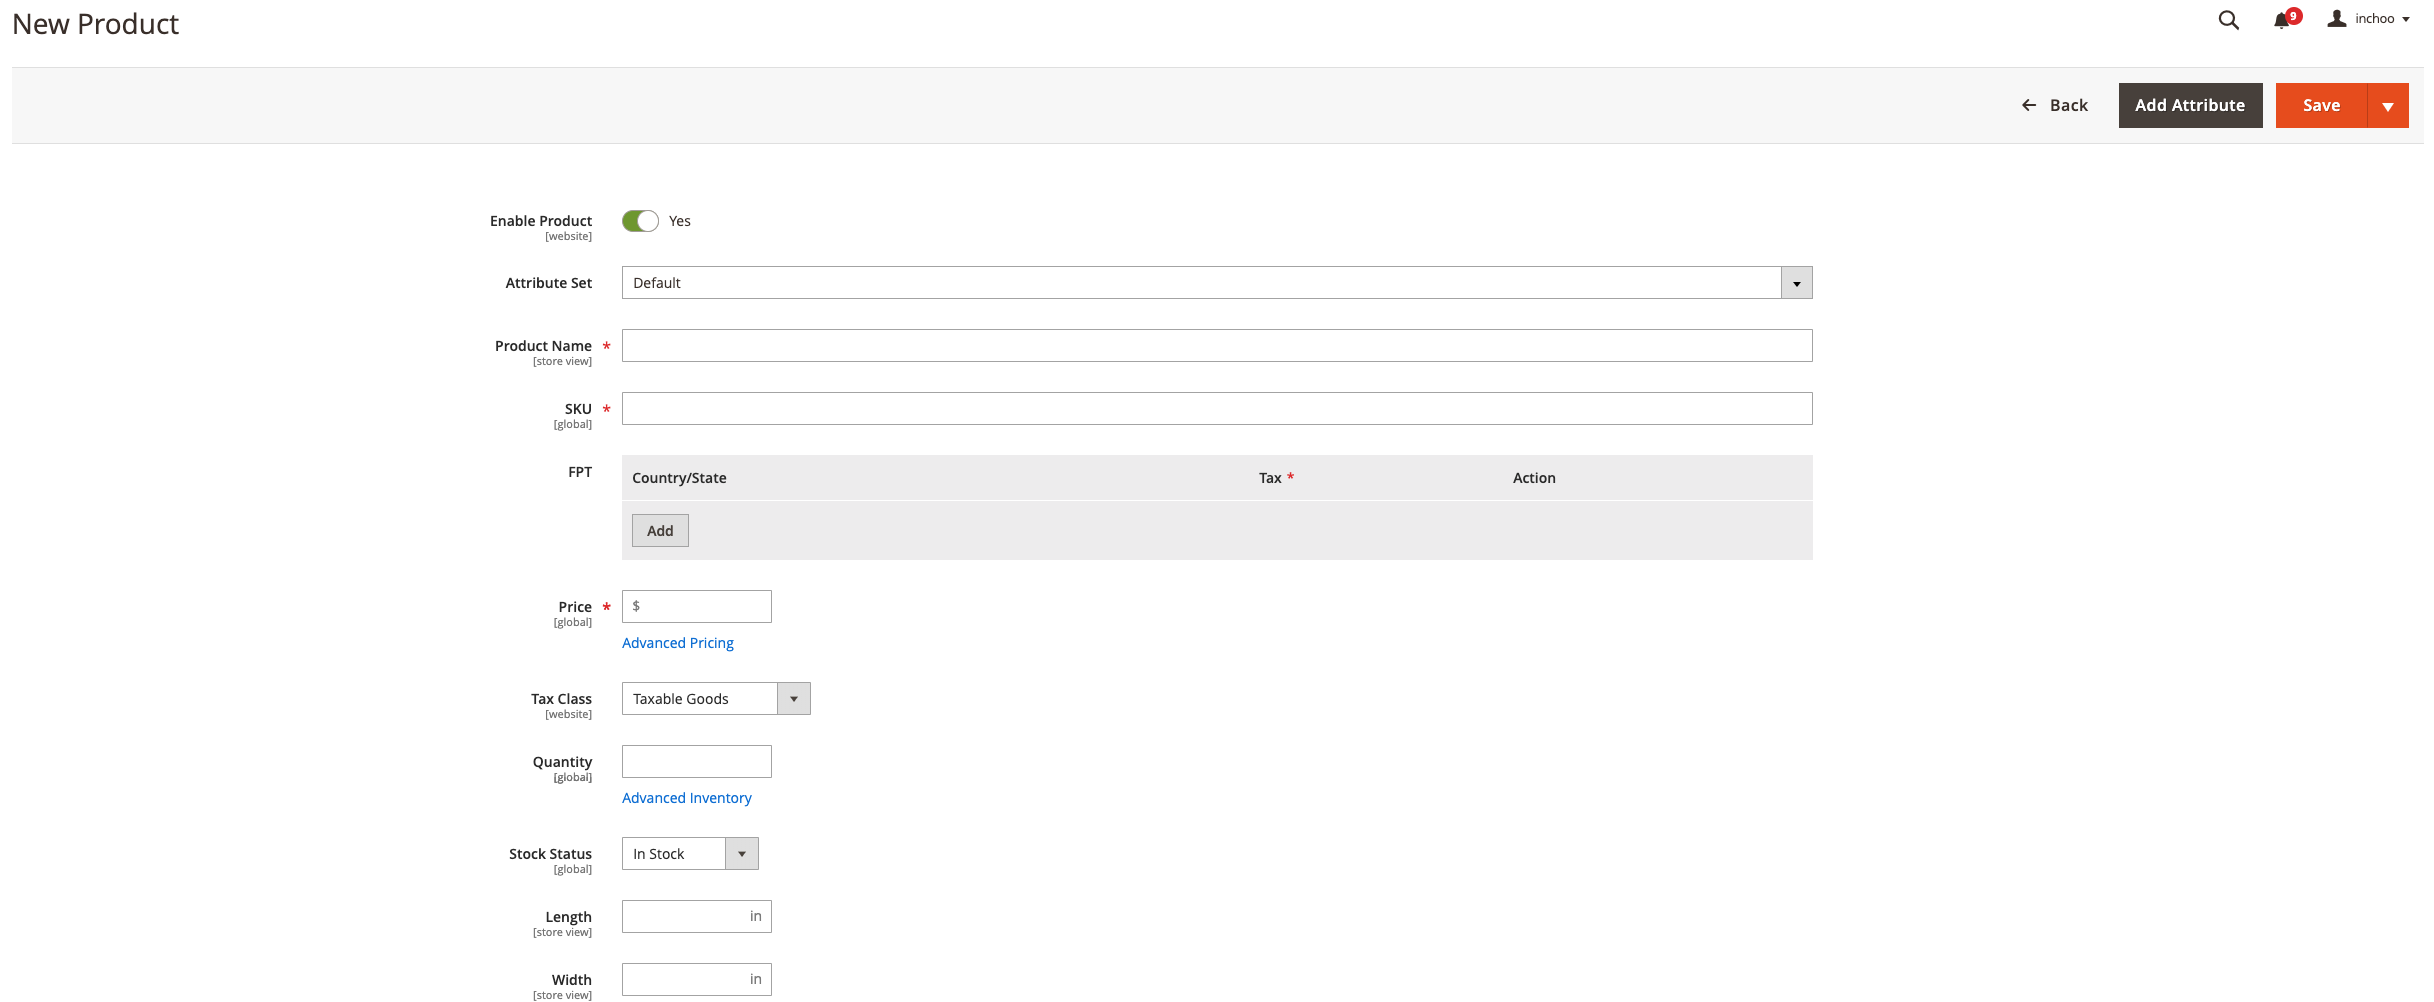
In some cases you can achieve the same outcome by not turning on FPT but instead having a specific product tax class for those products with specific taxes, and creating tax zones/rates and tax rules that trigger on those specific product tax classes, but with FPT it’s easier to manage multiple different specific product taxes as it’s all in one place instead of three places and you have additional options on how these are displayed or calculated in the FPT settings.
How to set up shipping taxes in Magento 2?

As briefly mentioned in this guide, there is no such thing as a shipping tax class entity in Magento 2. Instead, you’ll be assigning a product tax class to all shippings in Stores > Configuration > Sales > Tax > Tax Classes > Tax Class for Shipping.
Depending on your specific market, shipping might be taxable or not in certain conditions.
In our tutorial so far, we have a tax zone/rate and rule defined for California retail customers and products with product tax class “Taxable Goods” configured to collect 7.25% tax. Our Tax class for shipping is still “none”.
If we add one product with product tax class “Taxable Goods” and one with product tax class “none”, the following will be triggered:
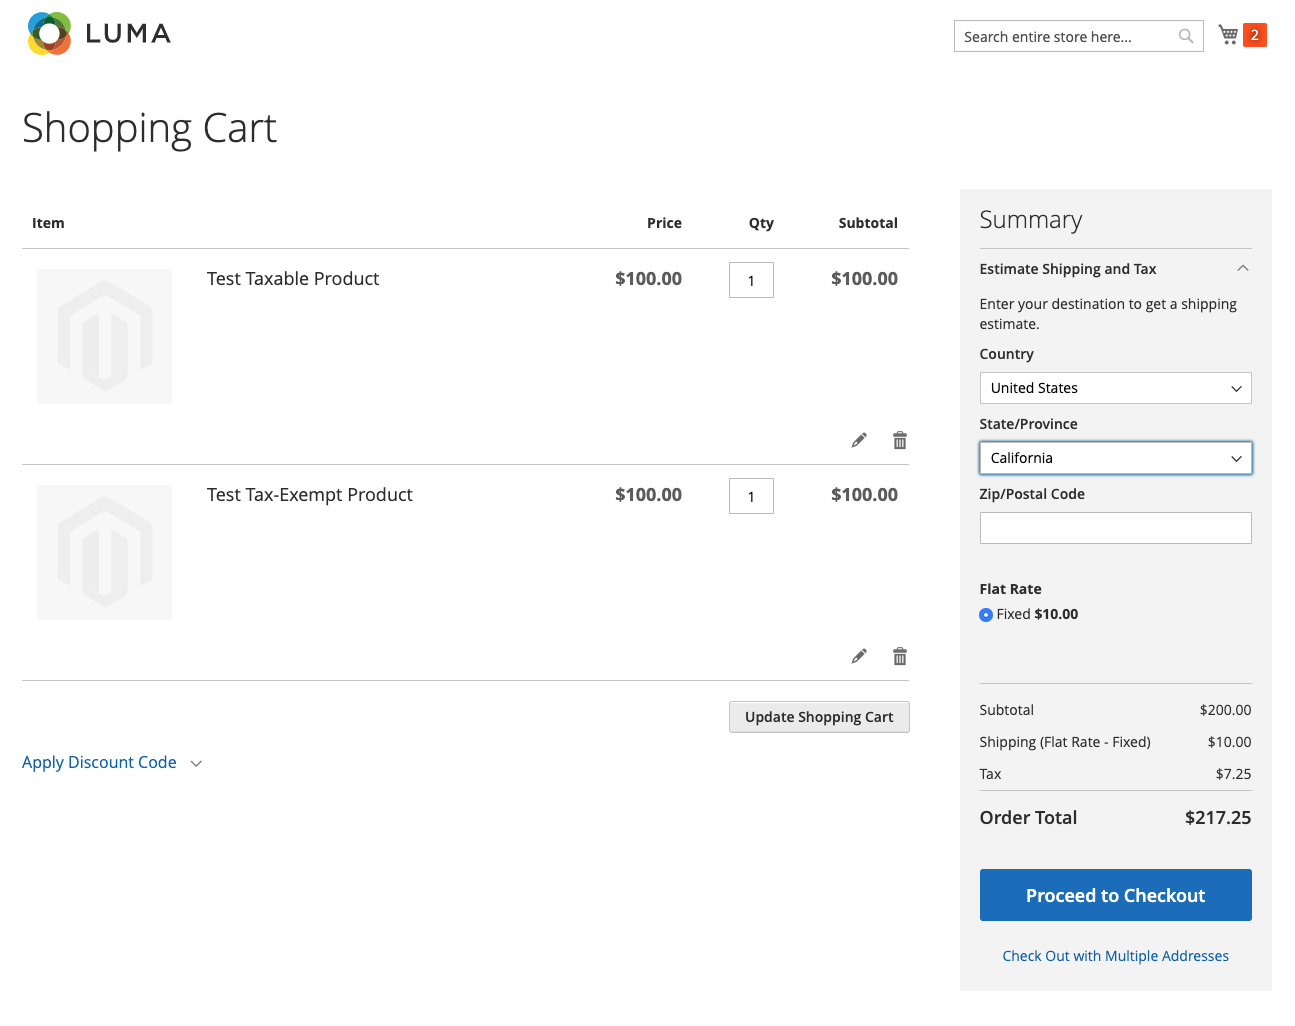
As you can see, 7.25% tax was applied to just $100 of one of the products that was taxable, while the other product and shipping didn’t get taxed.
Now, let’s say your shipping is always taxable, regardless of if the product is taxable or not.
In this case, we would do the following:
1. Create a new product tax class and call it for example “Shipping”
You can do this by editing any tax zone/rate or creating a new one, and under additional settings under “Product Tax Class” click on “Add New Tax Class“.
2. Set the “Shipping” product tax class to be used for shipping
You do this by navigating back to Stores > Configuration > Sales > Tax > Tax Classes > Tax Class for Shipping and selecting “Shipping” in dropdown and hitting save.
3. Adit the rule or rules you have to include the shipping product tax class
In our case, we have just one rule to edit, so we navigate to Stores > Taxes > Tax Rules, and select our “CA-US-Retail-Taxable” rule.
In the “Advanced Settings” we include the “Shipping” product tax class in our multi select along with taxable goods and hit save:
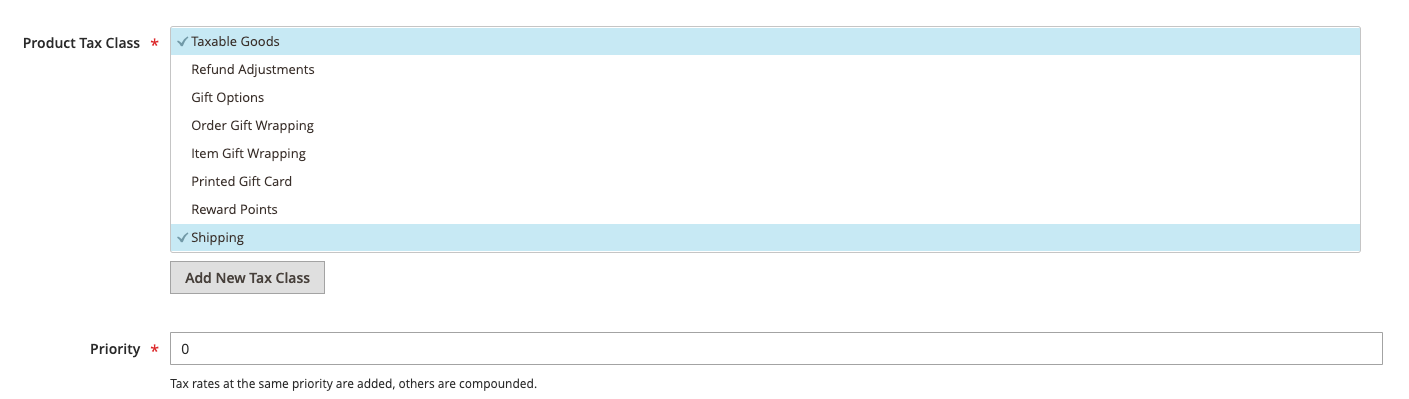
Now, since we never assign “Shipping” product tax class to any of our products, we know it will only trigger for shipping.
The outcome for the end user:

The 7.25% tax rate is applied to both the product with “Taxable Goods” product tax class and to the shipping amount.
To conclude, the best way to figure out how shipping taxes work is if you imagine shipping cost as a virtual product within your cart that always has the product tax class set to whatever you configured for it.
Taxing Configurable Products in Magento 2
While configurable products can hold their own product tax class, when added to cart, the actual tax rate that will apply is the tax rate of the child simple product associated with this configurable product.
To demonstrate this, we’ve created a configurable product that varies by color. One color is taxable and has “Taxable Gods” product tax class, while the other is non-taxable and has “none” assigned as a product tax class. Even though the configurable product itself has “Taxable Goods” product tax class assigned, adding both those options to cart results in this:
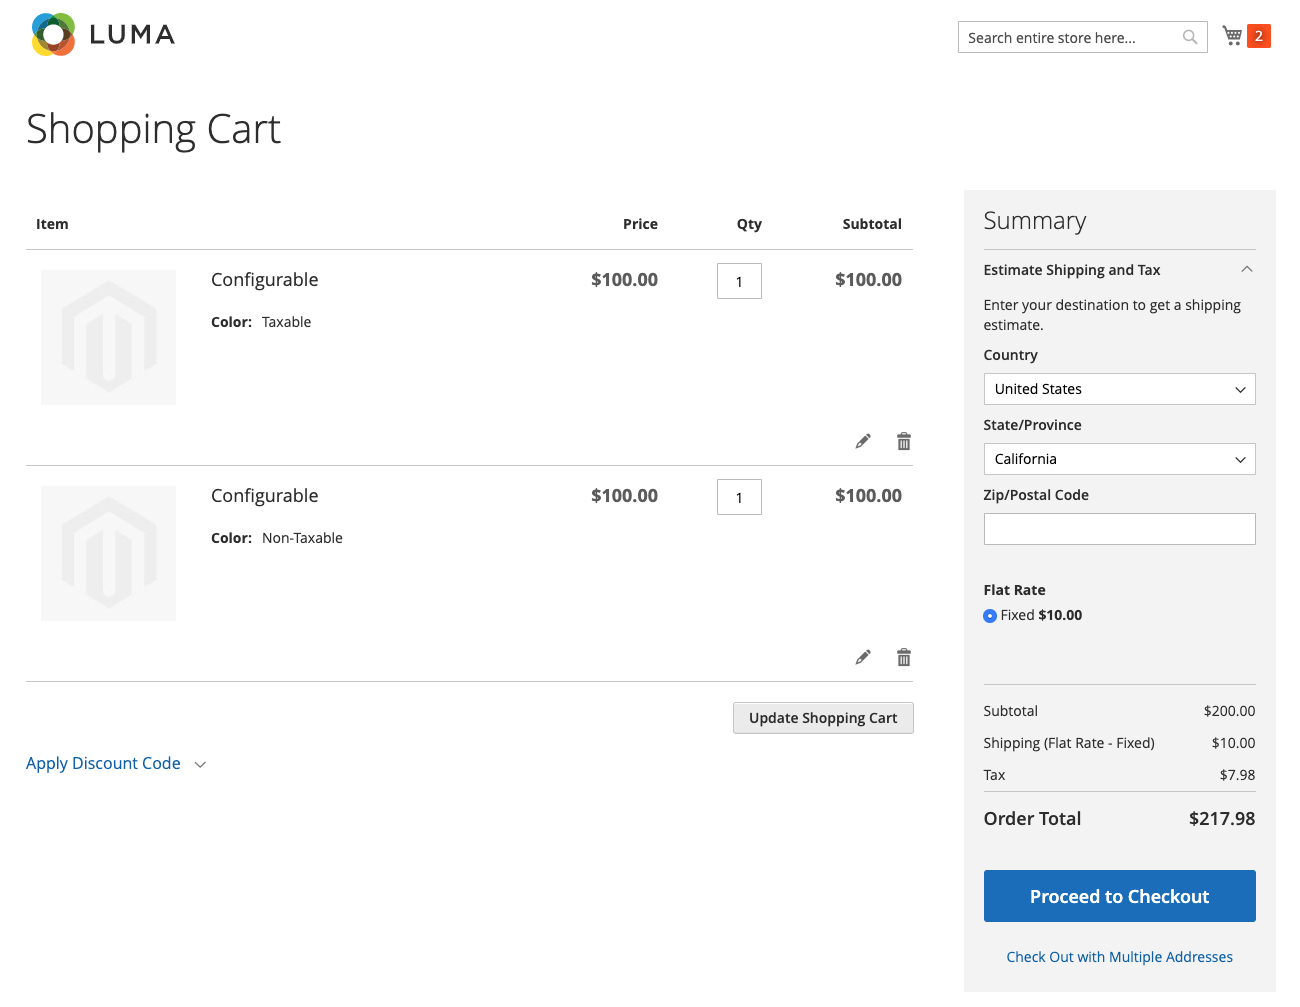
Taxes are applied to the option for which the simple associated products have “Taxable Goods” tax class and to shipping amount while the option which has “None” didn’t get taxed.
An example of where this feature comes in handy is for example if you’re selling clothes in the UK and for certain age groups your VAT is reduced, for certain it’s 0 and for certain it’s full VAT. So the size of your simple product influences the amount of tax that should be calculated. By having separate product tax classes for these sizes, simple products that actually hold the value of the size attribute can have their taxes adjusted accordingly and work properly with your tax setup in combination with configurable product functionality.
How to set up tax-exempt customers in Magento 2
If you’re selling B2B or in some other instances, you might have some customers who are tax-exempt and should not be calculated sales tax or VAT on their orders.
To achieve this, we will use a combination of Customer Groups, customer tax classes, and tax zones/rates and rules.
1. Navigate to Stores > Taxes > Tax Rules
We need to create a new customer tax class, and we can only do that by editing an existing tax rule within Magento or by creating a new rule.
Under additional settings in Customer Tax Class, click on the add new tax class button and create a new customer tax class “Tax-exempt”.
2. Assign the new customer tax class to a specific customer group
In Magento admin navigate to Customers > Customer Groups.
Edit the group you want to be tax-exempt or create a new one, let’s say “Wholesale” and set this customer group’s tax class to “Tax-exempt”.
3. Assign customers to the customer group
Under Customers > All Customers, while creating a new customer or by editing existing customers, you can choose the “Wholesale” customer group for this customer.
That’s it. Since there is no rule that triggers any tax defined for customers within this customer tax class, these customers will not be taxed on their orders.
Importing Magento 1 Tax Rates into Magento 2
If you are a merchant with complex tax setup migrating from Magento 1 to Magento 2, the good thing is a part of this manual work can be avoided by exporting your Magento 1 tax rates and importing them into Magento 2.
1. In Magento 1 admin navigate to Sales > Tax > Import / Export Tax Rates
You will have a csv file generated and downloaded to your machine. It will contain all of your zones and rates, but not tax rules.
2. Import them into Magento 2
In Magento 2 admin navigate to Stores > Taxes > Tax Rules, create a new rule or edit an existing one and select the file you downloaded from Magento 1 and hit import.
You might have to adjust for subtle differences in Magento 1 and Magento 2.
For example, in Magento 1, Puerto Rico was a country, while in Magento 2, Puerto Rico is a state within the USA, so import will not work until you correct that in the CSV file.
Generally about taxes in eCommerce
If you’re a merchant setting up your first eCommerce store reading this guide, or if you’re working in an agency which is doing this for the first time, you could notice this guide shows you how to set up your taxes technically within Magento 2, but it doesn’t explain how to determine what is the proper tax setup for you.
If we were to attempt and explain that, this guide would turn into a book, however, we will give you some pointers.
Sales Tax for eCommerce merchants in the USA
In terms of technical setup, you may use this Magento’s official guideline as a starting point, but do not blindly apply it to your case without researching terms below. For example, the guideline advises setting “Tax Class for Shipping” to “None”, while in reality, many states do tax shipping.
Here are some things you want to research:
- What is “Sales tax nexus“
- State and local sales tax rates
- What are origin-based and destination-based states in terms of sales tax
- Is shipping taxable in states where you have sales tax nexus
- Shipping vs handling fee
- What is economic sales tax nexus
VAT for eCommerce merchants in Europe
You will most likely be able to figure out how to set up your country’s specific taxes on your own. Issues might arise once you start shipping to other EU countries.
Here’s Magento’s recommended setup for some of the European examples.
Please also note, within the EU, there’s a thing called VAT threshold. Each Eu country has a certain amount you can sell to its residents in a year before you’re required to register for VAT in that country and start charging that country’s VAT to customers from that country. This means your entire tax setup becomes a bit more complex.
Here’s a nice list of thresholds for each country.
What’s next?
Hopefully, you’ve found this blog post useful and it can help you understand the tax setup in Magento 2 a little bit better. If you believe you need help with your tax setup or anything else related to eCommerce, please don’t hesitate to contact us!