Last few weeks, i often see confused people asking questions about difference between Magento’s API v1 and v2, and also bunch of questions about how to use WSDL and WS-I files when developing own or extending existing Magento soap API v2.
It is obvious that short articles about specific Magento API parts will not help them to get the bigger picture about Magento core API v2. Because of that, I decided to demystify practical usage of Magento API v2 and also to explain difference when using v1 and/or v2 API.
Let’s start from beginning, to everything clear later:
SOAP basics
SOAP = Simple Object Access Protocol. It is based on XML mostly via HTTP (POST).
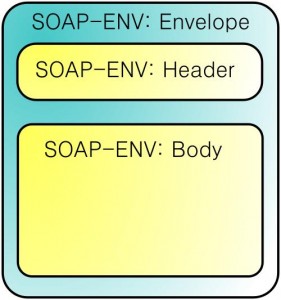
Soap basic structure is basically Envelope with Header and Body inside:
Some example SOAP message looks like this:
POST /InStock HTTP/1.1
Host: www.example.org
Content-Type: application/soap+xml; charset=utf-8
Content-Length: 299
SOAPAction: "http://www.w3.org/2003/05/soap-envelope"

<?xml version="1.0"?>
<soap:Envelope xmlns_soap="http://www.w3.org/2003/05/soap-envelope">
  <soap:Header>
  </soap:Header>
  <soap:Body>
     <m:GetStockPrice xmlns_m="http://www.example.org/stock">
     <m:StockName>IBM</m:StockName>
     </m:GetStockPrice>
  </soap:Body>
</soap:Envelope>
WSDL
WSDL stands for: “Web Services Description Language”. It is basically XML – based language that is used for describing the functionality offered by a web service.
There are two possible versions of WSDL: WSDL 1.1 and WSDL 2.0. Since Magento uses WSDL 1.1, I will continue with this WSDL version in this article.
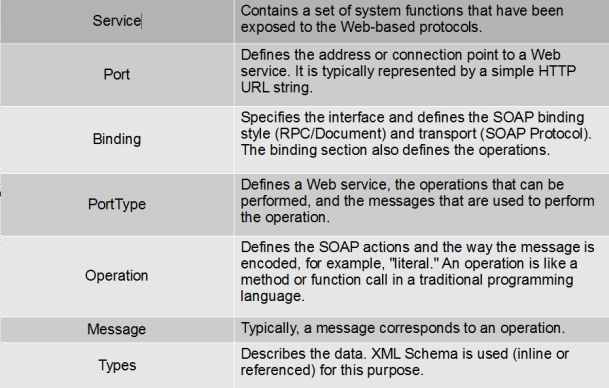
Objects in WSDL
Magento Core API
There are two API types present in Magento by default (I am talking about Magento versions 1.6.2CE and below):
- XML-RPC
- SOAP (API v1 and v2)
More on API types and differences you can find in post: Consuming SOAP web services in iOS by Ivan Kalaica
Accessing Magento API via SOAP – basic steps
- Create appropriate role (Magento Admin)
- Create web services user (Magento Admin)
- Assign created role to the user (Magento Admin)
- Log-in to web service and retrieve Session Id (Soap Client)
- Call appropriate method (Soap Client)
Creating Web Service Role
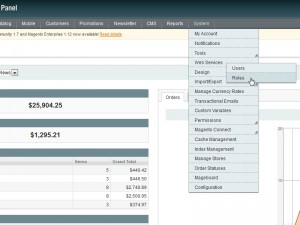
First we should define appropriate roles for web services user, so, log-in to admin panel, go to menu: System/Web services/Roles and click on Add New Role button.
On “Role info” tab, we need to enter some custom Role name, and then click on Role resources tab, choose wanted role resources and Save Role.
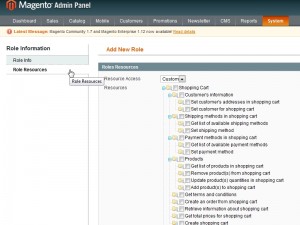
Role resources necessary for usage with API are basically defined in each Magento module’s api.xml file in etc folder, and can be checked there what role resources are needed for successful consuming specific API method.
Creating Web Service User
After creating role, let’s create web services user that will have defined role permissions.
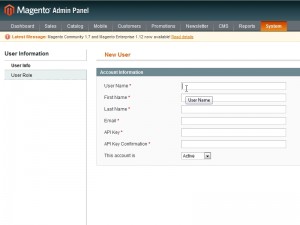
Go to menu: System/Web Services/Users and click on “Add New User” button. Under “User Info” tab fill the fields, and pay attention that “User Name” and “API key” values are values that we will use on client side to access API.
Assigning created Role to the User
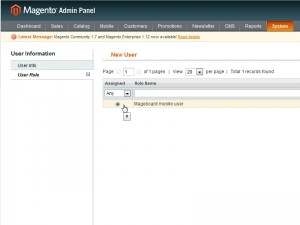
After that, we just have to click on User Role tab and click on radio-button to assign wanted role to current user.
After that we just need to click Save User button.
Calling Magento API v1 methods
<?php

$api_url_v1 = "http://magento.local/api/soap/?wsdl=1";

$username = 'mobile';
$password = 'mobile123';

$cli = new SoapClient($api_url_v1);

//retreive session id from login
$session_id = $cli->login($username, $password);

//call customer.list method
$result = $cli->call($session_id, 'customer.list', array(array()));
Calling Magento API v2 methods
<?php

$api_url_v2 = "http://magento.local/api/v2_soap/?wsdl=1";

$username = 'mobile';
$password = 'mobile123';

$cli = new SoapClient($api_url_v2);

//retreive session id from login
$session_id = $cli->login($username, $password);

//call customer.list method
$result = $cli->customerCustomerList($session_id);
If you compare those two versions of API calls, you will notice that v1 uses method “call” for ever requested method, and v2 has defined full method name to call.
//API v1 way
$result = $cli->call($session_id, 'customer.list', array(array()));

//API v2 way
$result = $cli->customerCustomerList($session_id);</pre>
Basically, API v2 calls method same way like v1, but there is some kind of wrapper around call method in v2. Somebody will ask: Why Magento did something like this? Why would somebody make different methods for accessing API when we have “call” method already?
Here comes the basic difference between v1 and v2 API in Magento.
To demystify that, we should first look at and compare WSDL for v1 and v2 API in Magento.
If we open url: http://yourserver.com/api/soap/?wsdl we can see that few basic method are inside: call, multiCall, login etc…
But, if we look at http://yourserver.com/api/v2_soap/?wsdl, we will find that there is bunch of methods defined inside.
Imagine that you want to use some generator for SOAP methods to auto-generate your client-side classes end entities for consuming web services.
When using WSDL generated for API v1, we could just generate those few methods which will not tell to our source code generator what methods are available, and what parameters for each methods can we use, what entities we should have on client side … but if we are consuming web services through v2 API, it’s already served for us inside WSDL…
Conclusion:
When using Magento v1 API, we access resources via call method and provide API method name and parameters as parameters of call method.
When using Magento v2 API, we access resources via real method name and we provide parameters as defined in WSDL for each specific method.
OK. When we got this difference, and showed how to consume SOAP, let’s focus on creating own web service methods compatible with API v2.
Practical example: Creating own API v2 method
Basic steps:
1. Create Magento Extension (we are not going explain here how to do it)
2. Create Model for API method
3. Create and configure api.xml file
4. Create wsdl.xml file (with proper definitions)
5. Create wsi.xml file (with proper definitions) (OPTIONAL)
Creating Model for API v2
After properly configuring our config.xml it looks like this:
<?xml version="1.0"?>

<config>
   <modules>
      <Inchoo_Mapy>
         <version>1.0.1</version>
      </Inchoo_Mapy>
   </modules>
   <global>
      <models>
         <inchoo_mapy>
             <class>Inchoo_Mapy_Model</class>
         </inchoo_mapy>
      </models>
   </global>
</config>
Let’s navigate through Magento core files to see where Magento API models are in file-system:
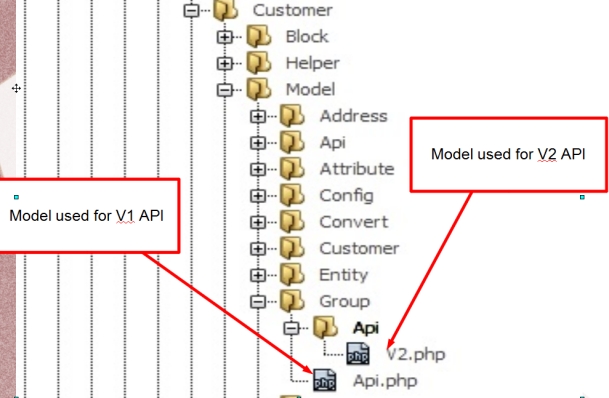
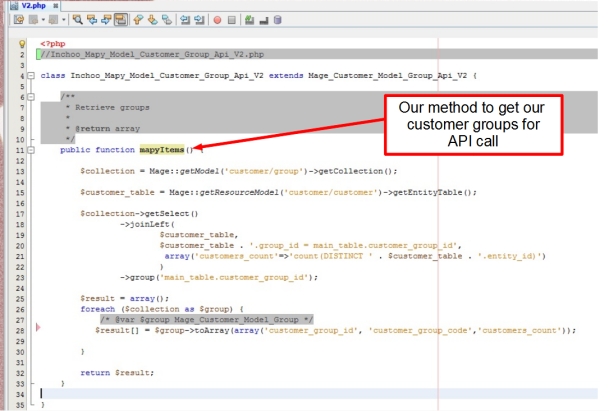
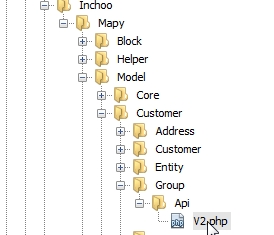
Since we are going to use API v2 only, We will create our model like this:
Creating and configuring api.xml
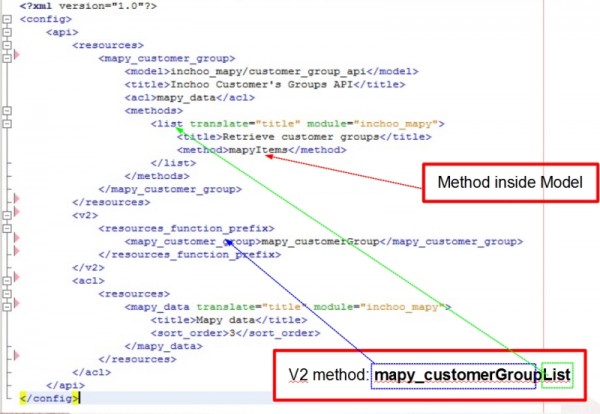
The easiest way is to copy/paste one of Magento’s api.xml files in our etc folder and make changes there to suit our needs. Our final api.xml should look like this:
<?xml version="1.0"?>
<config>
   <api>
     <resources>
     <!-- START GUSTOMER GROUP RESOURCES -->
       <mapy_customer_group>
            <model>inchoo_mapy/customer_group_api</model>
            <title>Inchoo Customer's Groups API</title>
            <acl>mapy_data</acl>
            <methods>
              <list translate="title" module="inchoo_mapy">
                  <title>Retrieve customer groups</title>
                  <method>mapyItems</method>
              </list>
            </methods>
       </mapy_customer_group>
     <!-- END CUSTOMER GROUP RESOURCES -->
    </resources>
    <v2>
      <resources_function_prefix>
           <mapy_customer_group>mapy_customerGroup</mapy_customer_group>
           </resources_function_prefix>
    </v2>
    <acl>
       <resources>
           <mapy_data translate="title" module="inchoo_mapy">
              <title>Mapy data</title>
              <sort_order>3</sort_order>
           </mapy_data>
       </resources>
    </acl>
  </api>
</config>
Here is logic that has to be implemented in api.xml file. Api.xml file basically connects API calls with php methods inside specific models. Also, the ACL resources are defined here for specific api call.
 <
<
Creating wsdl.xml file
When working with wsdl.xml and wsi.xml later, if you are happy NetBeans user, I strongly suggest you to search on Google and download the XML Tools plug-in that can make life much easier …
There are few things that we have to fill-in when creating wsdl.xml.
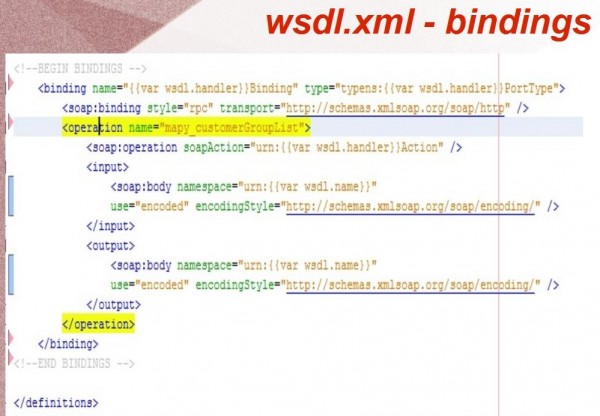
- Bindings
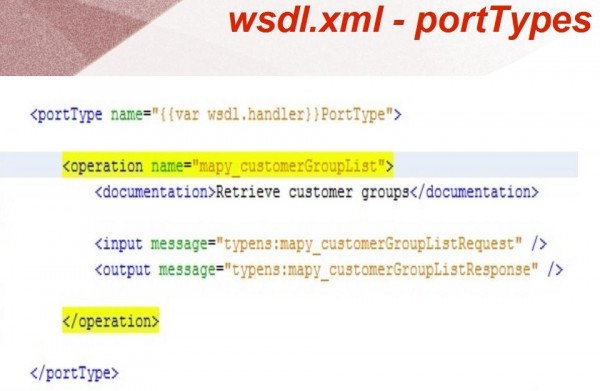
- Port types
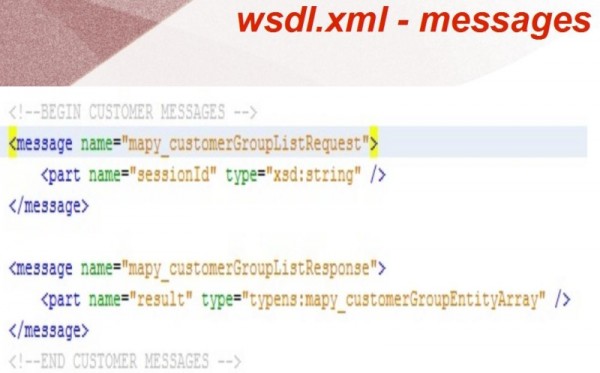
- Messages
- Types / Complex types
Also, it’s easier to copy one of Magento’s wsdl files, paste it in our etc folder and remove unnecessary things and add our own inside.
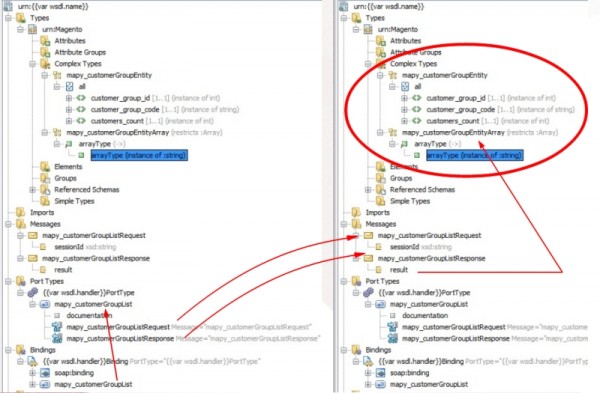
Here is NetBeans – XML Tools screen-shot how this look like:
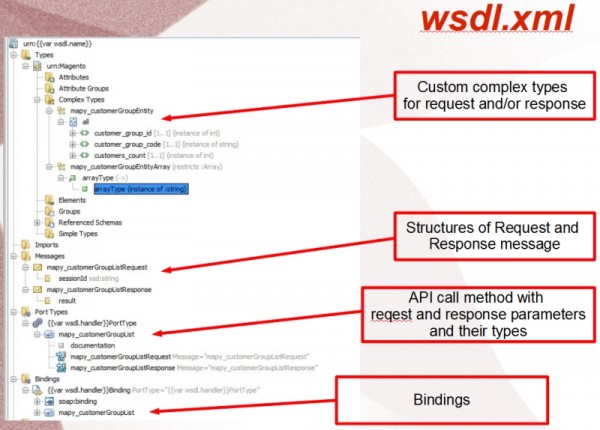
This image is showing logic and direction how should we fill-in wsdl.xml:
Let’s now look at real xml source:
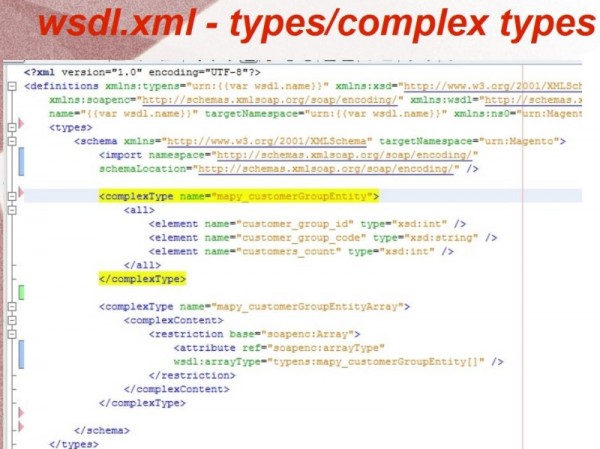
After we finished with wsdl, let’s go to http://ourmagento/api/v2_soap/?wsdl=1 to see changes in global wsdl we made. (Don’t forget to clear cache first!).
We can see that all wsdl.xml files including ours are rendered as single.
All available wsdl definitions for current Magento installations are shown and our definitions should be there.
Now we are ready to use our newly created SOAP method.
But, if we want use some generator for client classes with that, for example SUDZC (http://sudzc.com) we need to make one more thing in order to make it possible…
WSI
– WSI is in basic compatibility layer for different frameworks and provides a little bit more information that can be used for example with XSLT to transform definitions into our client source code.
– It’s not essential in order web services to work.
– It is rendered when: Magento admin: System/Configuration/Services/Magento core API/WSI-Compliance configuration value is set to “YES”.
We could say that following sections we have to fill-in inside, in order to add our definitions properly:
- Bindings
- Port types
- Messages
- Types / elements
- Types / complex types
Let’s copy/paste one of Magento’s wsi.xml inside our etc folder first. After that, let’s delete all unnecessary definitions for our SOAP method.
Adding definitions inside WSI except for slightly different definitions are basically the same as for wsdl.xml. If you are using existing wsi.xml, it’s easy to delete unnecessary and rename few nodes to suit your needs. Just follow the rule to fill all of this in the above list (Bindings, Port types … ).
Here you can download archive with basic wsdl.xml, wsi.xml, api.xml so you can easier start writing your own web service methods. Just put these files in your etc folder, rename appropriate things with your own and that’s it.
That would be all for now. If interested in Magento API, stay tuned. In case you would like to make your store even better, feel free to drop us a line. Our technical audit is designed to identify not only problems but also solution when dealing with Magento mysteries!

