Use browsersync in Magento frontend development workflow

As a frontend developer today you have tons of tools at your disposal. In everyday use you will need at least one tool which will be assigned to watch, process, generate, clean, minimize code. I will try to convince you to start using one which can be great assistant in modern frontend workflow. I will talk about Browsersync.io.
So, what is borwsersync!?
BrowserSync makes your tweaking and testing faster by synchronising file changes and interactions across multiple devices.
Started first as live reloader, you know, open your site in browser then write a few lines of code, hit refresh, go back to code, edit the code, back to browser refresh, open second browser, resize it, refresh, then repeat… You remember :-). By using Browsersync you can avoid all that “unneeded” repeated tasks and save time and money.
So, browsersync is node.js module which started and behaves as a standalone server and you can use it with other local servers, apache for example, as proxy server. It injects small script into every page which communicates with the server via WebSockets. When an event occurs — such as a file modification or scroll action — the server sends an update notification to all connected devices.
Some of the key features that comes with browsersync:
- Scroll on one browser; other browsers follow the scroll to the same point
- Click links; other browsers load the clicked URL
- Fill out & submit forms; other browsers submit
- Test responsive designs; see your site rendered on different devices at one time
- Change HTML, CSS & JS; automatically inject those new files without a page refresh
And also have great looking UI where you can have overview of all available tools and important info. You can find UI in browser typing https://inchoo.net:3001, URL address will be shown in terminal/console window.
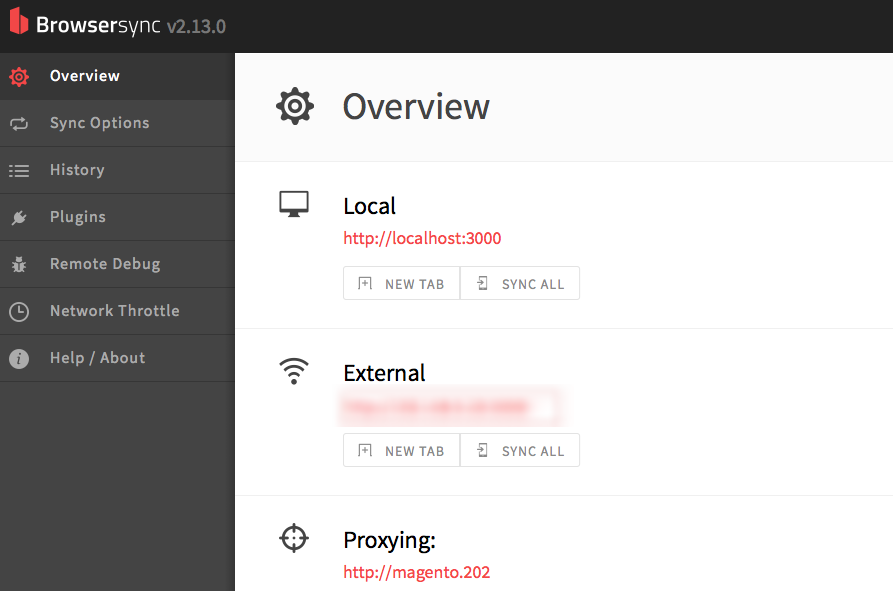
Browsersync UI
Browsersync can be used in various ways, it depends on your personal preference and also on your current frontend workflow. You can use it under gulp.js or grunt.js task or my personal choice – as a standalone console tool.
Let’s start with the installation.
We believe you already have installed node.js so we will skip installation of node. There are two options: global and local installation. Global means that you can start browsersync in any directory, and local for each project separate, you decide.
Global:
npm install -g browser-syncLocal:
npm install browser-sync --save-devIf you are running Mac OSX, please don’t use “sudo” if you encounter error in installation, please check NPM permissions.
After installation let’s start with some basic things
browser-sync --version
browser-sync start --helpGreat things about browsersync is that you can write down recipes and reuse it on different project. Or maybe to run different task on one project.
Recipes are stand-alone examples of how to use Browsersync alongside many other popular tools. Each example can be run separately and is a great way for newcomers and pros alike to get their heads around the different use-cases that are possible.
Checkout github for full list of recipes.
# List all available recipes
$ browser-sync recipe ls

# Copy files for gulp.sass recipe
$ browser-sync recipe 'gulp.sass'

# Copy files for gulp.sass recipe into custom output directory
$ browser-sync recipe 'gulp.sass' -o 'my-project'
Please note you need to install globally browsersync to get recipes command!
Please refer to documentation where you can find more examples and guides.
Using in Magento 2 development
So, what about Magneto? In Magento 2 version they introduce new frontend workflow using grunt as a task runner and livereload.js as a “watcher” for changes inside .less/.css files.
For livereload you need to have installed browser extension. It is not my thing to go with inside browser development so I choose browsersync over livereload. This is my personal choice, it’s up to you to find comfortable environment for development.
If you have already created custom theme in Magneto2 and at least played with .less files you are familiar with the frontend workflow. I have already created custom theme “inchoo” and am using grunt as a task runner:
grunt clean:inchoo
grunt exec:inchoo
grunt less:inchoo
grunt watch
To start using browsersync go to pub static folder where are static files generated and simply watch changes.
cd magento-dir/pub/static/frontend/Inchoo/green/en_US/cssStart watching with this command
browser-sync start --proxy 'magento.local.address' --files="*.css"
Stanislavs-MacBook-Pro:css stamba$ browser-sync start --proxy 'magento.202' --files="*.css"
[BS] Proxying: http://magento.202
[BS] Access URLs:
 -------------------------------------
       Local: https://inchoo.net:3000

 -------------------------------------
          UI: https://inchoo.net:3001
 -------------------------------------
[BS] Watching files...
After I have made changes in custom .less file, grunt picks up on this, calls PHP, generates new css inside pub/static folder after which browsersync “listens” and serves inside browser changes.
[BS] Proxying: http://magento.202
[BS] Access URLs:
 -------------------------------------
       Local: https://inchoo.net:3000

 -------------------------------------
          UI: https://inchoo.net:3001

 -------------------------------------
[BS] Watching files...
[BS] File changed: styles-m.css
[BS] File changed: styles-l.css
So, here you go, if you think that this will be of use and addition to your current workflow please write it down in comments and especially if you have something to add or change on this topic.
Thanks.


4 comments
Thank you for this helpful tip!! Much appreciated!
Is there a way to let browser-sync inject the changes?
So far I’ve only managed to set it up for a full reload…
Does not work. I called the external URL e.g. http://redesign.company.de:3000 but I get timeout.
Cannot login using Browsersync any ideas?
I’d Love to know how you use Browser Sync in a multi-store setup. often we use a child theme for each store inheriting from a common parent, so when we are making changes to that parent we need to check each store. is it possible to use multiple browser sync proxies to achieev this?