After half a year we are back on Pimcore development. Since last time, Pimcore 4 has been released and it’s already in 4.3 version. I have been writing about portlets and now it is time to go much deeper in extending Pimcore. First of all, best reference for Pimcore development is their own documentation, you can find it at https://www.pimcore.org/wiki/. Pimcore can be extended with plugins, or by writing code in website folder, but we’ll cover plugins.
Plugin creation
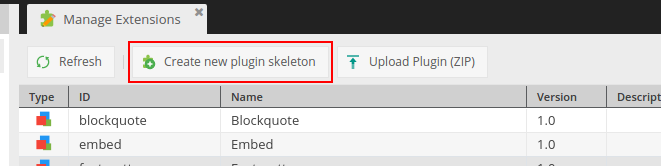
You can create plugin in two ways: manually create structure and files in plugins folder or create plugin skeleton from admin panel. The second way will save you some time and it will ensure you have all needed for plugin to work – final structure and code should be the same. First login to admin panel and on the left side of menu choose Tools→Extensions, it will open extensions panel, and on panel toolbar select button “Create new plugin skeleton”:
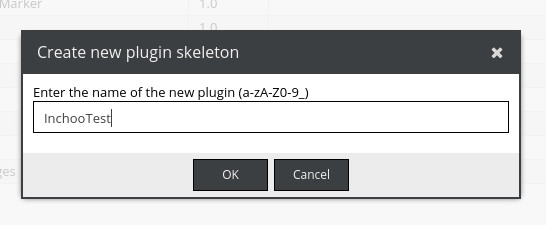
you will be prompted to enter plugin name, for testing we’ll enter InchooTest:
Now we have created plugin, but we still need to enable it. In extensions grid you can see green plus icon (+) to enable plugin and you have the option to remove plugin (red x icon). After enabling plugin you will get message to reload pimcore – for having plugin active we need to reload. Your plugin is created in plugins folder: pimcore_root/plugins.
Plugin structure
After we have created plugin let’s continue with structure analysis. Plugin for Pimcore is configured from plugin.xml located in plugin root. For configuration you will enter all data necessary for plugin to work. We’ll cover most important parts of configuration:
<?xml version="1.0"?>
<zend-config xmlns_zf="http://framework.zend.com/xml/zend-config-xml/1.0/">
     <plugin>

            <!-- the plugin name [A-Za-z_] -->
            <pluginName>InchooTest</pluginName>

            <!-- a short description -->
	    <pluginDescription><![CDATA[]]></pluginDescription>

            <!-- meta data -->
            <pluginVersion>1.0</pluginVersion>
            <pluginRevision>1</pluginRevision>
            <pluginBuildTimestamp>0</pluginBuildTimestamp>

            <!-- put in the URL for the plugin configuration eg. /plugin/InchooTest/admin/index -->
            <pluginIframeSrc></pluginIframeSrc>

            <!-- className of the plugin which extends Pimcore_API_Plugin_Abstract-->
	    <pluginClassName>InchooTestPlugin</pluginClassName>

            <!-- include paths relative to plugin-directory -->
	    <pluginIncludePaths>
	         <path>/InchooTest/lib</path>
	    </pluginIncludePaths>

	    <!-- namespaces to register with autoloader-->
	    <pluginNamespaces>
		 <namespace>InchooTest</namespace>
	    </pluginNamespaces>

	    <!-- js files with path relative to plugin-directory -->
	    <pluginJsPaths>
                <path>/plugins/InchooTest/static/js/startup.js</path>
                <path>/plugins/InchooTest/static/js/test.js</path>
	    </pluginJsPaths>

	    <!-- css files with path relative to plugin-directory -->
	   <pluginCssPaths>
                <path>/plugins/InchooTest/static/css/example.css</path>
	   </pluginCssPaths>
     </plugin>
</zend-config>- pluginName – plugin name, displayed in extensions grid
- pluginDescription – plugin descriptions, displayed in extensions grid
- pluginVersion, pluginRevision, pluginBuildTimestamp – plugin meta data related for version, revision and timestamp when plugin is built
- pluginIframeSrc – configuration path for plugin
- pluginClassName – main class for plugin, path is located in pimcore_root/lib
- pluginIncludePaths – here you can enter multiple paths for autoloader, all classes in pths will be included by autoloader
- pluginNamespaces – here you can enter namespace(s) for plugin
- pluginJsPaths – place for including multiple javascript files (ext js scripts), note: you need to enter path relative from pimcore root, and NOT relative to plugins root
- pluginCssPaths – same like pluginJsPaths except you inchlude here css files
Plugin.php – main plugin class:
<?php

namespace InchooTest;

use PimcoreAPIPlugin as PluginLib;

class Plugin extends PluginLibAbstractPlugin implements PluginLibPluginInterface
{
    public function init()
    {
        parent::init();

        // register your events here

        // using anonymous function
        Pimcore::getEventManager()->attach("document.postAdd", function ($event) {
            // do something
            $document = $event->getTarget();
        });

        // using methods
        Pimcore::getEventManager()->attach("document.postUpdate", [$this, "handleDocument"]);

        // for more information regarding events, please visit:
        // http://www.pimcore.org/wiki/display/PIMCORE/Event+API+%28EventManager%29+since+2.1.1
        // http://framework.zend.com/manual/1.12/de/zend.event-manager.event-manager.html
        // http://www.pimcore.org/wiki/pages/viewpage.action?pageId=12124202
    }

    public function handleDocument($event)
    {
        // do something
        $document = $event->getTarget();
    }

    public static function install()
    {
        // implement your own logic here
        return true;
    }

    public static function uninstall()
    {
        // implement your own logic here
        return true;
    }

    public static function isInstalled()
    {
        // implement your own logic here
        return true;
    }
}- extends PluginLibAbstractPlugin and implements PluginLibPluginInterface
- init method – called on every pimcore load, it’s mostly used to catch events (Pimcore::getEventManager()→attach), but also can be used to set some custom configurations (like Zend_Locale), you can find more about event manager on https://www.pimcore.org/wiki/pages/viewpage.action?pageId=16854309
- install method – called when you click on install in extensions grid (admin extensions panel)
- uninstall method – called when you click uninstall in extensions grid
- isInstalled method – called when Pimcore check if plugin is installed (Broker class for example)
controllers folder:
- place where you create custom controllers
- there are two controller types – front and admin controllers
- front controller extends PimcoreControllerAction
- admin controller extends PimcoreControllerActionAdmin – it’s important to extend admin action class because it will check if user is logged in and check permissions – you don’t want to allow non-admin users to get data from admin controller
- controller file should be named: ControllernameController.php, for example IndexController.php
- controller class name: PluginName_ControllernameController, for example: InchooTest_IndexController
- access controller – http://pimcore_url/plugin/PluginName/controllername/methodname
- you can separate controller for multiple actions (called with method name + Action string), for example indexAction
controller example:
we’ll create custom controller that corresponds to this structure: url/plugin/InchooTest/Hello/say. So we need custom class file called HelloController.php and class inside called InchooTest_HelloController.php, we also need sayAction method that will be called. Let’s look at code:
pimcore_root/plugins/InchooTest/controllers/HelloController.php:
<?php
class InchooTest_HelloController extends PimcoreControllerAction
{
    public function sayAction()
    {
        die("sayAction method in InchooTest_HelloController, it works!!!");
    }
}
After we enter our url, we will get this output:

Lib folder
- all custom backend code (PHP classes) should be here
- for good organization you can separate models for example in lib/PluginName/Model/ModelName.php
- if you want, you can set here new include path for autoloader and create new namespace
example model:
for model we’ll create Model folder in plugins lib. Let’s create our model script: /plugins/InchooTest/lib/InchooTest/Model/Test.php
<?php
namespace InchooTestModel;

class Test extends PimcoreModelAbstractModel
{
    //CUSTOM Logic
}
As you can see our model extends PimcoreModelAbstractModel, but you should know that there are one very useful abstract model – AbstractListing, which you can use for listing calculations (page size, entity number, etc).
static folder
- contains subfolders for css, javascript and images
- al files (css and js) are included from plugin xml
views folder
- used for viewing templates
- Pimcore uses Zend_View as template engine
- read more about templates at https://www.pimcore.org/wiki/pages/viewpage.action?pageId=16854242
- views can be connected with controller and method name. For example, if we have TestController in our controllers folder and method inchoo, our corresponding view for this is located in plugin_root/layouts/test/inchoo.php and all data from method is available in template.
EXT-JS
This will be separated article, but I will explain shortly why it should be used. Ext JS Framework is used for Pimcore interface. Every part of Pimcore admin panel is created by Ext js scripts, and data for scripts are received from controllers, so this is how admin panel is rendered – EXT js script ←→ controller(s). If you want to know more about Ext JS (version 6) you can read the official documentation: http://docs.sencha.com/extjs/6.0.2/index.html. More about admin UI can be read in Pimcore documentation: https://www.pimcore.org/wiki/display/PIMCORE4/Plugin+Admin+UI
example admin panel:
For demonstration we’ll create one custom script which will add new menu item in left main menu. For that we need to create Ext JS script:
pimcore_root/plugins/InchooTest/static/js/test.js
pimcore.registerNS("pimcore.plugin.inchootest.main.toolbar");

pimcore.plugin.inchootest.main.toolbar = Class.create(pimcore.plugin.admin, {

    /**
     * Get class name
     *
     * @returns {string}
     */
    getClassName: function() {
        return "pimcore.plugin.inchootest.main.toolbar";
    },

    /**
     * Initialize plugin
     */
    initialize: function() {
        pimcore.plugin.broker.registerPlugin(this);
        this.navEl = Ext.get('pimcore_menu_search').insertSibling('<li id="inchoo-test" class="icon-cog-alt icon-rocket">Inchoo Test</li>', 'after');
    },

    /**
     * On pimcore ready action
     *
     * @param params
     * @param broker
     */
    pimcoreReady: function (params,broker){
        var user = pimcore.globalmanager.get("user");
        var menuItems = [];

        var menu = new Ext.menu.Menu({
            hideOnClick: false,
            items: menuItems,
            cls: "pimcore_navigation_flyout"
        });
        var toolbar = pimcore.globalmanager.get("layout_toolbar");
        this.navEl.on("mousedown", toolbar.showSubMenu.bind(menu));
    },

});

/**
 * Instantiate
 *
 * @type {pimcore.plugin.inchootest.main.toolbar}
 */
var inchootestTestPlugin = new pimcore.plugin.inchootest.main.toolbar();
We can analyze code now; as you can see we have registered pimcore.plugin.inchootest.main.toolbar new namespace, and created pimcore.plugin.inchootest.main.toolbar plugin. In initial method we have searched for pimcore_menu_search list item and inserted, with insertSibling method, new list item – Inchoo Test. I will leave space for submenu items, for practice – it should be added in menuItems array in pimcoreReady plugin method.
Not working!? – add this line in plugin.xml – /plugins/InchooTest/static/js/test.js inside pluginJsPaths xml node.
Conclusion
As you can see, for extending Pimcore you need to know PHP and Ext JS Framework. Be aware that admin panel is javascript application and good knowledge of javascript and Ext JS is required, so best place to start is Sencha documentation. This article will help you to start with creating plugins for Pimcore. I hope this was helpful to you and soon we’ll cover more Pimcore development topics.