Although still in development phase, Magento 2 comes with a distinctive set of changed/improved frontend approaches compared to its predecessor Magento 1.X. The big difference is that frontend is now updated with newer technologies such as HTML5, CSS3 and jQuery.
There are also significant changes/improvements to overall layout manipulation, file structure and a brand new introduction to Magento UI library heavily based on LESS preprocessor with built in compiler.
One of the main goals besides performance and scalability was to serve RWD out of the box. In this article I’ll try to cover some of the main differences, dive into development and demonstrate some practical examples.
Theme workflow changes
When creating a new theme theme_root_dir/theme.xml file is required to actually initialize it. There are a couple of other options to be taken into account as well. Add placeholder image for preview in administration, configure its parent theme, declare theme version etc. It’s quite similar approach to the one used in the newest 1.X versions.
Inchoo
    1.0.0.0
    Magento/blank

        media/preview.jpg
One of the first changes I’ve noticed when starting to tackle Magento 2 was certainly the removal of skin directory. Everything is organized directly under the app structure.
Another big change is that every module has its own VIEW directory where all module-specific template, layout, js, and css/less files are stored. This is a better approach and certainly it will be beneficial for module developers. All visual content will be stored directly within the module separating it from Magento core.
What does it mean for us fronted developers?
It means that structure inside app/design/frontend/vendorName/newTheme/ is no longer divided into layout and template directories. Instead we need to include module directory and its complete hierarchy to override default directory structure.
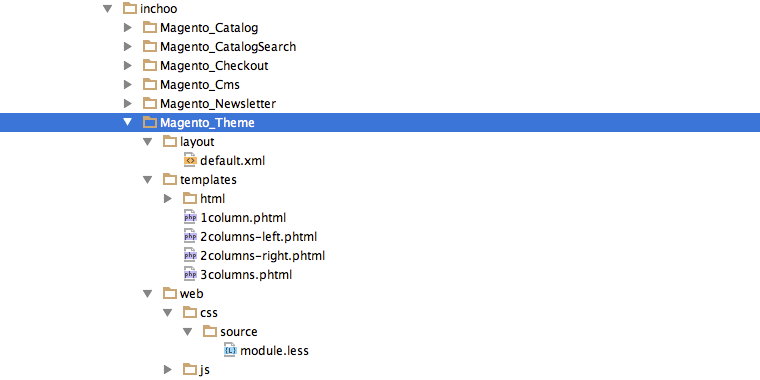
Example of a new architecture
For example, if the plan is to change something in 1column.phtml, it’s required to follow full directory hierarchy for a module Magento_Theme (this was a part of the page directory in 1.X versions).
Theming inheritance is now completely redesigned to support unlimited fallbacks and app/design/frontend/base/default directory is no longer included. From the documentation provided so far, the recommended approach is to fallback to blank theme as a starting point.
At the time of writing this article I was not in a position to properly test other options except to falling back to blank, but it seems this approach is beneficial only for the projects requiring slight styling modifications/updates. From custom development perspective, in some cases where development differs very much from default settings it might produce an impact on the performance.
Theme declaring process is pretty much the same as in previous 1.X versions except that now it’s possible to create a new theme from administration.
Layout updates/improvements
When it comes down to layout manipulation there are some really cool and interesting new improvements.
Before diving into practical examples it’s important to mention that layout files are now divided into smaller parts. Practically explained — what once was a layout handle now is a separate file.
Probably the intention was to simplify the maintenance.
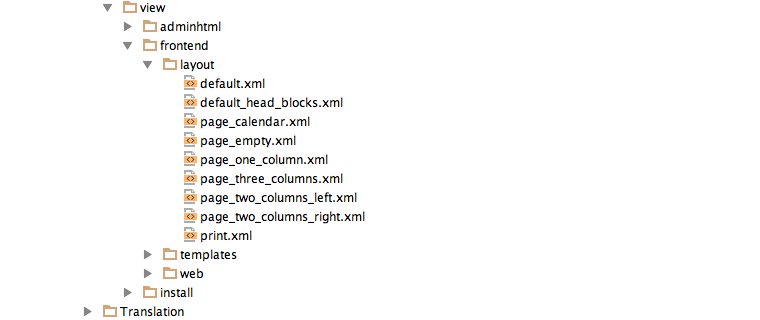
Magento 2 introduces the whole new concept for product/media image resizing actions right from the layout. Layout file view.xml is responsible and it needs to be placed under app/design/frontend/vendorName/newTheme/etc/ directory. Here is an example of resizing product catalog images in action.
<var>100</var>
        <var>275</var>
        <var>48</var>
        <var>166</var>
        <var>370</var>
        <var>0</var>
Although I presume that the main goal was to simplify actual resizing process for developers, it will certainly fail under majority of responsive design situations. For example, we don’t want to serve big images for smartphone users on edge connection. Resizing from template files offered a better way to serve out multiple sources for different end user profiles. Right now inspecting a blank theme I only see a situation with just scaling images down in html.
One of the great and more than welcome changes is an introduction of a container wrapper, successor to a core/text_list block type which served the role of a structural block in the previous versions of the system. What is really interesting is a possibility to pass attributes like htmlTag, htmlClass, htmlId directly from layout files.
My personal favorite is move method introduction. It’s a sort of refined action method set/unsetChild but now the process is much more intuitive. For example, if we need to insert source block1 into destination block2 this is the way how we can do it:
It automatically makes source block1 a child of a destination block 2.
It’s important to mention that Magento 2 offers a system validation for XML files using xml schemas for individual and merged layout files.
Magento UI library introduction
Magento 2 offers a complete UI library build up on LESS to match the specific system requirements. Reason for choosing LESS over other pre-processors is because Magento 2 comes with internal compiler to compile CSS directly from PHP. This will, according to Magento team, speed up development and allow developers to focus just on file editing/production while the system covers all the hassle with compiling etc.
However, this, of course, is not the only option to go with. This approach can be ignored and focus can be set on manually compiling with SASS or even writing down pure CSS.
UI Library itself provide tons of mixins (vertical rhythm,@font-face .etc) and a huge set of predefined variables to make the process more intuitive and less demanding for a fronted developer. Does it really accomplish that?
Let’s see some practical examples following the recommended approach.
Magento UI library is located under store_root_dir/lib/web/css/source/lib
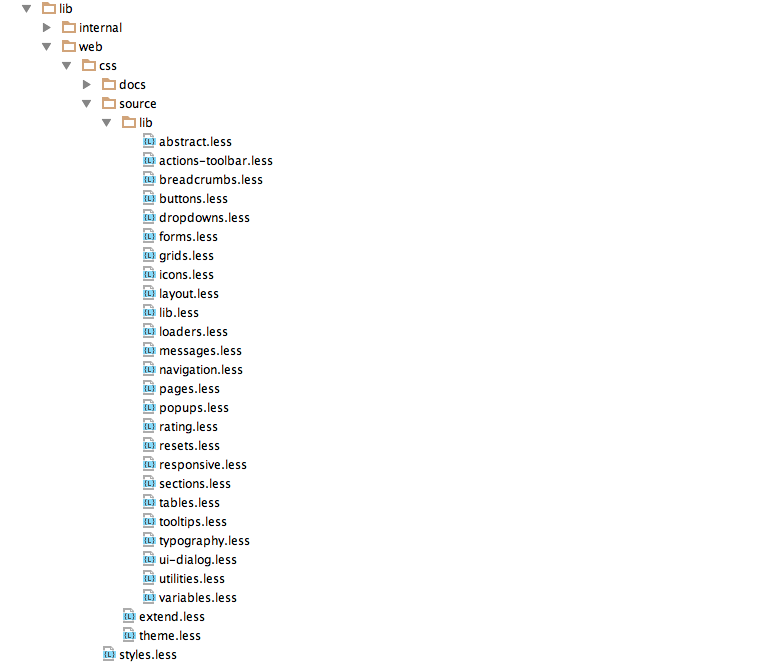
Element structure is quite in a way how I configured my own SASS files while dealing with Magento 1.X. I found it quite familiar. 🙂
Now let’s see how can we extend some of the files and its mixins etc. To import UI library to our theme it’s required to call/import lib.less file into styles.less which is default less file for a theme.
@import “source/lib/lib.less"It’s impossible to explain all variations and possibilities in one article so my focus will stay on a few practical examples to encourage you to check it out on your own if you didn’t do it already.
Let’s say that we want to extend predefined @font-face mixin to include our own font to the site. Open Sans is already included by default. So let’s replace it with our own Lovelo Black. Let’s check default mixin for @font-face under the store_root_dir/lib/web/css/source/lib/typography.less
.font-face(
    @family-name,
    @font-path,
    @font-weight: normal,
    @font-style: normal
) {
    @font-face {
        font-family: @family-name;
        src: url('@{font-path}.eot');
        src: url('@{font-path}.eot?#iefix') format('embedded-opentype'),
        url('@{font-path}.woff') format('woff'),
        url('@{font-path}.ttf') format('truetype'),
        url('@{font-path}.svg#@{family-name}') format('svg');
        font-weight: @font-weight;
        font-style: @font-style;
    }
}
Pretty much straightforward, required parameters are @family-name and @font-path.
What we need to do now is to extend default typography.less. We’ll accomplish that by copying file to our theme directory. Here is an example of theme.less file after including typography.less
/* Magento/blank */

.magento-reset();   // Reset default styles with magento_reset

// Import theme vars overrides and mixins
@import "source/lib/lib.less"; // Import all lib files
@import "source/theme.less"; // import theme styles

@baseDir: "../"; //default

@import "source/typography.less"; // extending theme typography
@import "source/lib/responsive.less"; // extending responsive styles
Once the procedure is completed it’s time to extend @font-face mixin to suit our needs.
.font-face(
  @family-name: 'Lovelo Black',
  @font-path: '@{baseDir}fonts/lovelo_black/Lovelo_Black',
  @font-weight: 300,
  @font-style: normal
);
And that’s it. We are now successfully extended UI Library @font-face predefined mixin. 🙂
Magento UI Library certainly provides a lot of powerful material and ideas in general, especially for projects that require more of a skinning type approach. On the other hand, I found it quite overcomplicated in some occasions, especially for complex custom responsive projects that pretty much differ from default layout architecture.
For example, the entire responsive construction is relying on 3 predefined variables @tablet @ desktop @mobile but even as it may be good for a starting point, it’s certainly not a fully scaled solution. Responsive design is all about content while this reminded me more of an adaptive approach with few predefined pixel based queries. Although the fact is that we can always upgrade and extend the system. After all, we can even avoid it altogether and start building our own architecture powered with SASS instead. We’ll certainly experiment with other approaches in the near future.
jQuery integration is a topic of its own and it’s too complex for this article so I’m planning to write another one in the future.
Conclusion
It’s great to see that the new platform is finally shaping up. Now when the potential launch dates are known, it’s even more interesting. Although still in development phase, Magento 2 is a substantially improved system when it comes to frontend development, compared to its predecessor. With all new technologies included, improved architecture and workflow, frontend development now requires by far more professional approach than before.
In case you feel you need some extra help, we can offer you a detailed custom report based on our technical audit – feel free to get in touch and see what we can do for you!
