Magento 2 introduced a new and improved way for adding products to the cart. The system now offers complete asynchronous (ajax) process, although the process itself is not activated in default application state. It requires some manual adjustments in the script call inside the templates. Someone would think, ok, we will simply modify the template script calls and that’s it! We successfully improved the process. Unfortunately, not so fast! There is still more room left for improvement. If you’re interested, let’s find out what’s left on the table.
Introduction
Although Magento ajax add to cart process offers improved experience and usability, (vast majority of users gets frustrated by continuous, back to back page reloading after adding each product to the cart) Magento implementation only gets the job done in core process of simply transmitting the data and showing either success, or the error message. While this certainly is a solid foundation, we’re still witnessing some usability issues along the way. For example, let’s put ourselves in customer perspective for a bit. We’re browsing the store and are currently located on the product page and ready to fire CTA button to add our desired product to the cart. We scrolled a little bit down the page, probably to check product specifications. Button is visible, but the top of the page and header minicart are not. We’re triggering the button. When the process starts, button changes its default state form “add to cart” to “adding” and when the process is finalized, changes the state to “added” before it returns to the default state. That’s the only indication from our current position on the page our product is actually added.
Someone would say, ok, it’s enough. Don’t forget we’re developers after all, we’re classified as advanced users. Not every customer is advanced user who instantly recognizes things and processes along the way. So, where is the actual problem? There is no problem if you’re on top of the page and after triggering the add to cart process, you’re able to see header minicart has changed while indicating updated number of products currently added, and system messages are then triggered to inform you your cart has been updated and product is therefore successfully added to the cart. But, if you are not on top of the page, there is no way you can see, neither the message, or the minicart.
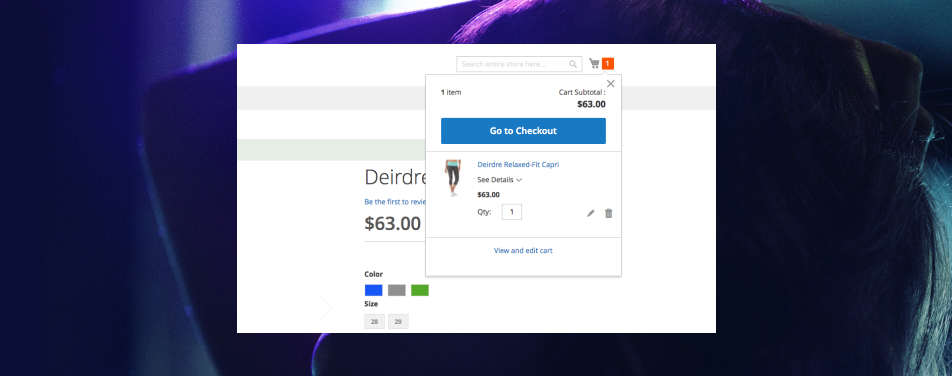
This situation left us with the plenty of room for improvement. How can we improve the process? Simple enough. Once the ajax process is complete, we can trigger scroll event to scroll on top of the page and as soon as minicart get’s updated we can then trigger minicart UI dialog to open and show us the complete experience and what minicart is actually offering to us (either to go to the cart, go to the checkout or continue shopping).
In this post, I will demonstrate one possible way to do it.
Enabling ajax add to cart process
First thing first, we need to get familiar with the architecture behind.
In [magento2_root_dir]/vendor/magento/module_catalog/view/frontend/templates/product/view/add-to-cart.phtml there is a script call for addtocart.js component. What we’re seeing is its “bindSubmit” method is set to false. First step is to actually change it to true and therefore enable ajax add to cart process. Override this file in your theme.
<script type="text/x-magento-init">
    {
        "#product_addtocart_form": {
            "catalogAddToCart": {
                "bindSubmit": false // change it to true
            }
        }
    }
</script>
Ok, we have successfully turned on ajax add to cart process. What’s next? Form the script initialization snippet inside the template, we have valuable information what script is actually responsible for the process. Script alias catalogAddToCart is actually pointing to [magento2_root_dir]/vendor/magento/module_catalog/view/frontend/web/js/catalog-add-to-cart.js javascript component. We will not modify the script itself, we will go one step further and extend the ajaxSubmit method so we can do our custom modification in a separate place and leave the rest of the process clean as much as possible. The procedure requires specific knowledge about jQuery UI widget factory in order to be comfortable with the approach.
Extending widget responsible for establishing the ajax call
Main goal is to extend $.mage.catalogAddToCart widget and modify it’s ajaxSubmit method. If you’re not familiar with UI factory widget extending approach, I’m suggesting getting familiar with UI widget factory in general prior continuing. I won’t go into specific details about core extending procedures, you can get familiar either on jQuery documentation site here or checking out my previous article digging more deeply into the matter.
We will create new require-js script component in our custom theme and call catalog-add-to-cart script as dependency using require-js define module procedure.
First, create script in [magento2_root_dir]/app/design/frontend/[your_vendor_dir]/[your_theme_dir]/web/js/ directory. For the sake of this tutorial, we will call the script inchoo-ajax-cart.js Script needs to be defined as a require js module. Inside the script, we will extend the $.mage.catalogAddToCart and override ajaxSubmit method adding scroll animation to scroll to the top of the page once the ajax call is completed. Simple copy the whole ajaxSubmit method from the original file. Following code is demonstrating how to do it.
/**
* Copyright © 2013-2017 Magento, Inc. All rights reserved.
* See COPYING.txt for license details.
*/
define([
'jquery',
'mage/translate',
'jquery/ui',
'Magento_Catalog/js/catalog-add-to-cart'
], function($, $t) {
"use strict";
$.widget('inchoo.ajax', $.mage.catalogAddToCart, {

ajaxSubmit: function(form) {
var self = this;
$(self.options.minicartSelector).trigger('contentLoading');
self.disableAddToCartButton(form);

// setting global variable required for customized ajax cart process

window.ajaxCartTransport = false;

$.ajax({
url: form.attr('action'),
data: form.serialize(),
type: 'post',
dataType: 'json',
beforeSend: function() {
if (self.isLoaderEnabled()) {
$('body').trigger(self.options.processStart);
}
},
success: function(res) {
if (self.isLoaderEnabled()) {
$('body').trigger(self.options.processStop);
}

if (res.backUrl) {
window.location = res.backUrl;
return;
}
if (res.messages) {
$(self.options.messagesSelector).html(res.messages);
}
if (res.minicart) {
$(self.options.minicartSelector).replaceWith(res.minicart);
$(self.options.minicartSelector).trigger('contentUpdated');
}
if (res.product && res.product.statusText) {
$(self.options.productStatusSelector)
.removeClass('available')
.addClass('unavailable')
.find('span')
.html(res.product.statusText);
}
self.enableAddToCartButton(form);

// animate scrolling to the top of the page

$("html, body").animate({ scrollTop: 0 }, 1000, function() {});

// changing global variable value to true (this flag enables communication with update minicart logic)

window.ajaxCartTransport = true;
}
});
}
});

return $.inchoo.ajax;
});
Map newly created custom js component in requirejs-config
Second step is to map the script in requirejs-config.js file in the root of your theme directory.
var config = {
map: {
"*": {
"custom-ajaxcart": "js/inchoo-ajax-cart"
}
}
};
Don’t forget to check if your script is actually loaded, you can trace it in the network panel of your debugger of choice.
Initialize new custom js component in template file
The third step is to actually get back to our template where the original script is initialized and initialize our custom script instead of the default one. Remember we’re still loading default script as a dependency.
<script type="text/x-magento-init">
    {
        "#product_addtocart_form": {
            // we need to call our script by alias previously mapped in requirejs-config.js file
            "custom-ajaxcart": {
                "bindSubmit": true
            }
        }
    }
</script>
Now go back to our custom script file, what you can see is we’re relying on success method, once we get status 200 OK from the server. We’re than animating the scroll event to the top of the page using jQuery. You can use whatever approach you like but since jQuery is already included in Magento, I have used it.
Maybe you’re now questioning yourself, why there is no anything else in the code except scroll to top method? Where is our code logic responsible for opening the minicart dialog located? The answer is, there is no code! Why? The reason is simple, we’re still not getting anything more here besides the indication post request is actually completed. Magento fires another/separate call to populate the minicart with the updated state. We need to be aware of this call, and we need to open cart dialog once the minicart is updated with the new data.
We don’t want to expand the minicart UI dialog immediately from here because the data is still not updated. Best time to open the dialog is as soon as the minicart gets updated and populated with the new data. Since those two processes are not connected on the frontend, we need to set some sort of a flag so we know when to trigger our cart dialog opening state. You will see I have created ajaxCartTransport variable on top of the file and assigned the variable to the window object, making it global and always accessible. This flag will connect our process further on. Once the ajax success and scroll process is completed, you will see we’re forcing variable value change to true. This is the flag we’re using to trigger cart dialog opening in our next step.
Ok, now we know where is our ajax call, next step is to find the logic responsible for updating the minicart with the fresh data.
Modify js component responsible for updating the minicart data
The logic lies in [magento2_root_dir]/vendor/magento/module-checkout/view/frontend/web/js/view/minicart.js file. Since this file is a mixture of UI component (knockout) and separate logic I suggest you just copy and override the whole script in your theme.
Now, we need to locate where is the actual place where data gets updated. It’s inside UI component update method. Inside the update method, we will add our small logic to expand the minicart dropdown dialog. Here is a quick example of how to do it.
/**
* Update mini shopping cart content.
*
* @param {Object} updatedCart
* @returns void
*/
update: function (updatedCart) {
_.each(updatedCart, function (value, key) {
if (!this.cart.hasOwnProperty(key)) {
this.cart[key] = ko.observable();
}
this.cart[key](value);

// our logic for opening the minicart

if(window.ajaxCartTransport == true) {

// finding the minicart wrapper element

var minicart = $('[data-block="minicart"]');

// finding the dropdown element itself and invoking dropdownDialog open method

minicart.find('[data-role="dropdownDialog"]').dropdownDialog('open');

// setting our custom global variable immediately back to false

window.ajaxCartTransport = false;
}
}, this);
},
What we did here? First, we checked our flag to make sure we will expand our dialog only in case ajax call is triggered shortly before. We will check if the global ajaxCartTransport variable is set to true, if it is, we will open up the minicart dialog. We will open it in best practice manner, invoking ui .dropdowndialog(‘open’) method. JQuery widget factory provides a nice feature, widget methods invocation. We need to make sure to set our flag back to false immediately after to prevent errors from opening minicart on each other update process that is not connected to our ajax add to cart custom process.
Conclusion
And here we are, we have successfully improved our ajax add to cart process. Now the customer is instantly aware no matter on which position of the page is currently located. We have extended ajax cart process and added our scroll to top animation, waited for the minicart to update the data and opened the ui dropdownDialog once the procedure is completed and the data is fully updated.
Maybe there is a better/cleaner way to handle the issue, if you’re eager for more and strive for an even more sophisticated solution, drop the note in the comments section. I will be happy to discuss it further.
Happy coding! 🙂