If you’re running an online shop, you know how important it is to be present when your customers are researching the market to find their desired products. Since Google has just announced that Google Shopping opens up for free product listing ads, we’re bringing you a brief guide on setting up and optimizing your product feed through Magento and Google Merchant Center.
What is Google Shopping Feed?
Shopping Feed is a detailed list of products, along with their images, descriptions, and attributes that Google uses to match customer’s search terms with their results on Google Shopping. And if you want your product to show, you need to have everything in place because Google will disapprove all products that are not following the guidelines (but you probably already know that if you’re running paid shopping campaigns).
Since Google Shopping is now opening to free product listings, it’s more important than ever to have a good set of data in your Shopping Feed. That way, you will help Google understand your products better, which should, in the end, improve your online visibility.
Keep in mind that configuring the feed isn’t enough. You will need to ensure that your feed complies with data quality guidelines by uploading it to Google Merchant Center. After your products are reviewed and approved, you can start advertising on Google Shopping.

How to configure Shopping Feed in Magento
Now that we’ve covered the basics let’s get to the real deal – configuring and optimizing your product feed in Magento.
Whether you have a custom solution for shopping feed generation, or you’re using a 3rd party extension, it’s essential to do everything right in this step, in order to create a detailed product feed with top-notch data. In case you don’t have any feed generation solution on your store, we would recommend Rocketweb’s Google Shopping Feed extension (available for both Magento 1 and Magento 2). Since this extension is highly flexible and easy to use, we are using it on most of our projects to ensure the quality of our feeds and shopping campaign structure.
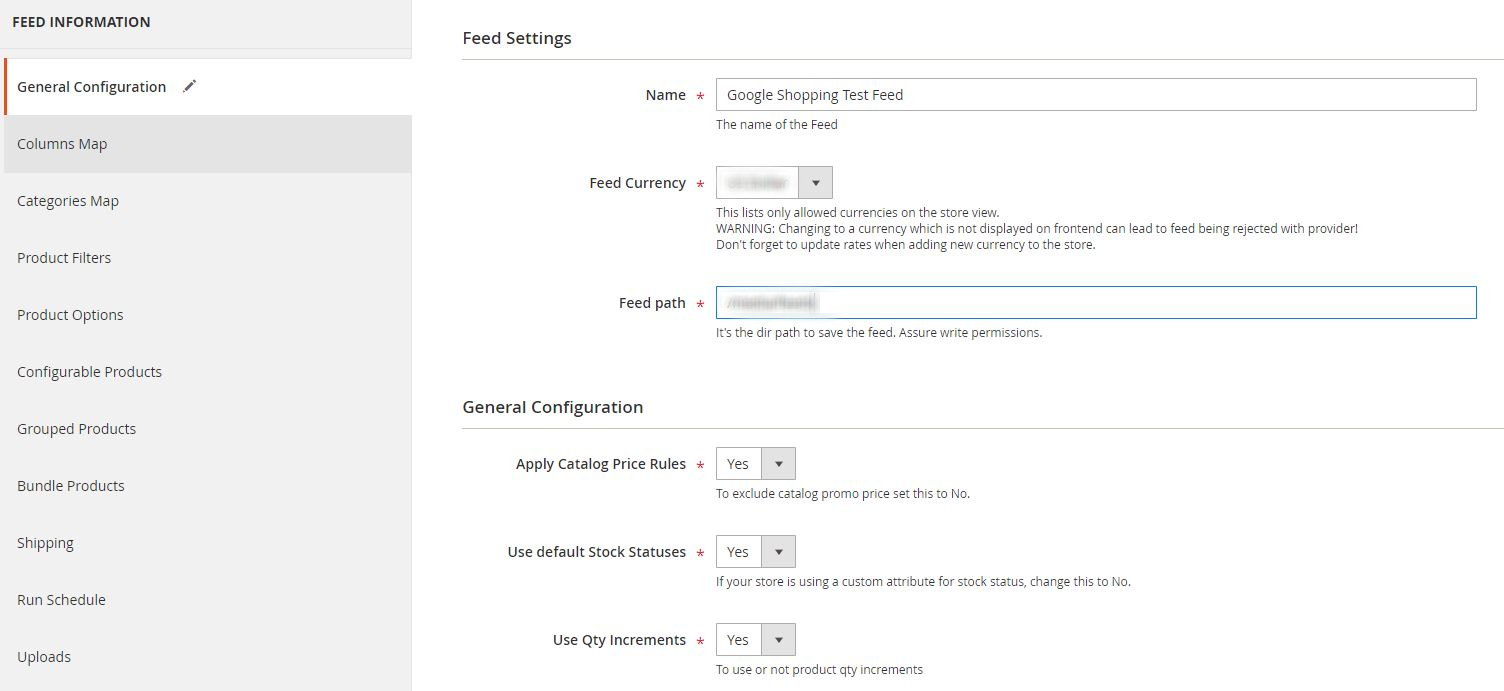
When you’re setting up your Shopping feed, you must keep in mind to cover basic product information, such as ID, Title, Description, Google Product Category, etc. Since we’ve already covered this topic, I won’t go into (too many) details regarding these because there are still plenty of other fields and attributes to cover.
Price [price]
Although this might seem pretty straightforward, it’s essential to send correct prices in your feed to avoid product disapproval (or even Google Merchant Center suspension).
The price you’re sending through your shopping feed must be the minimum price customers can pay to get advertised products. In practice, that would mean that if you sell certain products in bundle quantities, and it’s impossible to buy only one piece, your feed should have the price per bundle (not per piece). Additionally, the same amount should be the most prominent price on your landing page and microdata markup.
If you want your ads to showcase the price per piece, make sure to include [unit_pricing_measure] and [unit_pricing_base_masure] in your feed.
Sale Price [sale_price]
Many merchants don’t include the sale price attribute in their feeds, which causes trouble in their Google Merchant Center accounts. Why? Because Google sees different prices on your landing pages from those you’ve sent in the feed.
That’s why we can’t stress enough how important it is to always have the same prices in the feed as they are presented on your landing pages and microdata markup.

Shipping Weight [shipping_weight]
Although this field is optional, if you’re using table rate shipping or any other shipping type that depends on the product weight, you need to include it in your shopping feed.
Brand [brand]
Adding Brand to your product feed is mandatory on most of the new products. The rules here are simple; submit the brand attribute of the products you’re selling through Google Shopping or, if you don’t have a brand assigned to products, send the manufacturer attribute instead.
Bear in mind that you should never “fake” the brand names in your feed. If you’re selling replicas or products compatible with certain OEM brands, don’t submit the OEM brand to your product feed.
GTIN & MPN [gtin,mpn]
Global Trade Item Number [gtin] field is mandatory for all products that have GTIN assigned by the manufacturer. If you don’t have a manufacturer-assigned GTIN, you can submit the Manufacturer Part Number [mpn] instead.
If your products are missing their unique identifiers (either GTIN or combination of Brand and MPN), make sure to assign a value of “no” to [identifier_exists] field within your feed.

Other values [color, size, gender, etc.]
Depending on your products, you might need to (or want to) include additional details in your feed, such as color, size, gender, etc.
All of these will help Google understand your products better and allow you to compete on Google Shopping, as well as to help you structure your paid Google Shopping Campaigns.
Before you start adding these values to your shopping feed, make sure to check product data specifications. You might even find some useful attributes that you wouldn’t think of on your own.
Custom Label [custom_label_0]
You’ve decided on a specific structure for your shopping campaigns, but you can’t segment the data the way you want with all available attributes? Add Custom Label fields to your product feed!
Whether you want to sculpture your campaigns by price buckets, item group id, or anything else, you’ll be able to do it through custom labels. You can add up to five custom labels per feed, so use them carefully.

Once you finish the feed configuration, generate the feed, set up the schedule for automatic generation, and you can go onto the next steps.
Let’s set up your Google Merchant Center Account!
Now that you’ve configured your feed, it’s time to set up your Google Merchant Center. If you are already using Google Merchant Center, you can skip this step, but if you’re new to shopping campaigns, keep reading to set up your account.
Sign in to Google Merchant Center with the same Google account you’re using for GoogleAds. Once you’ve registered to GMC, add your Business information and verify your website. Fill out the rest of the information through Tools (such as shipping rates and taxes), opt-in the Google Merchant programs you’re interested in, and you’re ready to upload your product feed.
How can you know if your product feed is compliant with Google policies?
You can guess, but you can’t be sure unless you test it.
Download your new product feed and upload it to Google Merchant Center as Test Feed. After a few minutes, Google will create a test feed report, in which you’ll be able to see if any issues should be resolved before you upload your (real) Google Shopping Feed to Merchant Center.
Once you’re confident that the data in your feed is correct and in-line with Google’s recommendations, add new product feed to Google Merchant Center. Don’t forget to opt-in to Surfaces Across Google program to participate in these new Google Shopping ads, schedule a daily fetch, and your feed is ready.
What if Google Merchant Center doesn’t accept your values for specific attributes?
Since Google has strict guidelines regarding the product data, and your Magento store attribute values might not be in line with Google’s, you might need to adjust your feed to comply with Google’s policies.
If you’re using Rocketweb’s shopping feed, you can do it directly in the extension with Find & Replace feature on the Product Filters section. If you’re using a different solution that doesn’t have that option, don’t worry, You can resolve the issues within Google Merchant Center itself.
To do so, go to your feed in Google Merchant Center, and select “Feed Rules” in the upper right corner. Create rules for attributes (and values) you want to adjust, and you’ll be good to go.
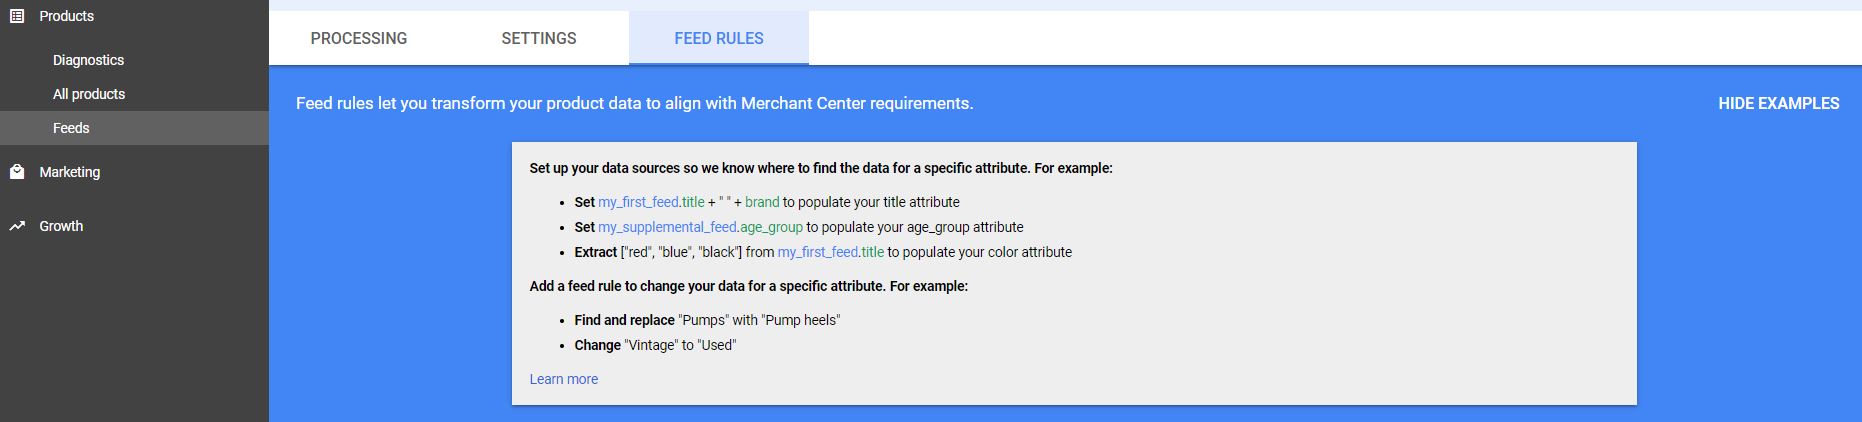
Since Merchant Center rules configuration is a broad topic (and this article is already too long), I won’t go into details this time. I’ll cover them in one of my next articles about Google Shopping, where I will show you how to optimize your Google Shopping feed with Merchant Center feed rules.
Once your feed is in place, and your products are approved, you’re ready to start advertising on Google Shopping.
I hope this article will help you configure your Google Shopping feed. If you have any questions, or if you’d like to share a few tips from your experience, please leave a comment below.
If you need any assistance with your shopping feed and campaign management, reach out to see how can we help you achieve your business goals.