
This article is sort of a follow up on my previous article on custom form validation, which explains step-by-step what it takes to validate any form. The Magento 2 way, of course.
But what if you have to implement another field that has to be in a particular format or that kind of rule does not even exist? Well… Keep reading, my dear visitor, keep reading.

Really, Gandalf, wanna make a bet? 🙂
We will be working on a contact form that is located in a custom theme (in this case, Inchoo/FormValidation):
app/design/frontend/Inchoo/FormValidation/Magento_Contact/templates/form.phtml
- Add custom validation method
In thedata-mage-initattribute, add a custom method name (in this case,theInchooValidationMethod), which will be used to trigger our custom validation rule:<form class="form contact" action="<?php /* @escapeNotVerified */ echo $block->getFormAction(); ?>" id="contact-form" method="post" data-hasrequired="<?php /* @escapeNotVerified */ echo __('* Required Fields') ?>" data-mage-init='{ "validation":{}, "theInchooValidationMethod":{} }'> - In the same form, add your custom field:
<form>
<!-- form content -->

<div class="field name required">
            <label class="label" for="field5"><span>Field 5 (inchoo)</span></label>
            <div class="control">
                <input name="field5" id="field5" title="Field 5" value="" class="input-text required inchoo" type="text"/>
            </div>
        </div>

<!-- form content -->

</form>
As you can see, a custom class named
inchoohas been added to the input field, which will be used as a custom rule name to validate this field. - Bind your custom validation method name to a Javascript file using RequireJs (app/design/frontend/Inchoo/FormValidation/requirejs-config.js):
var config = { map: { "*": { theInchooValidationMethod: "js/theInchooValidationRule" } } }; - Create the Javascript file with the code that will validate the field (app/design/frontend/Inchoo/FormValidation/web/js/theInchooValidationRule.js):
define([
    'jquery',
    'jquery/ui',
    'jquery/validate',
    'mage/translate'
], function($){
    'use strict';

    return function() {
        $.validator.addMethod(
            "inchoo",
            function(value, element) {
                return this.optional(element) || /^Inchoo/.test(value);
            },
            $.mage.__("Type 'Inchoo' in this field")
        );
    }
});
Let’s open up the browser and submit the form!
![]()
OK, we can see that validation is working (by default, required rule kicks in first. Let’s type in something and submit the form…

Hooray! Our custom validation rule has been invoked! And now if we type in the word “Inchoo” and submit the form…
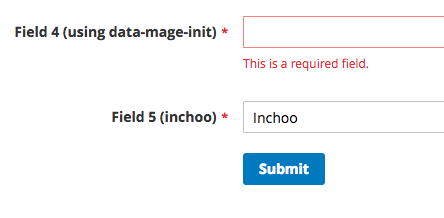
The error message is gone, our custom validation is working as expected!

Nice try, Gandalf, nice try…
If you have any questions, feel free to post them in the comment section below!