This blog post is a follow up to my previous blog post, which explained how to manage the display of error message on A2C section. By adding one mixin, you will be able to manage the position of error message on any form on any page. Let’s get the show on the road!
There is a proverb, “Life is full of surprises”. I would like to add, so is Magento 2. 😀
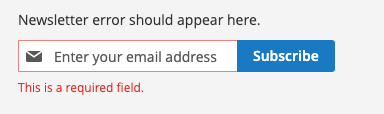
While trying some things out on the newsletter form, I noticed it would be great to change the position of the error message on the newsletter email field. I made another custom element #custom-newsletter-error in app/design/frontend/YOUR_VENDOR/YOUR_THEME/Magento_Newsletter/Templates/subscribe.phtml that should contain the error message…
<div class="block newsletter">
    ...
    <p id="custom-newsletter-error"><?= $block->escapeHtml('Newsletter error should appear here.') ?></p>
    ...
    <input name="email" type="email" id="newsletter"
           placeholder="<?= $block->escapeHtmlAttr(__('Enter your email address')) ?>"
           data-mage-init='{"mage/trim-input":{}}'
           data-validate="{required:true, 'validate-email':true}"
           data-errors-message-box="#custom-newsletter-error"
    />
    ...
</div>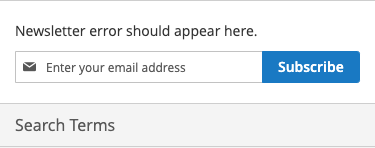
However, the error message still appears in the default place, after the input field.
This means, there must be something specific on the product page, which makes it work in A2C section, but not elsewhere. In other words, it’s time to start digging through the code. After spending some finding what is where and putting all the pieces of the puzzle together, I was able to identify why it worked on product page only.
It is not nice to point fingers, but…. grouped product.
First thing that caught my attention was the custom data-errors-message-box attribute, which I thought had something to do with it. By searching the vendor/magento folder, the string was used in the following files:
vendor/magento/module-catalog/view/frontend/web/product/view/validation.jsvendor/magento/module-grouped-product/view/frontend/templates/product/view/type/grouped.phtml
Ok, so grouped product has the custom <div id="validation-message-box"></div>, but I need to know where and how is the JavaScript file loaded on the page. After some additional search in the modules files, I found that it’s used as a RequireJS dependency in vendor/magento/module-catalog/view/frontend/web/js/validate-product.js
define([
    'jquery',
    'mage/mage',
    'Magento_Catalog/product/view/validation',
    'catalogAddToCart'
], function ($) {
    ...
});
Which is loaded in vendor/magento/module-catalog/view/frontend/templates/product/view/addtocart.phtml
...
<script type="text/x-magento-init">
    {
        "#product_addtocart_form": {
            "Magento_Catalog/js/validate-product": {}
        }
    }
</script>
Improve the validation method!
With all the key information at hand, it is possible now to enhance the native validation process and provide this feature globally. First of all, create app/design/frontend/YOUR_VENDOR/YOUR_THEME/requirejs-config.js file and setup a mixin of main validation file:
var config = {
    config: {
        mixins: {
            'mage/validation': {
                'mage/validation-mixin': true
            },
        }
    }
};
Next logical step is to create the app/design/frontend/YOUR_VENDOR/YOUR_THEME/web/mage/validation-mixin.js , which will override the native options errorPlacement keh with the following content (actual modification is wrapped with comment, see snippet below):
define([
    'jquery',
    'jquery-ui-modules/widget'
], function ($) {
    'use strict';

    var enhancedMageValidation = {
        /**
         * @param {*} error
         * @param {*} element
         */
        options: {
            errorPlacement: function (error, element) {
                var errorPlacement = element,
                    fieldWrapper,
                    messageBox;

                /* added snippet - start */
                // use custom element to display error message
                if (element.attr('data-errors-message-box')) {
                    messageBox = $(element.attr('data-errors-message-box'));
                    messageBox.html(error);

                    return;
                }
                /* added snippet - end */

                // logic for date-picker error placement
                if (element.hasClass('_has-datepicker')) {
                    errorPlacement = element.siblings('button');
                }
                // logic for field wrapper
                fieldWrapper = element.closest('.addon');

                if (fieldWrapper.length) {
                    errorPlacement = fieldWrapper.after(error);
                }
                //logic for checkboxes/radio
                if (element.is(':checkbox') || element.is(':radio')) {
                    errorPlacement = element.parents('.control').children().last();

                    //fallback if group does not have .control parent
                    if (!errorPlacement.length) {
                        errorPlacement = element.siblings('label').last();
                    }
                }
                //logic for control with tooltip
                if (element.siblings('.tooltip').length) {
                    errorPlacement = element.siblings('.tooltip');
                }
                //logic for select with tooltip in after element
                if (element.next().find('.tooltip').length) {
                    errorPlacement = element.next();
                }
                errorPlacement.after(error);
            }
        }
    }

    return function (mageValidation) {
        $.widget('mage.validation', mageValidation, enhancedMageValidation);

        return $.mage.validation;
    }
});
Now, if you refresh the page, the validation of newsletter email field should be placed into the configured HTML element
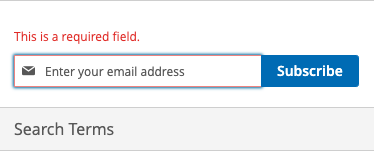
And there you have it! 🙂 You should now be able to customize where the error message will be displayed on any page on any field.
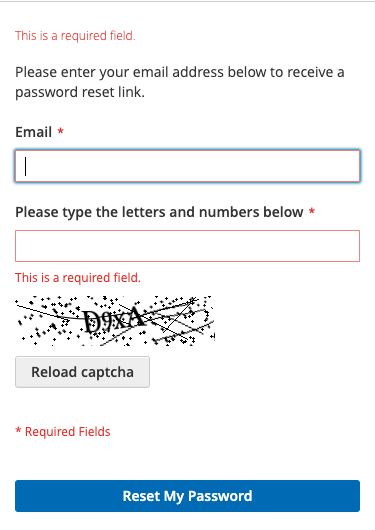
To test this, I tried to make something very silly – to set the email error on H1 tag on Forgot Password page located in app/design/frontend/YOUR_VENDOR/YOUR_THEME/Magento_Customer/templates/form/forgotpassword.phtml file with the following change:
<form class="form password forget"
      action="<?= $block->escapeUrl($block->getUrl('*/*/forgotpasswordpost')) ?>"
      method="post"
      id="form-validate"
      data-mage-init='{"validation":{}}'>
    ...
    <input
        type="email"
        name="email"
        alt="email"
        id="email_address"
        class="input-text"
        value="<?= $block->escapeHtmlAttr($block->getEmailValue()) ?>"
        data-mage-init='{"mage/trim-input":{}}'
        data-validate="{required:true, 'validate-email':true}"
        data-errors-message-box="h1 span"
    />
</form>
This is how it looks like before submitting the form:
And this is how it looks like when submitting the form: