With almost 10 months after Magento 2 has been officially launched, Google has indexed a decent number of articles related to creating themes, fallback mechanisms and LESS compiling. Great job, community! =). But there was not a single one on how to create your own Grunt task. =(
Even on official Magento 2 documentation, there was no luck with the results either.
Enough of motivation for me, challenge accepted!
So, what is where when it comes to Grunt?
For the purpose of this article, latest stable Magento 2 version was used (2.0.9).
This article will not go into showing how to set up Grunt in your project/operating system, there are a lot of good tutorials on how to do it. The first place to start looking is, of course, Gruntfile.js file, where some lines of code deserve some attention.
In versions 2.0.x it’s the following snippet:
configDir = './dev/tools/grunt/configs',
taskDir = './dev/tools/grunt/tasks';
[
    taskDir + '/mage-minify',
    taskDir + '/deploy',
    taskDir + '/black-list-generator',
    taskDir + '/clean-black-list',
    taskDir + '/static',
    'time-grunt'
].forEach(function (task) {
    require(task)(grunt);
});
In version 2.1 (at the moment of writing it is a RC1), it’s the following snippet:
configDir = './dev/tools/grunt/configs',
tasks = grunt.file.expand('./dev/tools/grunt/tasks/*');
tasks = _.map(tasks, function(task){ return task.replace('.js', '') });
configDir variable indicates path where some JSON and JS files can be found. On the other side, tasks list are loaded differently:
- 2.0.x versions load them statically as an array of hardcoded tasks (filenames). If your current project is using any of these versions, the custom task name will have to be manually inserted (as will be shown later on),
- 2.1 version load them dynamically (using globbing pattern)
Create custom task
Now that it is known what is supposed to go where, it is time to create the custom task. Two files are needed to achieve this, inchoo.js (our custom task) and inchoo.json (configuration for our custom task):
magento2_root/dev/tools/grunt/tasks/inchoo.js
magento2_root/dev/tools/grunt/config/inchoo.json
Note: for 2.0.x versions only: custom filename has to be manually appended, like this:
[
    ...
    taskDir + '/static',
    taskDir + '/inchoo',
    'time-grunt'
]
For this article, a snippet will be used that was found on StackOverflow written by gilly3, which returns formatted string representation of the current date and time. In inchoo.json file, two formats will be supported, Croatian and English (because of the differences in notation), with Croatian being the default one:
{
  "default": "hr_HR",
  "formats": {
    "hr_HR":  "HH:mm:ss dd.MM.yyyy.",
    "en_EN":  "h:mm:ss TT M/d/yyyy"
  }
}
With this taken care of, it’s time to write down the actual task in inchoo.js:
module.exports = function (grunt) {
    "use strict";

    function formatDate(date, format, utc) {
	/* actual code was removed from this article */
    }

    grunt.registerTask("now", function (arg_locale) {
        var formatting, initial_locale;

        if (arguments.length) {
            formatting = grunt.config.get("inchoo.formats." + arg_locale);
        } else {
            initial_locale = grunt.config.get("inchoo.default");

            if (initial_locale) {
                formatting = grunt.config.get("inchoo.formats." + initial_locale);
            } else {
                grunt.log.error("unknown locale: " + initial_locale);
            }
        }

        grunt.log.writeln(formatDate(new Date(), formatting));
    });
}
It is worth noting that the name of your JSON file has to be the same as the first part of the string in the grunt.config.get() method (so, if you change inchoo.json -> example.json, you have to use grunt.config.get(“example”) and use your keys as usual).
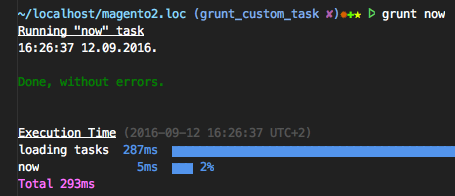
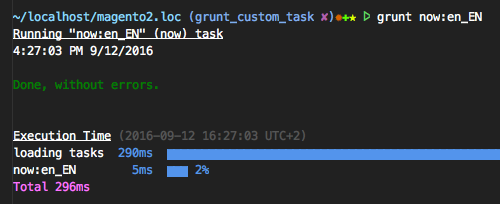
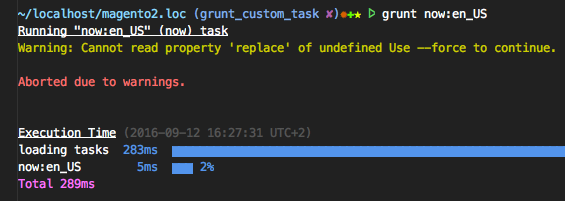
It is now safe to run the following commands from terminal:
- grunt now – no arguments were passed, the task will use default formatting (hr_HR), which is the same as running grunt now:hr_HR)
- grunt now:en_EN – a valid argument was passed, the task will use English formatting
- grunt now:en_US – an invalid argument was used and an error will be thrown for specifying an undefined value
That’s it! Things should now be a bit more clear on how to add your own Grunt tasks into Magento 2, as well as how to setup basic configuration for your task.
Let us know what you think and how you handled it.