Follow these clear steps to connect your Google Analytics 4 to Magento 2 store through Google Tag Manager.
NOTE: This post has been updated, as the previous one had instructions for Universal Analytics (GA3) and Magento 1. Enjoy the refreshed instructions below.
A basic way to connect your Google Analytics 4 (GA4) property to any webshop is by inserting the Google Analytics 4 tracking code (gtag.js) in the <head> tag of every page you want to track. You can find the code by clicking on the property Admin > Data Streams > then click on the stream and there you have it.
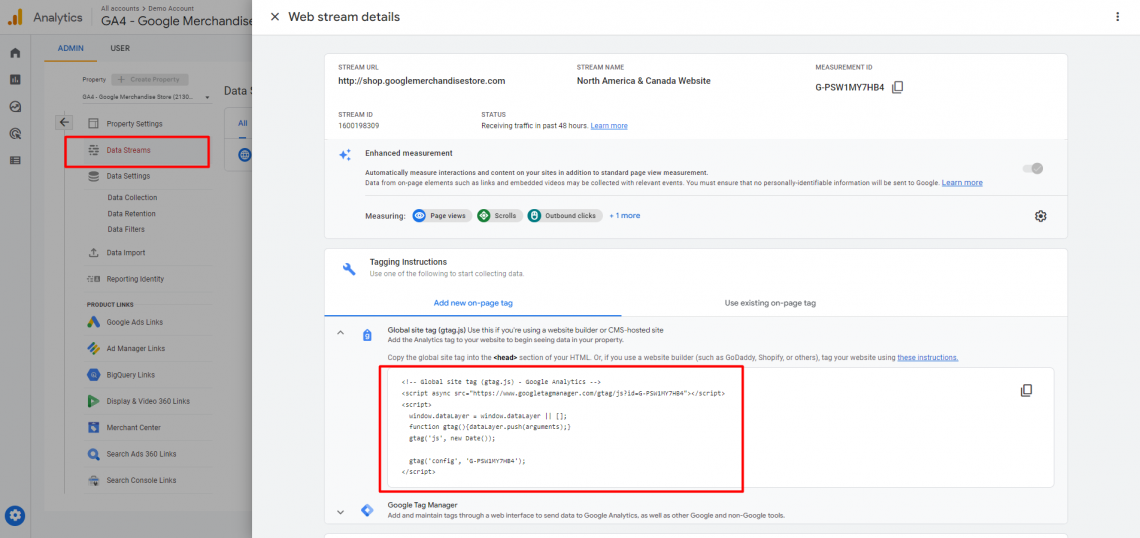
There is also an easier way to connect it by using one of many Google Analytics Magento extensions on the market. In this case, you’ll need just to insert the Measurement ID number of your GA4 property in the Magento extension interface, without copy-pasting the above-mentioned code.
How it is done is depending on the Google Analytics Magento extension that you choose to use. Therefore it’s best to search for the step-by-step instructions of the extension provider.
- Create a Google Tag Manager (GTM) account and container
- Install the Google Tag Manager Magento 2 Extension
- Connect your GTM container with the Magento GTM extension
- Create a GA4 configuration tag in GTM
- Test your connection in GTM Preview Mode
But, the best way to connect your Google Analytics to Magento is to connect it through Google Tag Manager. Overall, Google Tag Manager gives you more management options when it comes to handling Google Analytics and other marketing tools like Google Ads or Facebook, and enables you to create Google Analytics Enhanced eCommerce events that can help you track the user journey.
Here you can read more about why I think that’s the best way to connect Google Analytics to Google Tag Manager. In this case, instead of the Google Analytics Magento extension, you’ll need the Google Tag Manager Magento extension to set up everything properly.
Without further ado, here are the steps of connecting Google Analytics 4 to your Magento webshop with Google Tag Manager.
1. Create a Google Tag Manager (GTM) account and container
Start by clicking the “Start for free” button at this link:https://marketingplatform.google.com/about/tag-manager/ and then I highly recommend watching this short video tutorial on how to create your first GTM account and container.
You’ll also get an overview of the interface and account structure. If you later feel the need to dive deeper into the GTM, I recommend checking out other videos and materials from the Analytics Mania Youtube channel.
2. Install the Google Tag Manager 2 Extension
I will not suggest any particular GTM extension here, because they all do the job. The best for you is to Google it and choose the extension that has features that fits your needs the best. In general, they all need to follow Google documentation regarding GA4 Enhanced eCommerce configuration. We put effort into making our own performance-aware GTM extension that is used exclusively by our clients free of charge and therefore I’ll show you the interface of this extension in the example. Connecting the GTM with the GTM extension is similar and simple, regardless of the extension provider so I’m sure you will connect it successfully.
3. Connect your GTM container with the Magento GTM extension
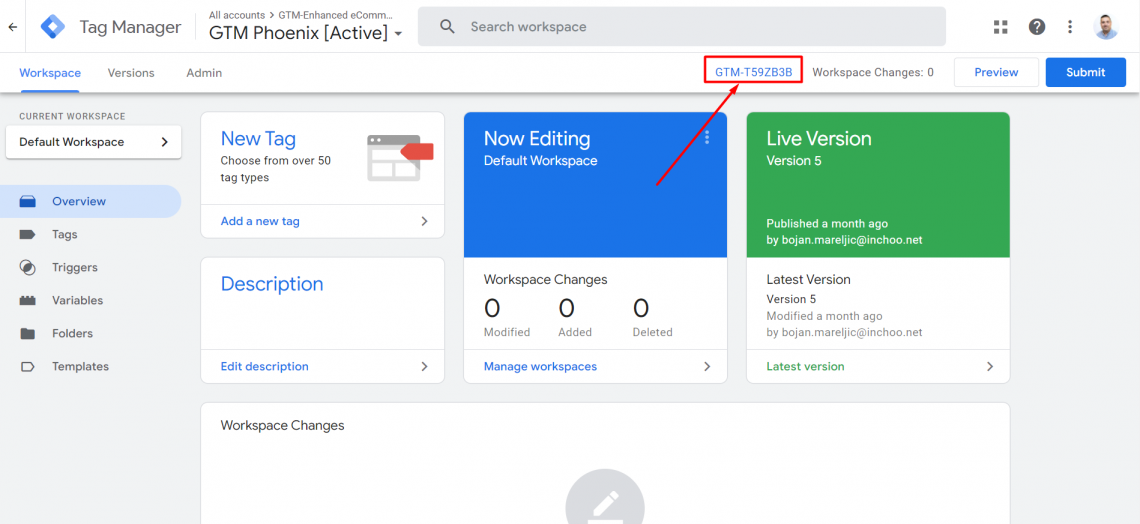
Open your GTM container and click on the GTM ID number.
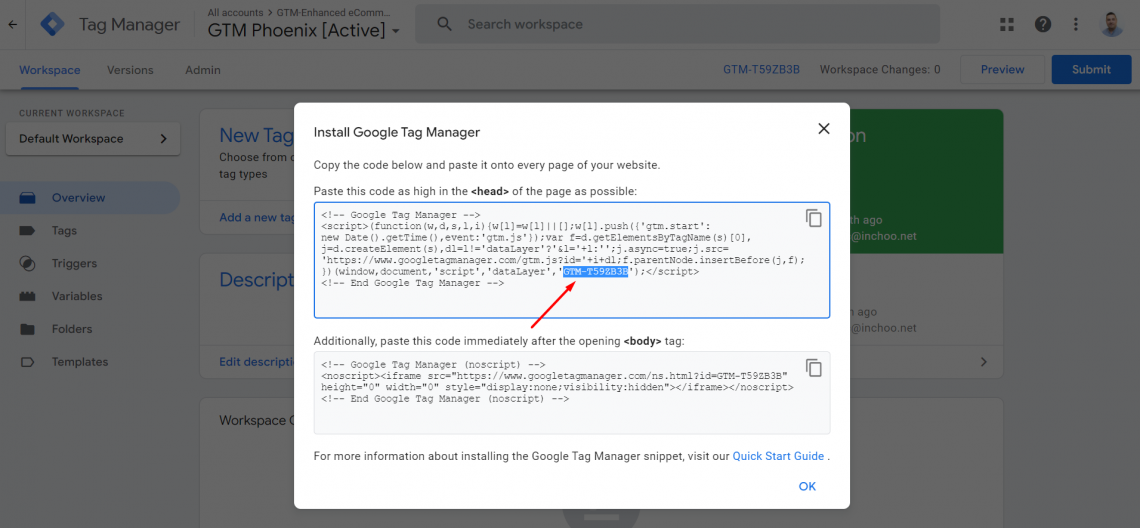
Then copy only the GTM ID number from the code.
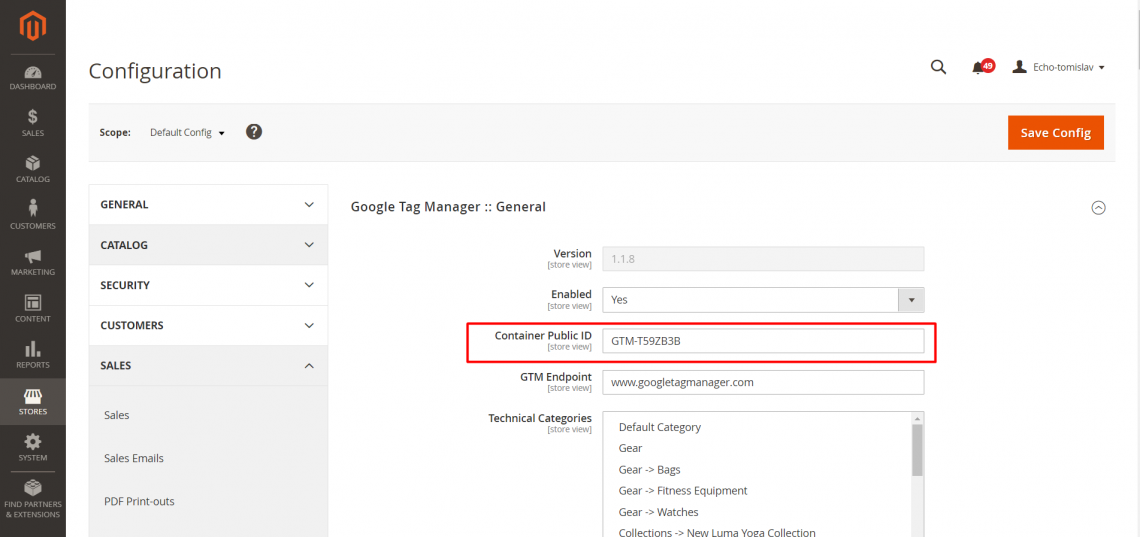
Open your Magento GTM extension and paste the GTM ID number in Stores > Configuration > Sales > Google API > Google Tag Manager section. Save the configuration and the GTM is connected to your Magento webshop. You can test it by viewing the page source of your webshop and finding the GTM ID number. Or install the Tag Assistant Legacy browser extension. It is a useful extension that can help you troubleshoot installations of GTM, and Google Analytics and give you some other insights.
4. Create a GA4 configuration tag in GTM
I assume you have already created the GA4 property needed for this step. If you didn’t, check out how to do it in this blog post. Now open the GTM container and on the Tags section click the button “New”.
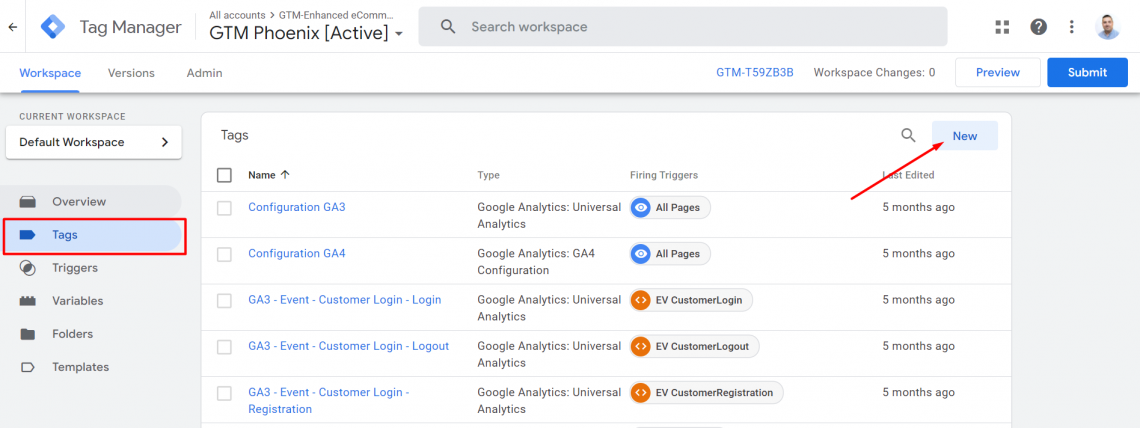
Then click on the Tag configuration space to open tag types. 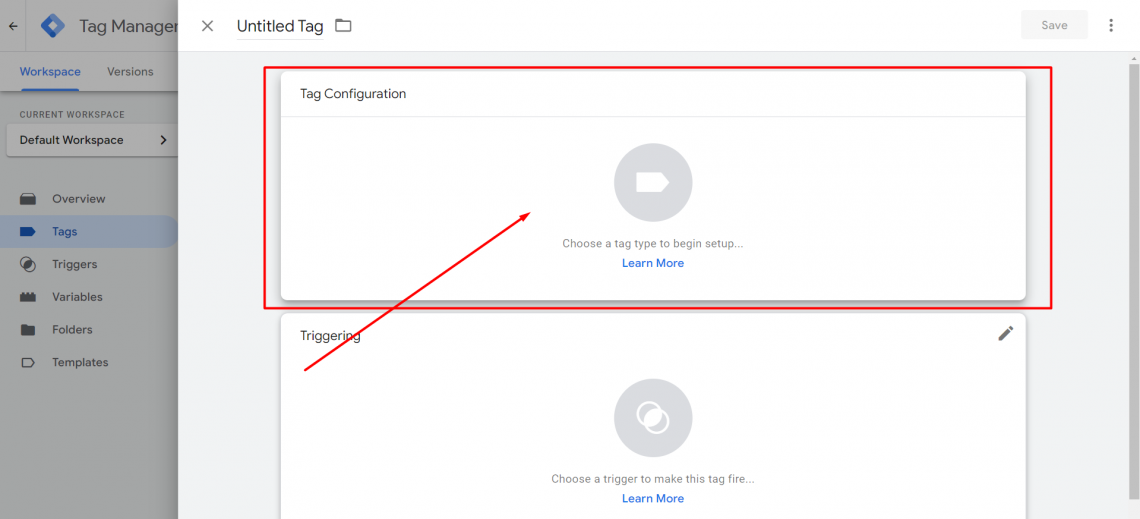
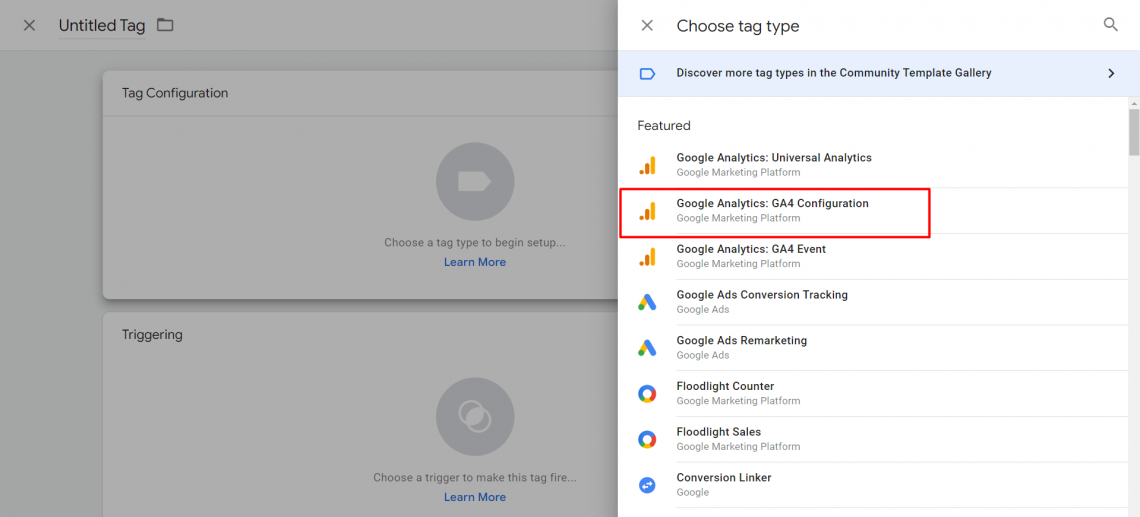
Choose the GA4 configuration tag types.
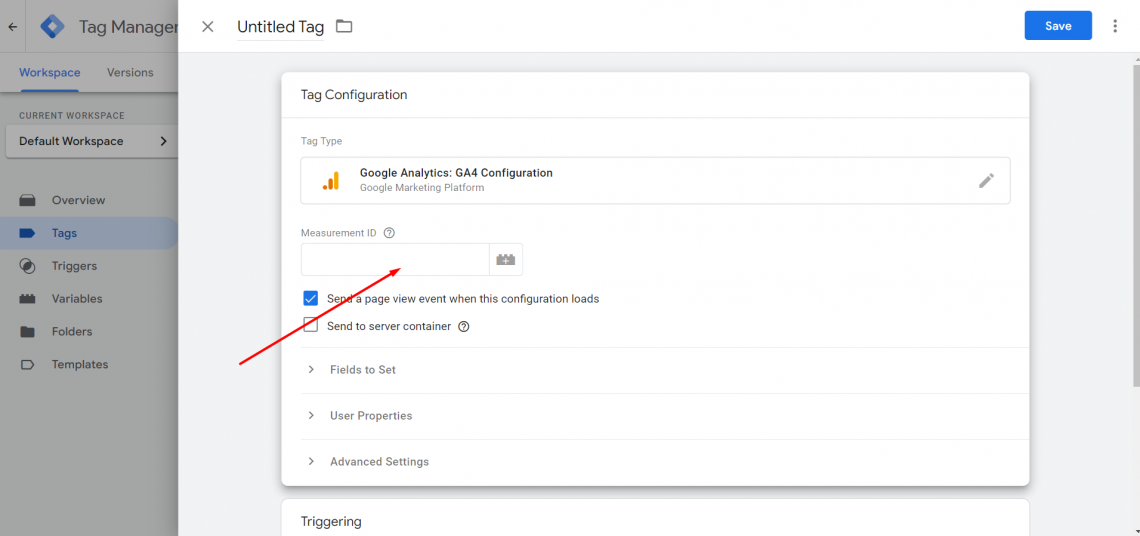
…and then enter your GA4 Measurement ID number. The Measurement ID is located in the same place as the GA4 tracking code.
Remember the screenshot at the beginning of this blog where I showed you the path on how to find the GA4 tracking code on the screenshot you’ll see the Measurement ID location.
Now click on the triggering section and choose the trigger “All pages”.
Name your tag “GA4 Configuration” and click save.
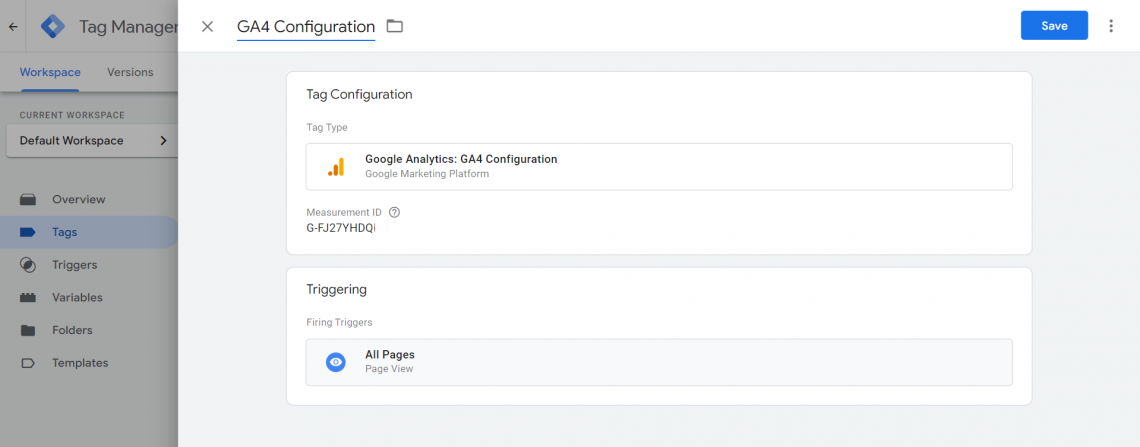
And that’s it. You connected your Google Analytics property to your Magento webshop with Google Tag Manager.
5. Test your connection in GTM Preview Mode
Open your Google Analytics GA4 property and check if you’re receiving traffic. GA4 needs some time to start showing the traffic, but you can test your connection immediately by clicking on the “preview” button in your GTM container. Enter your webshop URL and click “Connect”.
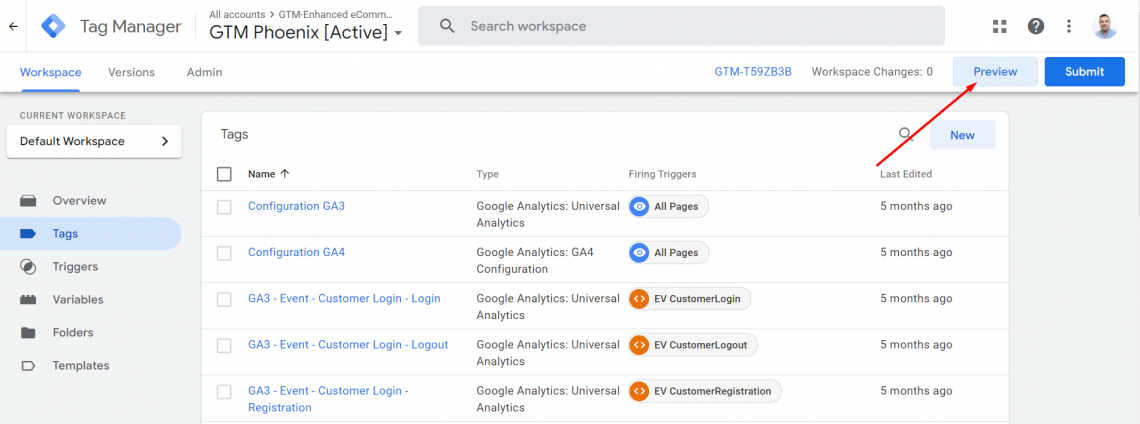
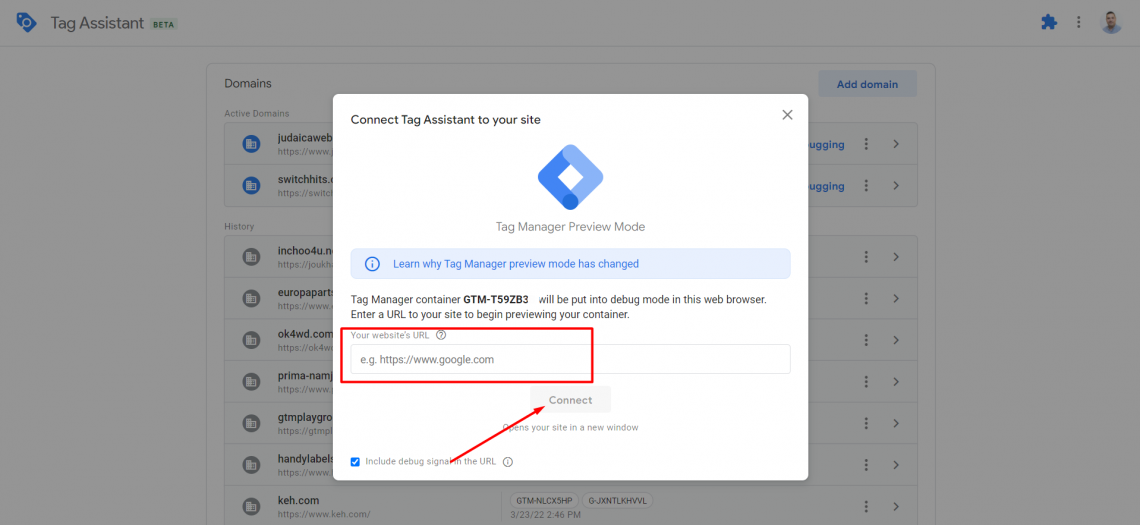
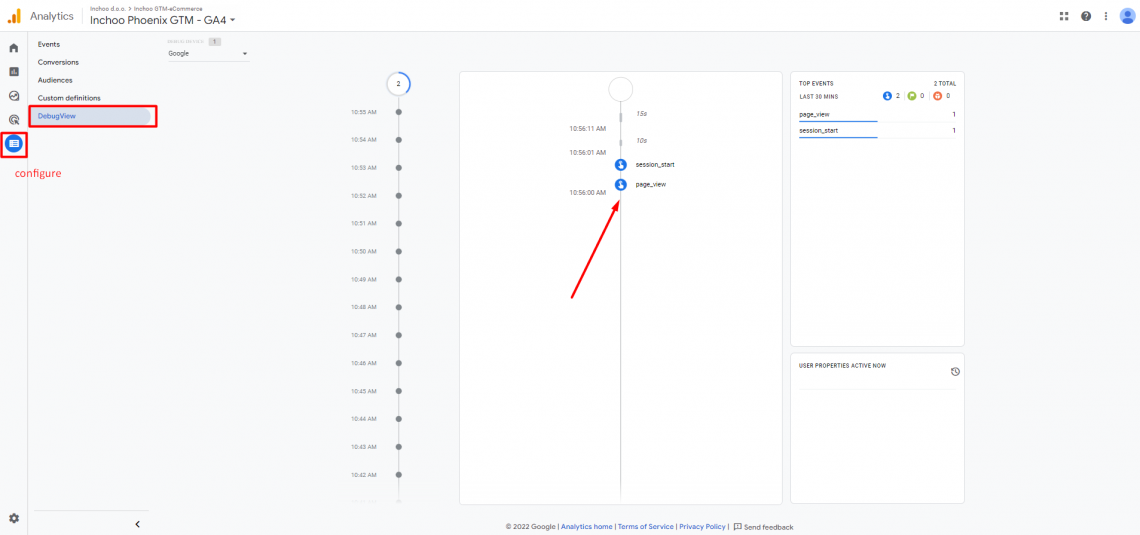
GTM will open your webshop in another tab. Now go to your GA4 property and in the Configure report open the DebugView interface. You should see a page_view event that happened when the GTM opened your webshop in another tab, which means that your Google Analytics receives hits and is connected to your webshop. Continue to browse through your webshop and observe what events are starting to show in the DebugView in Google Analytics.
If you want to continue to set up Enhanced eCommerce events like e.g. this one:

feel free to reach out to us and we will do it for you.
Also, setting up events in Google Analytics 4 is one thing, and monitoring, researching, and analyzing the data is another important thing to do. We can do that for you also. Our GTM/GA and UX specialists will analyze the data, test the hypotheses, and give you reports with suggestions on what needs to be improved/optimized on the webshop to improve the conversions – keeping in mind the revenue increase as a final goal.


